
TP-Link USB Not Working: How to Fix Router USB Storage Access
This page covers common reasons a USB drive connected to a TP-Link router may be inaccessible and how to resolve them. The fix for your TP-Link router USB storage issue depends on the specific symptom you're seeing: the drive is not recognized by the router, TP-Share does not appear on your network, or you cannot access the drive via SMB (Server Message Block).
Key Takeaways
- If your USB drive is not appearing on the network, the issue is typically related to Windows sharing settings. Enabling SMBv1 (Server Message Block version 1) and Network Discovery usually resolves it.
- To find the router's shared drive on Windows, look for TP-SHARE (shown in red) in Windows Explorer under Network. TP-Share (shown in green) is media-sharing only and does not support USB storage sharing.
- If you cannot access the USB drive via SMB, enabling insecure guest logons through the Windows Local Group Policy Editor is the recommended fix.
- TP-Link routers do not guarantee compatibility with external hard drive enclosures, particularly multi-bay models.
- Supported USB formats vary by router model. Most support NTFS and FAT32, with some also supporting exFAT and HFS+. NTFS is recommended for best compatibility and performance.
If you are unable to access the USB drives, we provide some suggestions for different situations.
Scenario 1: USB Drive Not Recognized by the Router
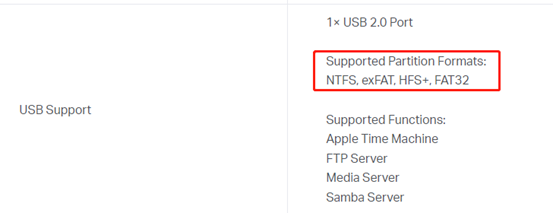
TP-Link routers support a range of USB drive formats, though compatibility varies by model. Some models only support NTFS/FAT32. Some support exFAT/HFS+/NTFS and FAT32. You can check the specification page on our official website.
Some large-capacity storage devices may experience compatibility or detection issues. In such cases, dividing the drive into multiple smaller partitions (for example, around 2 GB per partition) may improve compatibility. The router supports a limited number of partitions and may not load all partitions on drives that exceed this limit.
Notes:
1. NTFS is recommended for the best compatibility and performance.
2. For the macOS system, you can use exFAT or HFS+.
3. TP-Link routers do not guarantee compatibility with external hard drive enclosures, especially multi-bay models — performance may vary.
Scenario 2: Can't Find TP-Share on the Network
This issue is typically caused by Windows sharing settings. Try the following:
1. Enable SMBv1 in the Windows system.
Step 1. Open the control panel.
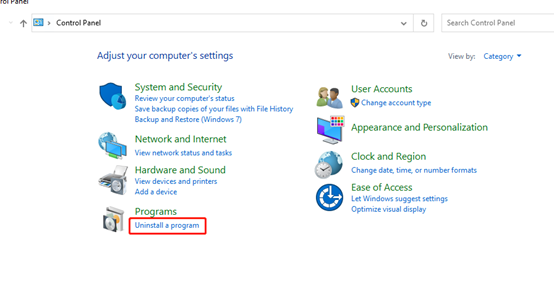
Step 2. Click Uninstall a program.
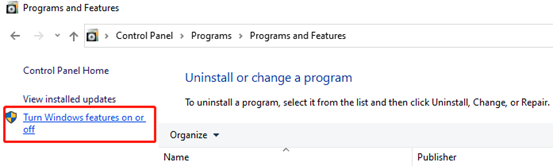
Step 3. Click Turn Windows features on or off.
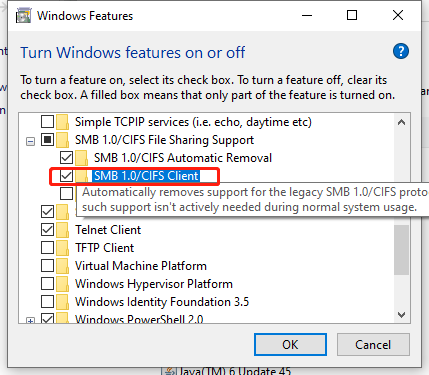
Step 4. Enable SMB 1.0/CIFS Client. Then click OK.
2. Enable Network discovery in the network and sharing center settings.
Step 1. Open the control panel.
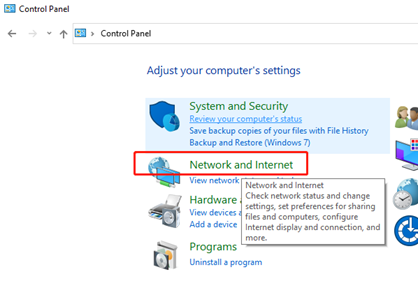
Step 2. Click Network and Internet.
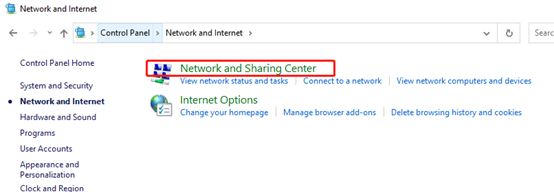
Step 3. Click Network and Sharing Center.
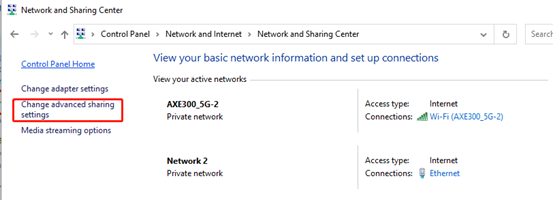
Step 4. Click Change advanced sharing settings.
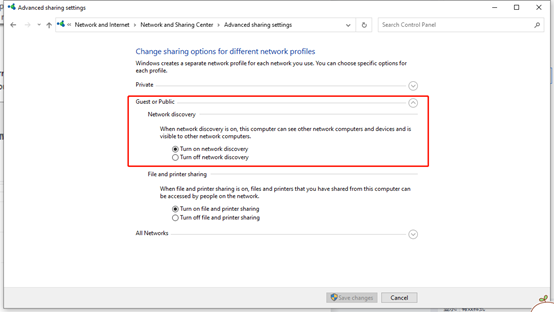
Step 5. Enable "Turn on network discovery" in Private, Guest, or Public.
Step 6. Open Windows Explorer. Go to Network. Click TP-SHARE(Red) to access the USB drive.
Note: TP-Share(Green) is not USB storage sharing.
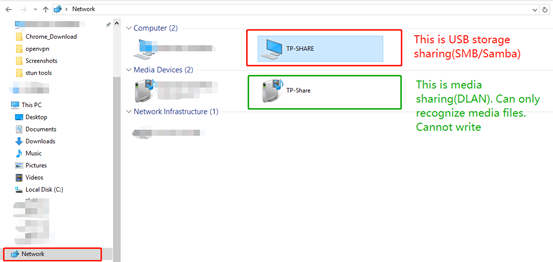
Step 7. If you still fail to access USB storage, you can refer to this FAQ to access it: How to access USB storage device on the TP-Link Routers from Windows or Mac OS
Scenario 3: Can't Access USB Sharing via SMB
Some Windows systems restrict SMB access by default. Try the following:
1. Enable SMBv1 in the Windows system.
Step 1. Open the control panel.
Step 2. Click Uninstall a program.
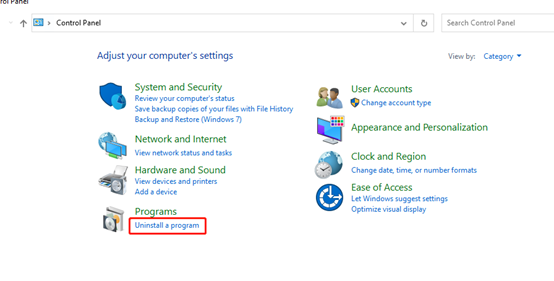
Step 3. Click Turn Windows features on or off.
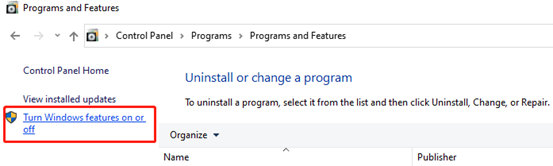
Step 4. Enable SMB 1.0/CIFS Client. Then click OK.
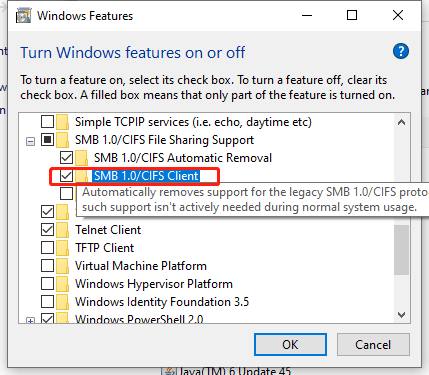
2. Enable insecure guest logons
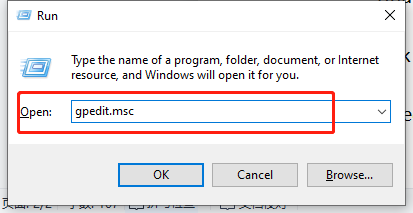
Step 1. Press Win+R. Within the run box, type “gpedit.msc”
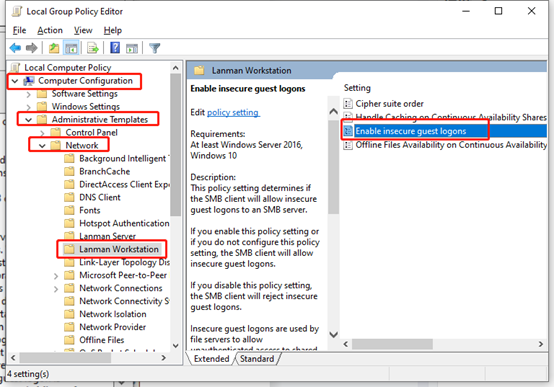
Step 2. Within the Local Group Policy Editor, select “Administrative Templates” > “Network” > ”Lanman Workstation”.
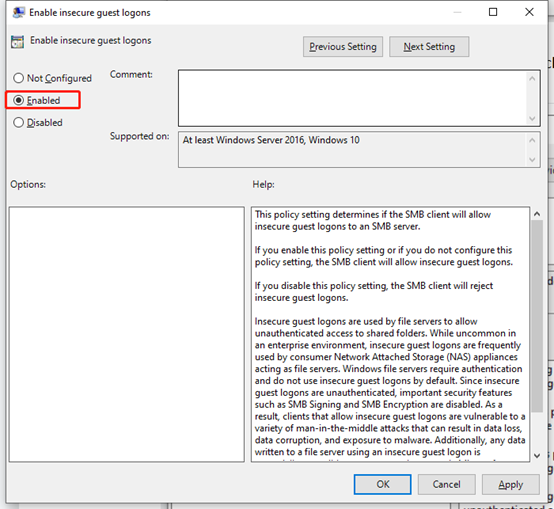
Step 3. Double-click the “Enable Insecure guest logons” option > tick the “Enable” option > OK.
Scenario 4: Unable to access USB sharing after changing the password
If you change the account under Advanced > USB Devices > Sharing Access > Account from Use Default Account to Use New Account,or if you change the USB access password under Use New Account, you may encounter an error when you access the USB device again.
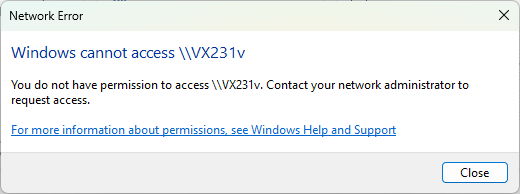
You can follow the steps below to resolve this issue.
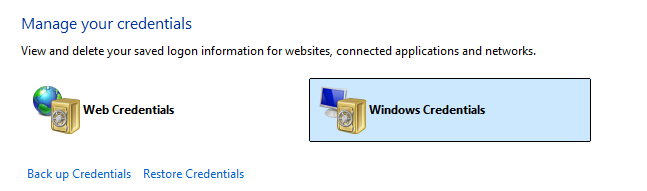
1. Open Credential Manager in Windows, then click Windows Credentials.
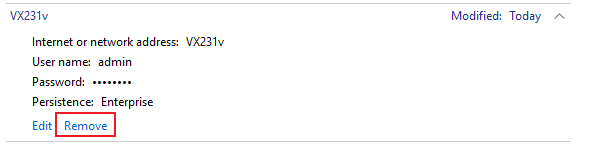
2. Find the entry such as \\VX231v, then click Remove.
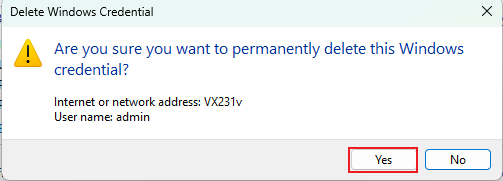
3. Restart the Windows computer, then you can access the USB device using the new authentication password.
Looking for More
Is this faq useful?
Your feedback helps improve this site.



TP-Link Community
Still need help? Search for answers, ask questions, and get help from TP-Link experts and other users around the world.