
Table of Contents
TL-PA717 KIT Product and Installation Guide
About This Guide
This guide provides a brief introduction to AV1000 Gigabit Powerline Starter Kit and its multiple-pack kits and regulatory information.
When using this guide, please notice that features of the powerline adapter may vary slightly depending on the model and software version you have, and on your location, language, and internet service provider. All screenshots, images, parameters and descriptions documented in this guide are used for demonstration only.
Conventions
In this guide, the following conventions are used:
|
Convention |
Description |
|---|---|
|
Underline |
Underlined words or phrases are hyperlinks. You can click to redirect to a website or a specific section. |
|
Bold |
Contents to be emphasized and texts on the web page are in bold, including the menus, items, buttons and so on. |
|
> |
The menu structures to show the path to load the corresponding page. For example, Wireless > MAC Filter means the MAC Filter function page is under the Wireless menu. |
|
Note: |
Ignoring this type of note might result in a malfunction or damage to the device. |
|
Tip: |
Indicates important information that helps you make better use of your device. |
1. Get to Know About Your Powerline Device
This chapter introduces what the Powerline adapter can do and shows its appearance.
1.1 Product Overview
The powerline adapter aims to extend your existing home network, with the help of your home’s service panel.
1.2 Appearance
Your powerline adapter may differ in appearance slightly from that depicted because of the region and product version.
* TL-PA717 KIT (European version) is used for demonstration here. Images may differ from your actual product.
KIT_4.0-package.png_副本_20260804030754c.png)
LED Explanation
LEDs indicate the powerline adapter’s working status.
| LED | Status | Indication |
|---|---|---|
|
Power |
On/Off |
The powerline adapter is on or off. |
|
Blinking quickly |
Pairing is in progress. |
|
|
Blinking slowly |
Power-Saving Mode is on.* |
|
|
Powerline |
On |
The powerline adapter is successfully connected to a powerline network. |
|
Off |
The powerline adapter is not connected to any powerline network. |
|
|
Ethernet |
On/Off |
The Ethernet port is connected or disconnected. |


*Five minutes after the device connected to the powerline adapter is turned off or inactive, the powerline adapter will automatically switch to Power-Saving Mode.
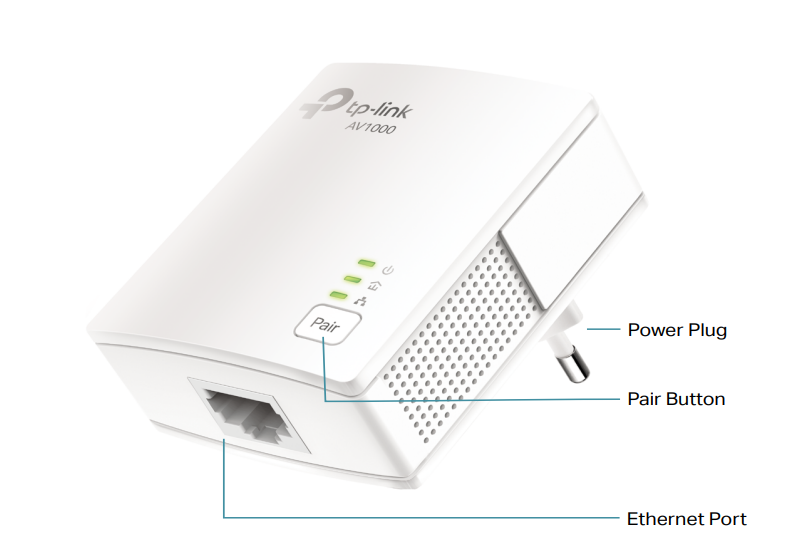
Ports and Buttons
|
Item |
Description |
|---|---|
|
Power Plug |
The powerline adapter has a Plug that can be connected to any standard power socket. |
|
Ethernet Port |
Connect the Ethernet ports to your wired devices, such as a computer, a router or a game console, via Ethernet cables. |
|
Pair Button |
Press and hold for 1 second to set up or join a secure powerline network. |
|
Press and hold for more than 6 seconds to reset the powerline adapter. |
2. Before You Start
Powerline adapters work in pairs. You should have at least two powerline products to build a powerline network. To optimize your network performance, please follow these principles:
• All powerline adapters should be on the same electrical wiring system.
• Avoid plugging in powerline adapters and high-powered household devices (such as washing machines and refrigerators) close to one another.
• Plug the powerline adapter directly into a wall outlet. Do not plug the powerline adapter into a power strip, extension cord, or surge protector.
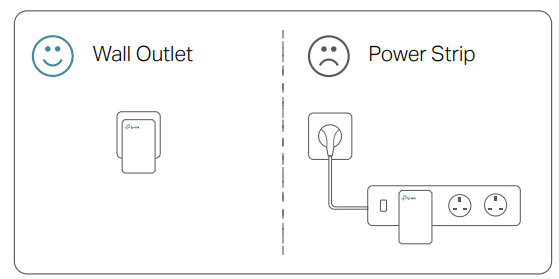
• Environment:
Operating Temperature: 0 ºC ~ 40 ºC (32°F ~ 104°F )
Storage Temperature: -20°C~70°C (-4°F~158°F)
Operating Humidity: 10%~90%RH, Non-condensing
Storage Humidity: 5%~90%RH, Non-condensing
3. Set Up a New Powerline Network
Follow any of the following methods to use two powerline adapters to set up a new powerline network in your house.
Method 1. Plug and Play
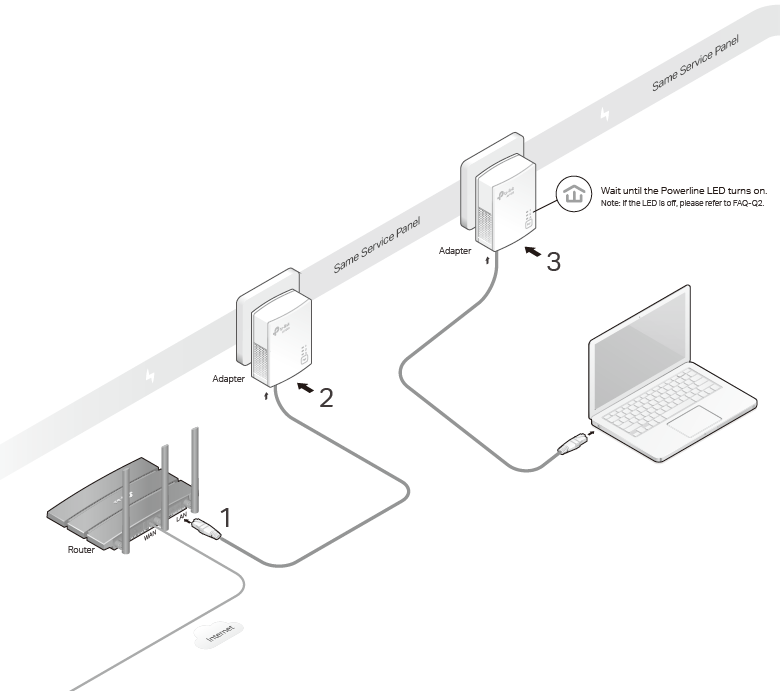
1. Connect one of the powerline adapters to an available LAN port of the router using an Ethernet cable.
2. Plug the powerline adapter into a wall outlet.
3. Plug the other powerline adapter into a power outlet on the same service panel. Wait until the powerline LED  turns on.
Done! Now enjoy the internet by connecting your wired devices, such as a computer or game console, to the powerline adapter via an Ethernet cable.
Method 2. Pairing
You can create a secure powerline network using the Pair button on two devices at a time.
Tip: We recommend that you plug in the powerline devices near each other when pairing.
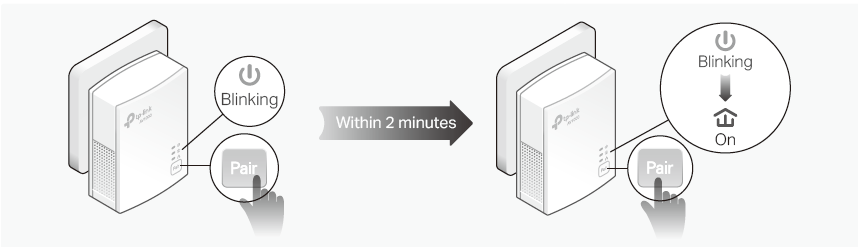
1. Plug one of the adapters into a power outlet and connect it to the router’s LAN port via an Ethernet cable. Wait until the extender’s Powerline LED turns on.
2. Plug the other adapter into a power outlet on the same service panel. Wait until the Powerline LED turns on.
Tips: We recommend that you plug in your powerline devices next to each other, or as close to each other as possible when pairing.
3. Press the Pair button on any of the powerline adapters for 1 second. The Power LED  should start blinking.
Note: If the Power LED does not blink, press the Pair button again.
4. (Within 2 minutes) press the other adapter’s Pair button for 1 second. Its Power LED should start blinking. When the Powerline LED lights up, a powerline network has been successfully created.
Done! Now enjoy the internet by connecting your wired devices, such as a computer or game console, to the powerline adapter via an Ethernet cable.
4. Join an Existing Powerline Network
If you already have a powerline network want to add a new powerline adapter into the existing powerline network to extend your network, you can follow the steps to join a secure powerline network using the Pair button on two devices at a time.
Tip: We recommend that you plug in the powerline devices near each other when pairing.
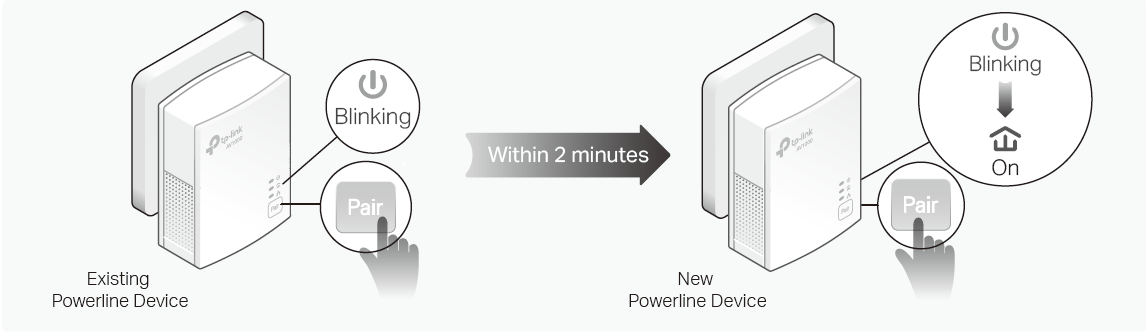
1. Plug the new powerline adapter into a power outlet near one of the existing powline devices. Wait until the new adapter’s Powerline LED turns on.
2. Press the Pair button on any of the existing powerline devices for 1 second. Its Power LED starts blinking.
3. Within 2 minutes, press the Pair button on the new adapter for 1 second. Its Power LED should start blinking. When the Powerline LED lights up, a powerline network has been successfully created.
Done! Relocate the new powerline adapter to the place where wired internet access is needed.
FAQ (Frequently Asked Questions)
Q1.How do I reset my powerline adapter?
With the powerline adapter plugged into the wall socket, press and hold its Pair button for more than 6 seconds until the Power LED goes off momentarily and comes back on.
Q2.What should I do if the Powerline LED is off?
•Try another wall socket and make sure all powerline devices are on the same electrical circuit.
•Try to set up a powerline network by pairing. Refer to Method 2. Pairing for instructions.
•Try to reset each powerline adapter to its factory default settings
•If the problem persists, contact our Technical Support.
Q3.What should I do if there is no internet connection in my powerline network?
•Make sure all powerline devices are on the same electrical circuit.
•Make sure the Powerline LEDs are lit on all of your powerline devices. If they are not, pair all powerline devices according to Method 2. Pairing to secure your Powerline network by pairing.
•Make sure all devices are correctly and securely connected.
•Verify that you have an internet connection by connecting your computer directly to the modem or the router.
Q4.What should I do if a successfully-paired powerline device does not reconnect after it is relocated?
•Try another socket on the same electrical circuit.
•Try to pair the device again, and make sure the Powerline LED is on.
•Check for possible interference due to a washing machine, air conditioner or other household appliance that may be too close to one of the powerline devices. Plug the appliance into the integrated electrical socket to remove the electrical noise if your powerline device has an integrated electrical socket.
More Info
-
The latest software and utility are available from the Download Center at https://www.tp-link.com/support.
-
The Quick Installation Guide can be found where you find this guide or inside the package of the router.
-
Specifications can be found on the product page at https://www.tp-link.com.
-
A TP-Link Community is provided for you to discuss our products at https://community.tp-link.com.
-
Our Technical Support contact information can be found at the Contact Technical Support page at https://www.tp-link.com/support.
Disclaimer
-
This device complies with part 15 of the FCC Rules. Operation is subject to the following two conditions: (1) This device may not cause harmful interference, and (2) this device must accept any interference received, including interference that may cause undesired operation.
-
Maximum Powerline signal rates are the physical rates derived from Homeplug AV/AV2 specifications. Actual Powerline data throughput and Powerline range are not guaranteed and will vary as a result of network conditions and environmental factors, including electrical interference, volume of traffic and network overhead, AFCI circuit breaker, and Powerline adapters separated between two or more service panels.
-
Compatible with all HomePlug AV and AV2 Standard Powerline adapters. This product may not be compatible with routers or gateways with firmware that has been altered, is based on open source programs, or are non-standard or outdated.
-
The Power Saving feature takes effect when your appliances are disconnected or turned off. Actual power saving data will vary in different network conditions and environments.
-
Actual network speed may be limited by the rate of the product's Ethernet WAN or LAN port, the rate supported by the network cable, Internet service provider factors and other environmental conditions.
Authentication
CE Mark Warning

EU Declaration of Conformity
TP-Link hereby declares that the device is in compliance with the essential requirements and other relevant provisions of directives 2014/30/EU, 2014/35/EU, 2009/125/EC, 2011/65/EU and (EU)2015/863.
The original EU declaration of conformity may be found at https://www.tp-link.com/en/support/ce/
UKCA Mark

UK Declaration of Conformity
TP-Link hereby declares that the device is in compliance with the essential requirements and other relevant provisions of the Electromagnetic Compatibility Regulations 2016 and Electrical Equipment (Safety) Regulations 2016.
The original UK declaration of conformity may be found at https://www.tp-link.com/support/ukca/
Canadian Compliance Statement
This device contains licence-exempt transmitter(s)/receiver(s) that comply with Innovation, Science and Economic Development Canada’s licence-exempt RSS(s). Operation is subject to the following two conditions:
(1) This device may not cause interference.
(2) This device must accept any interference, including interference that may cause undesired operation of the device.
L’émetteur/récepteur exempt de licence contenu dans le présent appareil est conforme aux CNR d’Innovation, Sciences et Développement économique Canada applicables aux appareils radio exempts de licence. L’exploitation est autorisée aux deux conditions suivantes :
1) L’appareil ne doit pas produire de brouillage;
2) L’appareil doit accepter tout brouillage radioélectrique subi, même si le brouillage est susceptible d’en compromettre le fonctionnement.
Industry Canada Statement
CAN ICES-003 (B)/NMB-003(B)
CAN ICES-006/NMB-006


Продукт сертифіковано згідно с правилами системи УкрСЕПРО на відповідність вимогам нормативних документів та вимогам, що передбачені чинними законодавчими актами України.

Safety Information
-
Keep the device away from water, fire, humidity or hot environments.
-
Do not attempt to disassemble, repair, or modify the device. If you need service, please contact us.
-
Plug the powerline devices directly into the wall outlets but not the power strips.
-
Plug the product into the wall outlets with earthing connection through the plug.
-
Operating Temperature: 0°C~40°C (32°F~104°F)
-
運作溫度: 0°C~40°C (32°F~104°F)
-
Please read and follow the above safety information when operating the device. We cannot guarantee that no accidents or damage will occur due to improper use of the device. Please use this product with care and operate at your own risk.
Erp Information
-
Power consumption in networked standby: 2.2W
-
Power consumption in networked standby when all wired network ports are connected and all wireless network ports are activated: 2.2W.
-
The default period of time after which the power management function switches the equipment automatically into a condition providing networked standby: 20 minutes
Explanation of the symbols on the product label/產品標籤上符號的解釋
Symbols may vary from products. 符號可能因產品而異。
| Symbol 符號解釋 |
Explanation 解釋 |
|---|---|
 |
Class II equipment II类设备 |
 |
Class II equipment with functional earthing 具有功能接地的II类设备 |
 |
Alternating current 交流電 |
 |
DC voltage 直流電壓 |
 |
Polarity of output terminals 輸出端子極性 |
 |
Indoor use only 僅限室內使用 |
 |
Dangerous voltage 危險電壓 |
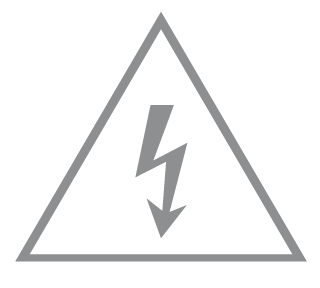 |
Caution, risk of electric shock 注意,有觸電危險 |
 |
Energy efficiency Marking 能源效率標示 |
 |
Protective earth 保護接地 |
 |
Earth 接地 |
 |
Frame or chassis 機架接地 |
 |
Functional earthing 功能接地 |
 |
Caution, hot surface 警告,表面高溫 |
 |
Caution 警告 |
 |
Operator’s manual 操作手冊 |
 |
Stand-by 待機 |
 |
“ON”/”OFF” (push-push) 「開」/「關」 ( 按壓式) |
 |
Fuse 保險絲 |
 |
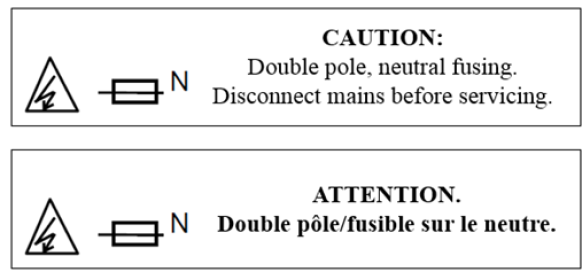
Fuse is used in neutral N 保險絲用於中性線N |
 |
RECYCLING This product bears the selective sorting symbol for Waste electrical and electronic equipment (WEEE). This means that this product must be handled pursuant to European directive 2012/19/EU in order to be recycled or dismantled to minimize its impact on the environment. User has the choice to give his product to a competent recycling organization or to the retailer when he buys a new electrical or electronic equipment. 回收利用 本產品標示有「廢棄電氣電子設備(WEEE)」的分類回收標誌。這表示本產品必須依據歐盟指令 2012/19/EU 進行妥善回收或拆 解,以減少對環境的影響。 使用者可選擇將本產品交給合格的回收機構,或在購買新電器或電子設備時,交回給零售商進行回收處理。 |
 |
Caution, avoid listening at high volume levels for long periods 注意,避免長時間以高音量收聽 |
 |
Disconnection, all power plugs 斷開所有電源插頭 |
| m | Switch of mini-gap construction 微間隙結構的開關 |
| µ | Switch of micro-gap construction (for US version) Switch of micro-gap / micro-disconnection construction (for other versions except US) 微小間隙結構開關(適用於美國版) 微小間隙 / 微小斷開結構開關(適用於美國以外的其他版本) |
| ε | Switch without contact gap (Semiconductor switching device) 無接點間隙開關(半導體開關裝置) |