How to Connect a TP-Link Router to Starlink
This guide covers how to connect a router to Starlink for both generations of Starlink terminals. Before following the steps, identify which dish you have: the Gen-1 (Circular Dish) or the Gen-2 (Rectangular Dish). The setup method differs between the two. The Gen-2 terminal removed the built-in Ethernet jack, so you must purchase a separate Starlink Ethernet Adapter before a wired connection to a TP-Link router is possible.
Key Takeaways
- There are two generations of Starlink terminals: the Gen-1 (Circular Dish) and the Gen-2 (Rectangular Dish). The method for connecting a TP-Link router differs between the two.
- For the Gen-2 Starlink terminal, you must purchase a Starlink Ethernet Adapter separately before you can connect a TP-Link router via a wired connection.
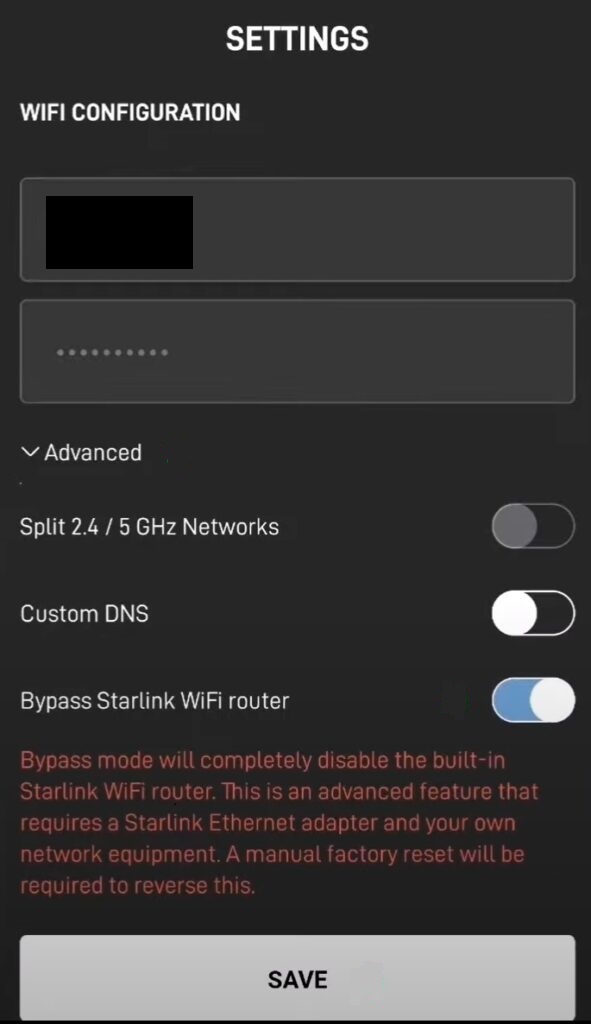
- With a Gen-2 terminal, two setups are supported: enable Bypass mode in the Starlink app (Settings > Advanced) and run the TP-Link router in Wireless Router mode, or leave Bypass mode disabled and run the TP-Link router in Access Point mode.
- Enabling Bypass mode on the Gen-2 Starlink router completely disables the built-in Starlink Wi-Fi. A factory reset is required if you want to revert to router mode.
- For the Gen-1 terminal, you can connect the TP-Link router directly (without the Gen-1 Starlink router) in Wireless Router mode, or connect it via the AUX port of the Gen-1 Starlink router in Access Point mode to avoid double NAT.
There are two generations of Starlink Satellite Dish: The Gen-1 Terminal (Circular Dish) and the Gen-2 Terminal (Rectangular Dish). The main difference between the two versions is the removal of the Ethernet Jack. So with a Gen-2 Terminal, you must purchase an Ethernet Adapter from Starlink first to allow for a wired connection to the network.
Head below to learn how to connect the TP-Link router to the Starlink Terminal.
For the updated Gen-2 Starlink User Terminal
Unlike the Original Starlink Terminal, the Gen-2 Dish is Rectangular, and no PoE adapter is included. The Rectangular Dish will be directly powered by the Gen-2 Starlink router. Since there is no more Ethernet jack on the Gen-2 Starlink router, you must purchase an Ethernet Adapter from Starlink to connect the TP-Link router.
- Connect the TP-Link router together with the Gen-2 Starlink router
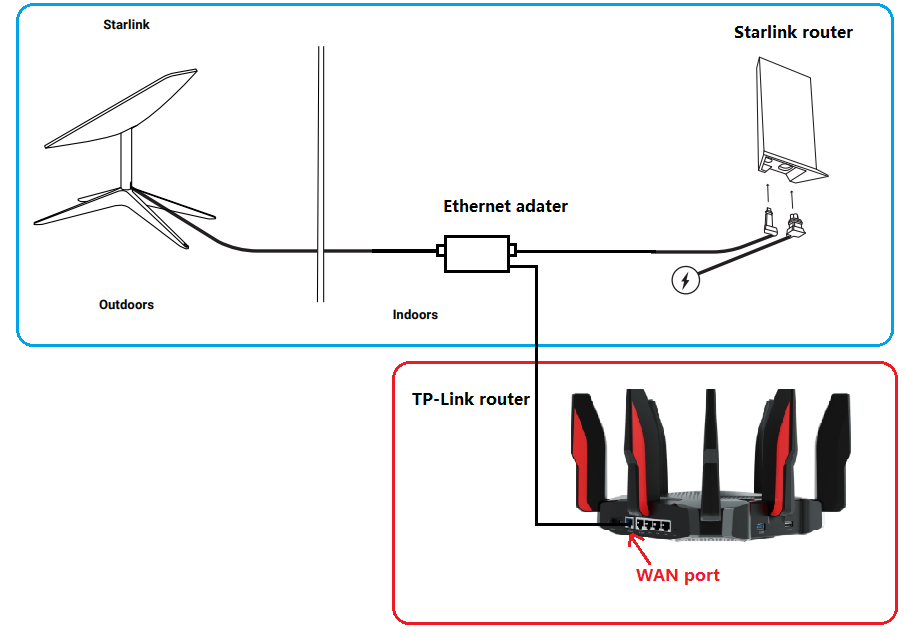
Gen-2 Starlink router supports Bypass mode that will completely disable the built-in Starlink WiFi router functionality. A factory reset is required if you want to switch back to router mode. So when the TP-Link router is connected to the Ethernet adapter, there are two recommended setups.
Option 1: Enable Bypass Mode — TP-Link Router in Wireless Router Mode
Option 2: Keep Bypass Mode Disabled — TP-Link Router in Access Point Mode
For the original Gen-1 Starlink User Terminal
Option 1: Connect the TP-Link Router Without the Gen-1 Starlink Router
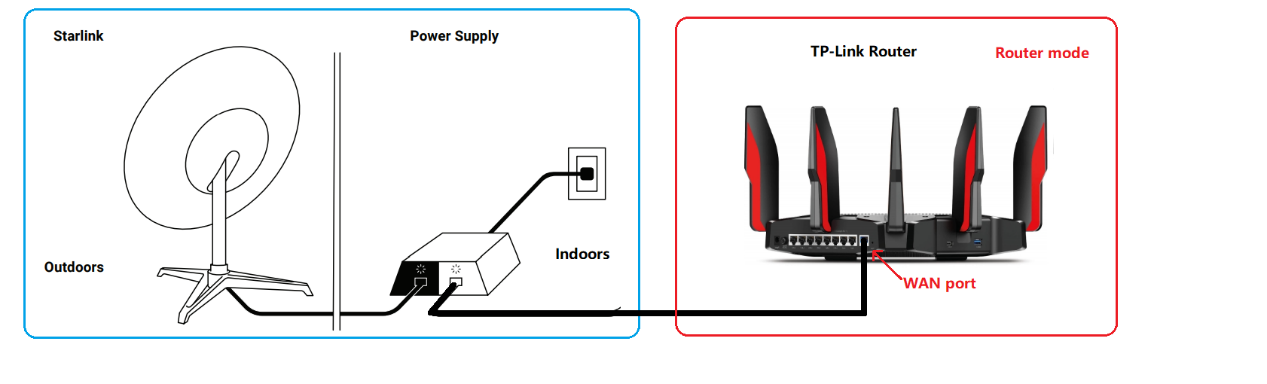
In this setup, the TP-Link router connects directly to the Starlink dish's power supply output and should be configured in Wireless Router mode. Go through how to set up a TP-Link router on the web management page.
Option 2: Connect the TP-Link Router Together With the Gen-1 Starlink Router
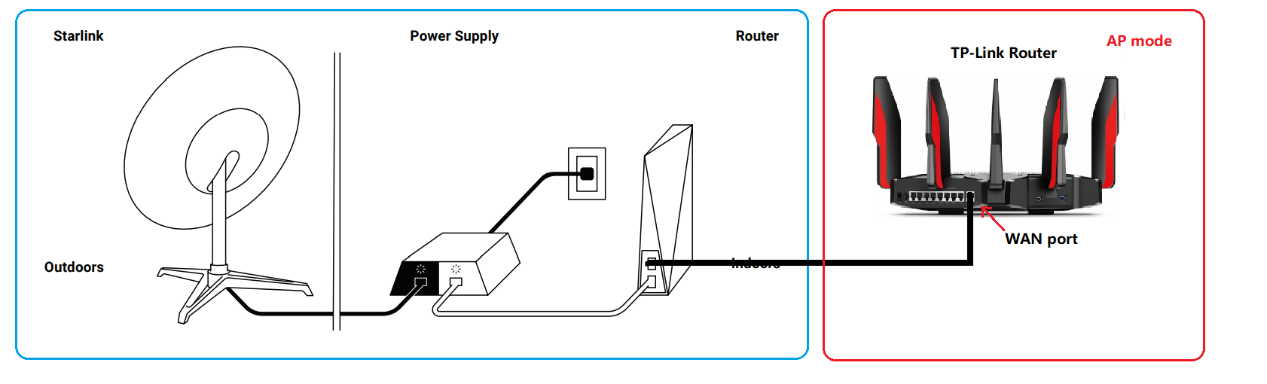
On this network topology, please connect the TP-Link router to the AUX port of the Gen-1 Starlink Router. To avoid double NAT, it is suggested to change the TP-Link router to Access Point mode.
Follow How to change a TP-Link router to Access Point mode.
For any further inquiries about the TP-Link router setup or configuration with Starlink, please contact our technical support.
Looking For More
Is this faq useful?
Your feedback helps improve this site.


TP-Link Community
Still need help? Search for answers, ask questions, and get help from TP-Link experts and other users around the world.