How do I set up Virtual Servers using TP-Link Wi-Fi Router? (new designed blue UI)
Virtual servers: When you build up a server in the local network and want to share it on the Internet, Virtual Server can realize the service and provide it to the Internet users. At the same time virtual server can keep the local network safe as other services are still invisible from the Internet. Virtual server can be used for setting up public services in your local network, such as HTTP, FTP, DNS, POP3/SMTP and Telnet. Different service uses different service port. Port 80 is used in HTTP service, port 21 in FTP service, port 25 in SMTP service and port 110 in POP3 service. Please verify the service port number before the configuration.
User’s Application Scenario
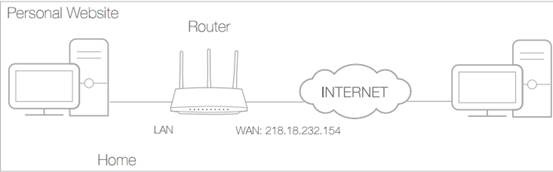
For example, the personal website has been built in my home PC (192.168.0.100). I hope that my friends in the Internet can visit my website in some way.
The PC is connected to the router with the WAN IP address 218.18.232.154.
Router LAN WAN: 218.18.232.154
Assign a static IP address to your PC, for example 192.168.0.100
Follow the steps below:
Note: Archer C9 is used for demonstration in this article.
Step 1
Access the web interface of Archer C9. Please click How do I log into the web-based Utility (Management Page) of TP-Link wireless router? to access the web interface
Step 2
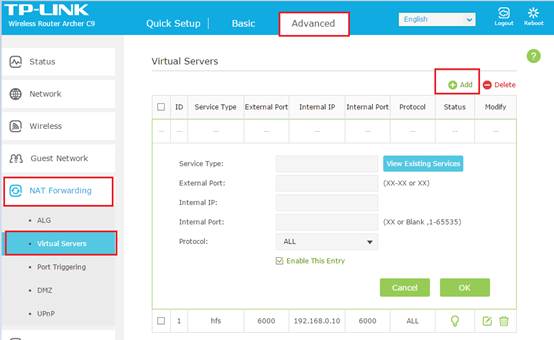
Click Advanced on the top, then on the left side, click NAT Forwarding->Virtual Servers->Add.
Step 3
Click View Existing Services, and select HTTP. The external port, internal port and protocol will be automatically filled with contents. Enter the PC’s IP address 192.168.0.100 in the Internal IP field.
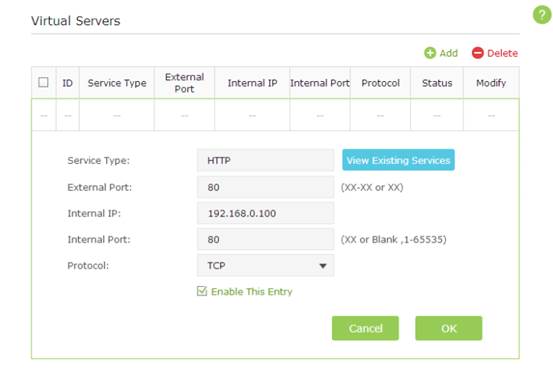
Click OK to save the settings.
Tips:
1. It is recommended to keep the default settings of Internal Port and Protocol, if you are not clear about which port and protocol to use.
2. If the service you want to use is not in the Service Type, you can enter the corresponding parameters manually. You should verify the port number that the service need.
3. You can add multiple virtual server rules if you want to provide several services in a router. Please note that the External Port should not be overlapped.
Step 4:
Users in the Internet can enter http:// WAN IP (in this example: http:// 218.18.232.154) to visit your personal website.
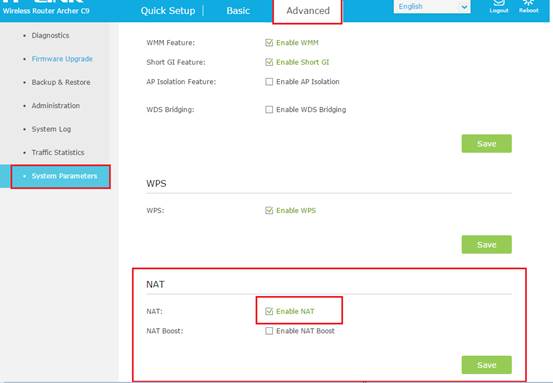
Note: Your configurations will not take effect if NAT function is disabled. Then you should go to Advanced > System Tools > System Parameters page to enable NAT.
Tips:
1. WAN IP should be a public IP address. For the WAN IP is assigned dynamically by ISP, it is recommended to apply and register a domain name for the WAN refer to Set Up a Dynamic DNS Service Account. Then you can use http:// domain name to visit the website.
For your reference:
How to set up DDNS (DynDNS) of Wi-Fi Routers (new designed blue UI)
How to set up DDNS (NO-IP) of Wi-Fi Routers (new designed blue UI)
If you are not sure how to configure static IP on the device, you may do an Address Reservation refers to How to configure Address Reservation on the TP-Link Wi-Fi Routers (new designed blue UI), so that IP will always be assigned to the device.
2. If you have changed the default External Port, you should use http:// WAN IP: External Port or http:// domain name: External Port to visit the website.
3. Make sure the server is accessible from internal network. You can check if you can access that server in the local network. If you are unable to get access to the server in internal network please check settings of your server.
Get to know more details of each function and configuration please go to Download Center to download the manual of your product.
Is this faq useful?
Your feedback helps improve this site.
TP-Link Community
Still need help? Search for answers, ask questions, and get help from TP-Link experts and other users around the world.