Recent updates may have expanded access to feature(s) discussed in this FAQ. Visit your product's support page, select the correct hardware version for your device, and check either the Datasheet or the firmware section for the latest improvements added to your product. Please note that product availability varies by region, and certain models may not be available in your region.
Within a normal home network, the bandwidth is shared by all computers. This means any computer using high-bandwidth applications, for example torrent programs or other P2P software, will affect the other computers. This may also include negative influence on the performance of the entire network. How can we avoid this?
The answer is Bandwidth Control, which is designed to minimize the impact caused when the connection is under heavy load. Using Bandwidth Control, we can assign a specific minimum or maximum bandwidth for each computer, which means they have less interference on each other. Please follow the steps below to configure this feature.
How to configureBandwidth Control?
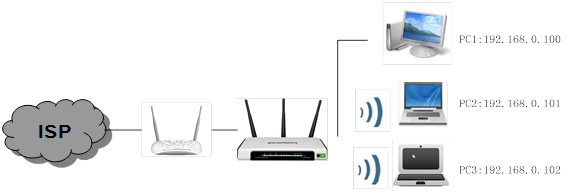
The scenario below will take 3 computers sharing 512Kbps Egress Bandwidth and 4Mbps Ingress Bandwidth as an example, and explain how to use Bandwidth Control to optimize the load respectively.
Scenario:
Example:①PC1 often plays online game and downloads files which uses the most part of bandwidth.
②PC2 is used for watching movies on the Internet which also needs much bandwidth.
③PC3 is used for browsing websites usually, so it only needs a few bandwidth.
Please log in to the web management interface to setup bandwidth control.
Step 1
Open the web browser and in the address bar type in the default access like::http://tplinkwifi.net
Note:
Please find the default access on the bottom label of the product.
Step 2
Type the username and password in the login page. The default username and password are bothadminin lower case.
Step 3
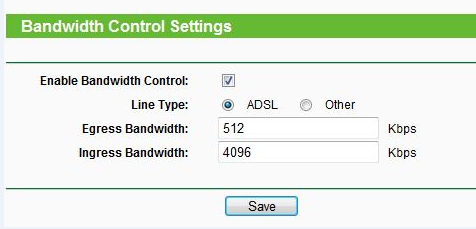
Click on Bandwidth Control-Control Settingson the left menu.
Note:
For example, if you have a ADSL Modem, please choose “ADSL” on the line type. If you don’t know how to choose the Line Type, please contact your ISP which line type you have access.
The Egress Bandwidth and Ingress Bandwidth should be the real bandwidth given by your ISP. (1Mbps=1024Kbps)
Step 4
Click Save to save the Settings.
Step 5
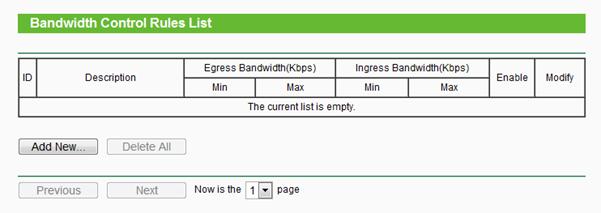
Click Bandwidth Control -> Rules List on the left page, you can view and configure the rules.
Step 6
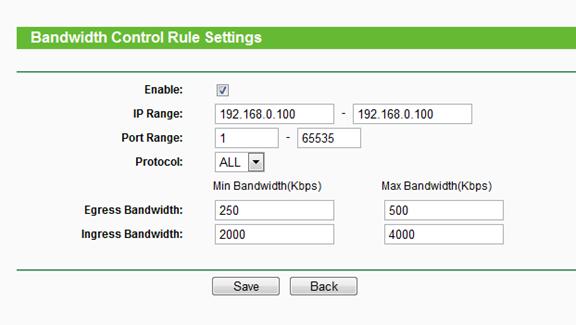
Click Add New to add a new rule.
IP Range-Single IP address or IP address Range. When you configure the single IP address, the computer with this IP address will get independent given bandwidth. When you configure the IP address range, all computers in the range will share the given bandwidth.
Port Range-The port arrange of TCP protocol or UDP protocol.
Protocol-You can choose the TCP protocol or UDP protocol or both of them.
Egress Bandwidth - The max and the min upload speed which through the WAN port, default number is 0.
Ingress Bandwidth - The max and the min download speed through the WAN port, default number is 0.
NOTE:
You’d better set static IP Address on your local computers or configure Address reservation on the wireless router in order to manage easily.
About how to configure TCP/IP properties on your computer, please refer to FAQ 14
About how to configure Address Reservation, please refer to FAQ 182
Step7
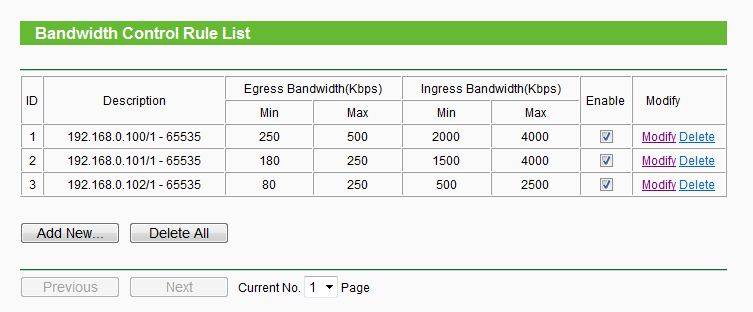
According to the demand of clients, the bandwidth could be allocated as following.
From the rules, the max Bandwidth can ensure that PC1 and PC2 can take up all bandwidth when it’s alone to access the Internet and the min Bandwidth can ensure that they have the necessary bandwidth when more than one PC work at the same time.
Note: The amount of Min Egress Bandwidth and Min Ingress Bandwidth you configure should be less than Egress Bandwidth and Ingress Bandwidth you configure on Bandwidth Control settings page previously.
Step 8
Enable the Bandwidth Controland click the Save buttonon Bandwidth Control Settingsto take effect.
Get to know more details of each function and configuration please go toDownload Centerto download the manual of your product.
As explained further in our website Privacy Policy, we allow certain advertising partners to collect information from our website through cookies and similar technologies to deliver ads which are more relevant to you, and assist us with advertising-related analytics (e.g., measuring ad performance, optimizing our ad campaigns). This may be considered "selling" or "sharing"/disclosure of personal data for "targeted advertising" as defined by certain U.S. state laws. To opt out of these activities, press "Opt Out" below. If the toggle below for "Targeted Advertising and 'Sale' Cookies" is to the left, you are already opted out and you can close these preferences.
Please note that your choice will apply only to your current device/browser. You must indicate your choice on each device and browser you use to access our website. If you clear your cookies or your browser is set to do so, you must opt out again.
Your Privacy Choices
As explained further in our website Privacy Policy, we allow certain advertising partners to collect information from our website through cookies and similar technologies to deliver ads which are more relevant to you, and assist us with advertising-related analytics (e.g., measuring ad performance, optimizing our ad campaigns). This may be considered "selling" or "sharing"/disclosure of personal data for "targeted advertising" as defined by certain U.S. state laws. To opt out of these activities, press "Opt Out" below. If the toggle below for "Targeted Advertising and 'Sale' Cookies" is to the left, you are already opted out and you can close these preferences.
Please note that your choice will apply only to your current device/browser. You must indicate your choice on each device and browser you use to access our website. If you clear your cookies or your browser is set to do so, you must opt out again.
These cookies are necessary for the website to function and cannot be switched off.
These cookies allow targeted ads or the "sale" of personal data (toggle to the left to opt out).
Analytics cookies enable us to analyze your activities on our and other websites in order to improve and adapt the functionality of our website and our ad campaigns.
Advertising cookies can be set through our website by our advertising partners in order to create a profile of your interests and to show you relevant advertisements on other websites.
Welcome to Our Website! If you stay on our site, we and our third-party partners use cookies, pixels, and other tracking technologies to better understand how you use our site, provide and improve our services, and personalize your experience and ads based on your interests. Learn more in your privacy choices.


14.0-A_normal_1584497163963a.png)
6.0-A-2000px_normal_1584497345873p.png)
3.0&4.0-F_normal_1584493102128p.png)