How to use the WDS Bridging function of Archer C2600 to extend my wireless network
User's Application Scenario
My house covers a large area. The wireless network coverage of the router I’m using (the root router) is limited. I want to use an extended router to extend the wireless network of the root router.
Note:
• WDS bridging only requires configuration on the extended router;
• WDS bridging function can be enabled either in 2.4GHz frequency or 5GHz frequency for a dual-band router.
We use the WDS bridging function in 2.4GHz frequency as an example.
1. Visit http://tplinkwifi.net, and log in with the username and password you set for the router. The default Username and password are admin/admin. If you don’t know how to login, please refer to Log in to the web management interface.
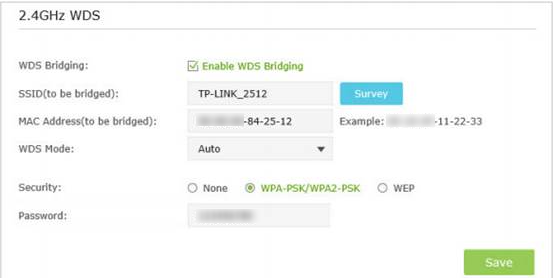
2. Survey the SSID to be bridged:
1) Go to Advanced >System Tools > System Parameters to load the 2.4GHz WDS, click Enable WDS Bridging;
2) Click Survey, locate the root router’s SSID and click Choose (Here we take TPLINK_2512 as example);
3) If the root router has wireless password, you should enter the wireless password of the root router;
4) Click Save.
3. Disable DHCP:
1) Go to Network > DHCP Server;
2) Deselect Enable DHCP Server;
3) Click Save.

4. Configure the IP address of the router:
1) Go to Advanced >Network > LAN, configure the IP address of the extended router to be in the same subnet with the root router;
(For example, the IP address of the root router is 192.168.0.1, the IP address of the extended router can be 192.168.0.2~192.168.0.254. We take 192.168.0.2 as an example.)
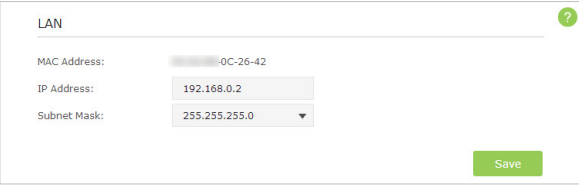
2) Click Save.
Note: Login to the web management page again if the IP address of the router is altered.
Now you can login to the web management page, click Advanced > Status > Wireless to check the WDS status. When the WDS status is Run, it means WDS bridging is successfully built.
You can also make a simple check by the Ping command. If the ping proceeds successfully (which means the WDS performs properly), you will see the similar screen as below: (in this example, 192.168.1.1 is the IP address of the root router)
Please refer to How to Use the Ping Command for detailed instruction.

Get to know more details of each function and configuration please go to Download Center to download the manual of your product.
Is this faq useful?
Your feedback helps improve this site.
TP-Link Community
Still need help? Search for answers, ask questions, and get help from TP-Link experts and other users around the world.