How to use PPTP VPN to access your home network through the Wi-Fi Routers (new logo)
Archer C1200 , Archer C5400 , Archer A2600 , Archer AX55 , Archer C4 , Archer C5200 , Archer AX53 , Archer C5 , Archer AX10 , Archer C2 , Archer AX51 , Archer AX96 , Archer A2200 , Archer C6U , Archer AXE95 , Archer C8 , Archer AX10000 , Archer C3150 , Archer C9 , Archer AX50 , Archer C6( V2 ) , Archer C7 , Archer AX90 , Archer AX6000 , Archer C5400X , Archer C25 , Archer C24 , Archer A20 , Archer C60 , Archer C2600 , Archer A1200 , Archer C21 , Archer C20 , Archer AX1800 , Archer AX206 , Archer C59 , Archer C58 , Archer AX4200 , Archer C3200 , Archer C900 , Archer A2 , Archer AX75 , Archer AX4400 , Archer C3000 , Archer AX73 , Archer C50
Recent updates may have expanded access to feature(s) discussed in this FAQ. Visit your product's support page, select the correct hardware version for your device, and check either the Datasheet or the firmware section for the latest improvements added to your product. Please note that product availability varies by region, and certain models may not be available in your region.
PPTP VPN Server is used to create a VPN connection for remote device. To use the VPN feature, you should enable PPTP VPN Server on your router, and configure the PPTP connection on the remote device. Please follow the steps below to set up a PPTP VPN connection.
You may refer to the video first
Step 1. Set up PPTP VPN Server on Your Router
1. Log in to the web-based interface of the router. If you don’t know how to do that, please refer to
How do I log into the web-based Utility (Management Page) of TP-Link wireless router?
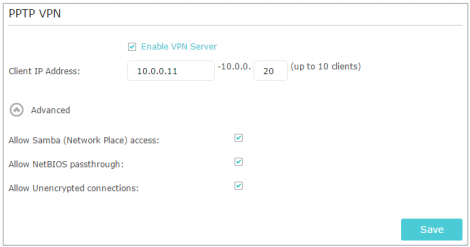
2. Go to Advanced > VPN Server > PPTP VPN, and select Enable VPN Server.
Note:
Before you enable VPN Server, we recommend you configure Dynamic DNS Service (recommended) or assign a static IP address for router’s WAN port and synchronize your System Time with internet.
3. In the Client IP Address filed, enter the range of IP addresses (up to 10) that can be leased to the devices by the PPTP VPN server.
4. Click Advanced to set the PPTP connection permission according to your needs.
• Select Allow Samba (Network Place) access to allow your VPN device to access your local Samba server.
• Select Allow NetBIOS passthrough to allow your VPN device to access your Samba server using NetBIOS name.
• Select Allow Unencrypted connections to allow unencrypted connections to your VPN server.
5. Click Save.
6. Configure the PPTP VPN connection account for the remote device, you can create up to 16 accounts.
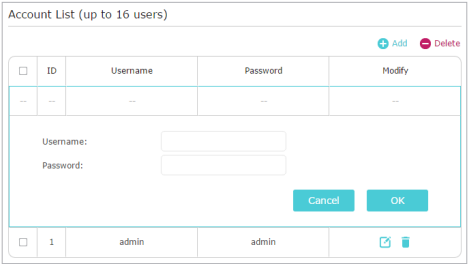
1) Click Add.
2) Enter the Username and Password to authenticate devices to the PPTP VPN Server.
3) Click OK.
Step 2. Configure PPTP VPN Connection on Your Remote Device
The remote device can use the Windows built-in PPTP software or a third-party PPTP software to connect to PPTP Server. Here we use the Windows built-in PPTP software as an example.
1. Go to Start > Control Panel > Network and Internet > Network and Sharing Center.
2. Select Set up a new connection or network.
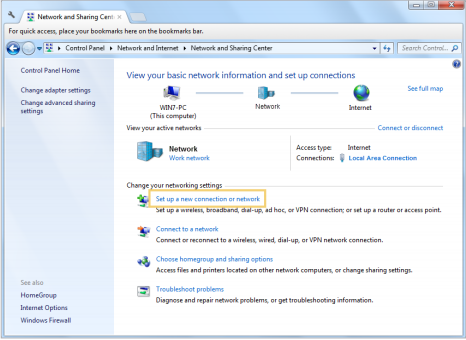
3. Select Connect to a workplace and click Next.
4. Select Use my Internet connection (VPN).
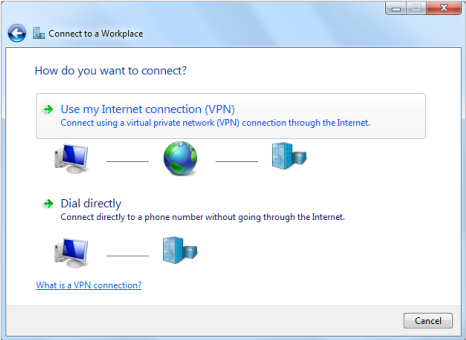
5. Enter the internet IP address of the router (for example: 218.18.1.73) in the Internet address field. Click Next.
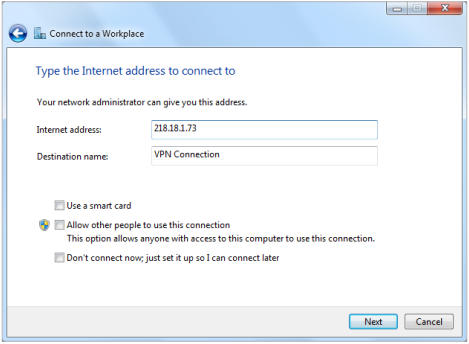
6. Enter the User name and Password you have set for the PPTP VPN server on your router, and click Connect.
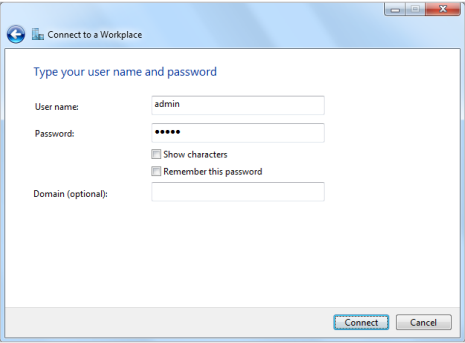
7. The PPTP VPN connection is created and ready to use.

Get to know more details of each function and configuration please go to Download Center to download the manual of your product.
Is this faq useful?
Your feedback helps improve this site.
What’s your concern with this article?
- Dissatisfied with product
- Too Complicated
- Confusing Title
- Does not apply to me
- Too Vague
- Other
Thank you
We appreciate your feedback.
Click here to contact TP-Link technical support.
TP-Link Community
Still need help? Search for answers, ask questions, and get help from TP-Link experts and other users around the world.
This website uses cookies to improve website navigation, analyze online activities and have the best possible user experience on our website. You can object to the use of cookies at any time. You can find more information in our privacy policy . Don’t show again
This website uses cookies to improve website navigation, analyze online activities and have the best possible user experience on our website. You can object to the use of cookies at any time. You can find more information in our privacy policy . Don’t show again
Basic Cookies
These cookies are necessary for the website to function and cannot be deactivated in your systems.
TP-Link
accepted_local_switcher, tp_privacy_base, tp_privacy_marketing, tp_smb-select-product_scence, tp_smb-select-product_scenceSimple, tp_smb-select-product_userChoice, tp_smb-select-product_userChoiceSimple, tp_smb-select-product_userInfo, tp_smb-select-product_userInfoSimple, tp_top-banner, tp_popup-bottom, tp_popup-center, tp_popup-right-middle, tp_popup-right-bottom, tp_productCategoryType
Livechat
__livechat, __lc2_cid, __lc2_cst, __lc_cid, __lc_cst, CASID
Youtube
id, VISITOR_INFO1_LIVE, LOGIN_INFO, SIDCC, SAPISID, APISID, SSID, SID, YSC, __Secure-1PSID, __Secure-1PAPISID, __Secure-1PSIDCC, __Secure-3PSID, __Secure-3PAPISID, __Secure-3PSIDCC, 1P_JAR, AEC, NID, OTZ
Analysis and Marketing Cookies
Analysis cookies enable us to analyze your activities on our website in order to improve and adapt the functionality of our website.
The marketing cookies can be set through our website by our advertising partners in order to create a profile of your interests and to show you relevant advertisements on other websites.
Google Analytics & Google Tag Manager
_gid, _ga_<container-id>, _ga, _gat_gtag_<container-id>
Google Ads & DoubleClick
test_cookie, _gcl_au
Meta Pixel
_fbp
Crazy Egg
cebsp_, _ce.s, _ce.clock_data, _ce.clock_event, cebs
lidc, AnalyticsSyncHistory, UserMatchHistory, bcookie, li_sugr, ln_or


