HS210 Installation FAQ Content
There are several types of light switches that you will encounter when upgrading a switch to a Smart Switch in your home.
With a standard or single-pole wall switch, only one switch controls a light or series of lights. This is the most common light switch found in a home. This switch can be upgraded to a Smart Switch using the TP-Link HS200 Wi-Fi Smart Switch (so long as there are neutral wires in the junction box).
How Can I Identify a Standard Switch?
If your light can only be switched from a single location, it's most likely a standard/single-pole switch. You can identify a single-pole wall switch when you remove it from the junction box. There must be 2 wires (usually black) connected to screw terminals or push connectors on the back of the switch housing. There may also be a ground wire connected.
If there are more than two wires contented to the switch, it is likely a three-way switch, however, there are some instances where more than two wires will be connected to a standard switch. In situations where one switch controls multiple light fixtures (like in a bathroom vanity or multiple pendant lights, etc.), you may find multiple wires connected to the same screw terminal/push-in connectors on the switch. If no other light switches control these lights, you likely have a standard switch that is being used as a junction for multiple load wires. You can still upgrade this configuration with HS200 Smart Switch, but you will need to wire-nut the bundle of load wires together as HS200 only has one load lead.
With a three-way switch, two separate light switches control a light or series of lights. In this configuration, you can turn the light on and off from either location. This switch configuration is often found in hallways, stairways or rooms where you have multiple entry points. Some three-way switches may not even be located in the same room, but they may still serve to control a light in a common space (a switch may be located in both a garage and kitchen if it controls a patio light accessible from both locations).
There are multiple wiring configurations for three-way switches and not all are compatible with HS210. While it is difficult to know exactly how your home was wired when it was originally built, there are several things you can look for to see if your switch scenario is compatible with HS210.
How Can I Identify a Three-Way Switch?
Three-way switches typically have three screw terminals on the housing, one of which will be a different color or marked "common." There may also be a separate green ground screw attached to the mounting flange of the switch (the ground wire may or may not be connected). If there are no screw terminals on your switch, there may be three push-in connectors on the back of the switch housing, one of which should be labeled "common." The labeling on the back of a switch may be difficult without cleaning it off and using a flashlight.
With a four-way switch, a total of three or more switches control a light or series of lights. This configuration is uncommon but can be found in larger homes or rooms with configurations that allow entry from more than two locations. In this situation, you can turn the light on and off from any of the switches. A four-way switch configuration is composed of two three way switches, one on each "end" of the switching circuit and a special four-way switch in-between the two three-way switches.
This wiring scenario is complex and HS210 has not been tested to work with this configuration.
How Can I Identify a Four-Way Switch?
Four-way switches often have four screw terminals on the housing, two of which will be labeled "input" and two of which will be labeled "output." There may also be a separate green ground screw attached to the mounting flange of the switch (the ground wire may or may not be connected). If there are no screw terminals on your switch, there may be four push-in connectors on the back of the switch housing, two of which should be labeled "input" and two of which should be labeled "output."
|
Standard Switch |
Three-Way Switch |
|
|
This standard switch has two wires that carry power (line and load) and one copper ground wire. |
This three-way switch has one black common wire, one black traveler wire, one red traveler wire and one copper ground wire. |
This four-way switch has a combination of red and black wires for the incoming connections and a combination of red and black wires for the outgoing connections in addition to a copper ground wire. |
What do all the different wires do on a 3-way switch?
On a standard switch, the switch simply allows or disallows power to flow from one wire to the other. When the switch is off, the circuit is broken, and power cannot flow to the light fixture. When the switch is on, the circuit is complete and power flows to the light fixture, illuminating your room.
This principle is essentially the same with a three-way switch, but an extra wire is needed to account for the second switch being on or off. With a three-way switch, instead of allowing and disallowing power to flow, the switch always sends power over one of the two traveler wires. Depending on the "on" or "off" state of both switches, the light will either be on or off.
This wire carries power into the circuit from the main service panel; this is the source of power for your light and will always be energized, regardless of how the switches are configured. This wire will be connected to the common screw on one of your three-way switches.
These wires connect the two wall switches together and allow power to pass between them. One of the two traveler wires is always energized when power is on.
This wire carries power from the switches to the light fixture; this wire will only be energized when the light fixture is on. This wire will be connected to the common screw on one of your three-way switches.
|
Diagram |
Description |
|
|
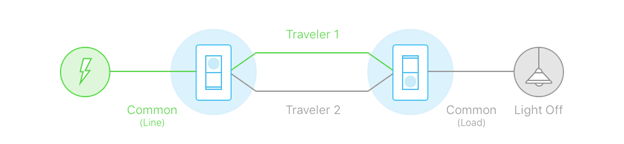
In this scenario, the first switch is "on" and the second switch is "off." Power flows from the first switch to the second switch over traveler 1 but doesn't make it to the light fixture. |
|
|
In this scenario, both switches are "on." Power flows from the first switch to the second switch over traveler 1 and the light turns on. |
|
|
In this scenario, both switches are "off." Power flows from the first switch to the second switch over traveler 2 and the light turns on. |
|
|
In this scenario, the first switch is "off" and the second switch is "on." Power flows from the first switch to the second switch over traveler 2 but doesn't make it to the light fixture. |


What do all the different colors of wires mean?
When you open your junction box to look at the wires connected to your wall switches, you may find a rainbow of possible colors. In most situations, you will only see black, red or white wires connected to your switch. While the color of the wire may imply something about its purpose, there is no guarantee that wire colors mean anything discernible about your three-way switch configuration.
Often, the colors of your wires may even be difficult to discern as they may be sprayed with paint or covered in spray-on wall texture. If this is the case, you will usually still be able to identify the wire color if you look at a more secluded section of the wire.
The color selector in the HS210 setup is primarily used to help gauge if you have a three-way switch configuration and if you may have an unusual wiring scenario. While the colors of the wires may not indicate how they are used in the three-way switch setup, the presence of certain colors of wires may indicate a more advanced wiring scenario through which the Kasa app cannot guide you. If your wiring includes brown, orange, purple, light blue, grey or yellow wires, the Kasa app will prevent you from completing setup. Your home may still be compatible with HS210; however, you should contact a licensed electrician for assistance.
|
Wire Color |
Purpose |
|
Black |
Black is the standard color of wire in most homes. This wire usually carries power to and from light fixtures. |
|
Red |
Red wires often appear in three-way configurations. They may be used as a traveler or either the common/line or common/load wire, depending on how the circuit is wired. |
|
White |
White wires are usually neutral wires, but they may appear in a three-way configuration wrapped with black tape. If this is the case, this wire is likely one of your two traveler wires. With this wiring situation, you are also unlikely to have a bundle of neutral wires. |
|
Brown |
Brown wires often indicate 277V electrical service. HS210 is incompatible with 277V electrical services. |
|
Orange |
Orange wires often indicate 277V electrical service. HS210 is incompatible with 277V electrical services. |
|
Purple |
Purple wires are not normally used in North America and may indicate an unusual wiring scenario. Purple wires are more common in certain European countries. |
|
Dark Blue |
Dark blue wires are less common but may appear in your home, carrying power to your outlets and lights. |
|
Light Blue |
Light blue wires are not normally used in North America and may indicate an unusual wiring scenario. Light blue wires are more common in Australia and are often used as a neutral wire. |
|
Grey |
Grey wires are often the neutral wire when used with 277V electrical service. HS210 is incompatible with 277V electrical services. |
|
Yellow |
Yellow wires often indicate 277V electrical service. HS210 is incompatible with 277V electrical services. |
|
Green/Yellow |
Green and yellow striped wires are ground wires. |
|
Green |
Green striped wires are ground wires. |
|
Bare Copper |
Bare copper wires are ground wires. |


How can I identify my common/line/load and traveler wires?
The Kasa app will guide you through the identification of your traveler and common/line/load wires.
To identify the common wires attached to each wall switch, you'll need to look at the old three-way switch itself. Not all three-way switches are the same, so you may need to look for a combination of the following to identify the common wire. While you will be looking for the common label, the screw terminals and wire labels supplied with HS210 use the terminology "Line/Load." For the purposes of installing your HS210 pair, you can consider Line/Load synonymous with "common."
For a normal HS210 installation, there is no need to identify which of the common wires corresponds to line and which corresponds to load.
|
Black Screw |
Push-in Only |
Push-in and Screws |
|
If your switch has screw terminals, you should find three screws on the switch housing (there may be an additional green ground screw). Two of the screws should be brass, one should be a different color. Most often, this other screw is black. This is your common wire. |
If your switch does not have screw terminals, you will have to look for a marking indicating which is the common wire. Often, there will be embossed lettering next to one of the three push-in connectors denoting the common wire. |
Some three-way switches will have both screw terminals and push-in connectors and the switch may be wired with a combination of both in-use. If this is the case, look for either the differently colored screw or embossed lettering to denote the common wire. |
Identifying the traveler wires is usually dependent on identifying the common wire. If your wall switch is connected with screw terminals, the two same-color screws, usually brass, will be your common wires. If your wall switch uses push-in connectors, you may find two unlabeled push-in connectors or two push-in connectors labeled traveler. These are your traveler wires.
|
Brass Screws |
Push-in Only |
|
If your switch has screw terminals, you should find two brass screws. The two wires connected to these screws are your traveler wires. |
If your switch does not have screw terminals, your traveler wires may not be marked. Look for an embossed or printed marking for the common wire, the other two push-in connections will be your traveler wires. |
How can I identify my neutral wires?
While you can't rely on wire color to indicate line, load, common or traveler, you can use several clues including wire color to help you identify the neutral wires in your junction box. When looking for neutral wires in your junction box, look for two or more white wires connected together with a wire nut. You may need to move wires around in the junction box to find the bundle as it is often in the very back behind any other wire bundles.
With rare exceptions, you shouldn't see neutral wires connected to the old wall switch you are replacing. If you find a white wire connected to your wall switch, look to see if it is wrapped with black electrical tape. If so, this is not a neutral wire but rather a repurposed white wire. If a white wire is connected to your wall switch, not wrapped with black electrical tape and can be traced to join the bundle of white wires, your old wall switch is connected to neutral and likely has more sophisticated features like a timer or remote control.
If all the wires in your junction box appear white, they may have been sprayed with paint or wall texture when your home was constructed. Look carefully as the actual wire color is usually still visible but less obvious.
|
Normal Bundle |
Crowded Box |
Painted or Textured |
Repurposed Neutral |
|
This is a normal, pristine junction box with a bundle of white neutral wires. |
This junction box is crowded with wires and there are several large bundles, but the neutral wire bundle can still be found in the back. |
This junction box was sprayed with paint or wall texture and all the wires look white. Upon careful examination, the true wire color can be seen. |
This junction box does not have a neutral wire even though there is a white wire present. The use of black electrical tape indicates that this white wire has been repurposed to carry power. |
What if my switch doesn't provide a neutral wire?
Because standard wall switches don't need a neutral wire to function and there are multiple ways to properly wire a three-way switch during construction, you may not find a neutral wire in one or both locations.
- If only one of the two junction boxes have a neutral wire bundle, you may still be able to use HS210 by following the instructions below.
- If neither of your switches have a neutral wire bundle, you will be unable to use HS210. An electrician may be able to assist, but running new wiring can be expensive.
What if only one of my switches has a neutral wire?
After examination, if you find that one wall switch has a neutral wire bundle but the other one does not, you may still be able to use HS210. While HS210 is designed to work in a pair, you can replace the wall switch with the neutral wires while leaving the old wall switch in place. If the neutral-less wall switch is very old, pops when actuated or has any other signs of age, you should replace this switch with a new, standard three-way switch to ensure reliable performance. It should be noted that this is a non-standard configuration for HS210 and results may vary.
What if my switches don't provide a ground wire?
Not all wall switches are connected to ground wires and not all junction boxes have a ground wire accessible.
- If your junction box is plastic and no ground wire was connected to your old switch, there may be a bundle of bare copper or green wires in the back of the junction box. You will need to unfold this bundle and connect the green ground wire from HS210 using a wire nut.
- If your junction box is plastic and no ground wire is present, you can simply cap the ground wire on HS210 with a wire nut.
- If your junction box is metal, there may not be a ground wire present; in this case, you should be able to connect your ground wire to the box itself.
|
Switch with Ground |
Switch Without Ground |
Box with Ground |
Box Without Ground |
|
The copper wire attached to this three-way switch is the ground wire. |
This three-way switch has a ground screw, but it is not connected to a ground wire. |
This junction box has an available bundle of ground wires. |
This junction box does not have any accessible ground wires. |
Is this faq useful?
Your feedback helps improve this site.

1.0-RGB_1513734401791q.jpg)
TP-Link Community
Still need help? Search for answers, ask questions, and get help from TP-Link experts and other users around the world.