How to manually assign an IP address on Windows 8
Here we will illustrate different ways to find control panel on Windows 8.
1) Press “Windows key  +F”, a search box will come out, please input control panel and press enter;
2)Press “Windows key+ R”, then there will be a “run” box, input control panel and press enter;
3) Press “Windows key +X”, and click on “control panel”;

4) You can also input “control panel” in the search bar on the right-hand side of the screen.

To check the IP address of the computer, please click on “Network and InternetàNetwork and Sharing CenteràChange Adapter Settings (on the left)”;
Then right click on “Ethernet” (right click on Wi-Fi if you want to check the wireless IP address), and go to StatusàDetails;
There you will see all the TCP/IP details of this computer.
Step 2
Right click on “Ethernet”, go to “Properties”, and then choose “Internet Protocol Version 4”, click on Properties;

Step 3
To set manual IP address, please select “Use the following IP address”, and input the IP or DNS address manually;
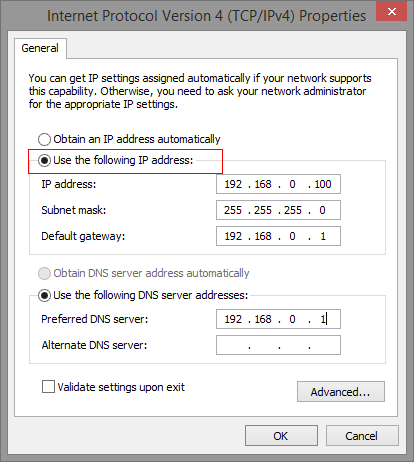
Note: If you need to set static DNS server, select “Use the following DNS server address”; If there’s no such requirement, leave it “Obtain DNS server address automatically”.
Questa faq è utile?
Your feedback helps improve this site.