How Do I Setup my Kasa Cam?

KC420WS , KC105P2 , KC310S2 , KC411S , KC300S3 , KC120 , KC300S2 , KC310S3 , EC70 , KC110 , EC60 , EC71 , KC100 , KC310 , KC200( V1 ) , KC300 , KC410S , KC125 , KC400 , KC411 , KC115 , KC401 , KC105
Recent updates may have expanded access to feature(s) discussed in this FAQ. Visit your product's support page, select the correct hardware version for your device, and check either the Datasheet or the firmware section for the latest improvements added to your product. Please note that product availability varies by region, and certain models may not be available in your region.
Please following the instructions step by step in this article to go through the entire setup process, then you can control the Kasa Cam with your Kasa app.
Before we begin:
1. Please download Kasa Smart from App Store or Google Play and install it on your smartphone.
2. Connect your smartphone to your home Wi-Fi network.
3. Plug your Kasa Cam into a power socket.
Here we use KC120 for example
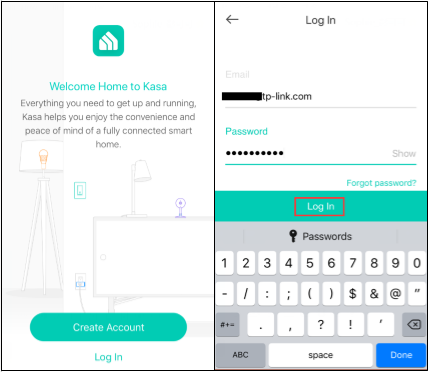
Step 1: Open the Kasa App
Log into your cloud account. Please refer to the link to sign up if you don’t have a cloud account.
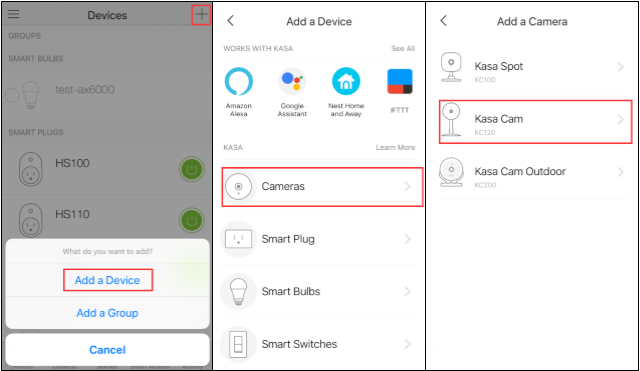
Step 2: Tap “+” button to add a Kasa Cam, select “Add a Device”, and choose “Cameras” icon according to your model number.
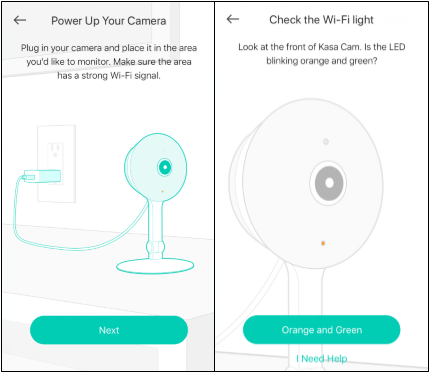
Step 3: Follow the instruction on the Kasa app to power on the Kasa Cam, and wait for the light to blink orange and green.
If the light does not blink orange and green, please reset the Kasa Cam as per UG/QIG.
Step 4: Connect your phone to the Kasa Cam’s Wi-Fi network.
For Andriod:
Kasa will look for your Kasa Cam automatically, and it will take about a minute.
If you have a problem with this step, please go to Settings->Wi-Fi on your smartphone and manually connect to Kasa Cam’s Wi-Fi network (same as iOS).
For iOS:
You need to connect to the Kasa Cam’s Wi-Fi network manually, please go to Settings->Wi-Fi on your smartphone and manually connect to Kasa Cam’s Wi-Fi network (which is named Kasa_Cam_xxxx), and then go back to the Kasa app to continue the setup process.
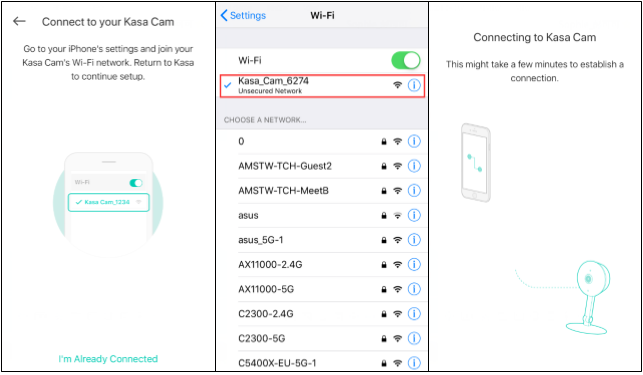
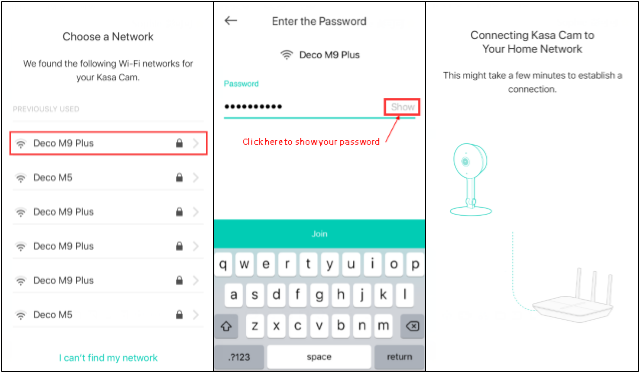
Step 5: Choose your home network to connect, enter the password of your home network.
Step 6: Name your Kasa Cam
Step 7: Enable Activity Notifications. If you enable this function, your camera can alert you whenever it detects motion. If you don’t want to be notified, click on “I don’t want to be notified”.
Step 8: Follow the instruction to mount your camera. If you do not want to do it now, click on “No Thanks”, and we have completed the setup of Kasa Cam.
If you need further assistance contact TP-Link Customer Support here.
Related FAQs
Looking for More
Questa faq è utile?
Your feedback helps improve this site.
What’s your concern with this article?
- Dissatisfied with product
- Too Complicated
- Confusing Title
- Does not apply to me
- Too Vague
- Other
Grazie
We appreciate your feedback.
Click here to contact TP-Link technical support.
Setup Videos
Questo sito utilizza i cookies per migliorare l'esperienza di navigazione, analizzare le attività online e offrire agli utenti una migliore user experience. Puoi disattivare o rifiutare il loro utilizzo in qualunque momento. Per maggiori informazioni consulta la nostra privacy policy .
Basic Cookies
Questi cookies sono necessari per il corretto funzionamento del sito e non possono essere disattivati nel tuo sistema.
TP-Link
accepted_local_switcher, tp_privacy_base, tp_privacy_marketing, tp_smb-select-product_scence, tp_smb-select-product_scenceSimple, tp_smb-select-product_userChoice, tp_smb-select-product_userChoiceSimple, tp_smb-select-product_userInfo, tp_smb-select-product_userInfoSimple, tp_top-banner, tp_popup-bottom, tp_popup-center, tp_popup-right-middle, tp_popup-right-bottom, tp_productCategoryType
Livechat
__livechat, __lc2_cid, __lc2_cst, __lc_cid, __lc_cst, CASID
Youtube
id, VISITOR_INFO1_LIVE, LOGIN_INFO, SIDCC, SAPISID, APISID, SSID, SID, YSC, __Secure-1PSID, __Secure-1PAPISID, __Secure-1PSIDCC, __Secure-3PSID, __Secure-3PAPISID, __Secure-3PSIDCC, 1P_JAR, AEC, NID, OTZ
Analytics e Marketing Cookies
I cookies analitici ci permettono di analizzare le tue attività sul nostro sito allo scopo di migliorarne le funzionalità.
I marketing cookies possono essere impostati sul nostro sito dai nostri partner pubblicitari allo scopo di creare un profilo di tuo interesse e proporti contenuti pubblicitari rilevanti su altri siti.
Google Analytics & Google Tag Manager
_gid, _ga_<container-id>, _ga, _gat_gtag_<container-id>
Google Ads & DoubleClick
test_cookie, _gcl_au
Meta Pixel
_fbp
Crazy Egg
cebsp_, _ce.s, _ce.clock_data, _ce.clock_event, cebs
lidc, AnalyticsSyncHistory, UserMatchHistory, bcookie, li_sugr, ln_or