How to prepare for using the tpPLC Utility (new logo)
TL-WPA4220 , TL-WPA7519 KIT , TL-WPA8730 KIT , TL-WPA4220KIT , TL-PA7020 KIT , TL-PA9020 KIT , TL-WPA8630P KIT , TL-WPA7510 KIT , TL-PA8015P KIT , TL-WPA4226 KIT , TL-PA7020P KIT(FR) , TL-PA4015PT KIT , TL-PA7020P KIT , TL-PA8010 KIT , TL-PA4010P TKIT , TL-PA4010P KIT , TL-WPA7617 , TL-PA8035P , TL-WPA7617 KIT , TL-PA9020P KIT , TL-PA7027P KIT , TL-WPA4226T KIT , TL-WPA7619 KIT , TL-WPA4220 KIT , TL-WPA8635P KIT , TL-PA7010 KIT , TL-PA8010P KIT , TL-PA7010P KIT(FR) , TL-WPA4235P KIT , TL-WPA9610 KIT , TL-PA7017P KIT , TL-PA4015PKIT , TL-PA4020PT KIT , TL-PA7017 KIT , TL-WPA4221 KIT , TL-PA9025P KIT , TL-PA4020P KIT , TL-PA4015P , TL-PA9025P , TL-WPA8631P , TL-WPA7517 , TL-WPA8630 KIT , TL-WPA8630 KIT(FR)( V1 V2 ) , TL-PA8035P KIT , TL-PA717 KIT( V4 ) , TL-WPA4230P KIT , TL-PA4025P KIT , TL-WPA4227KIT( V1 ) , TL-PA4022P KIT( V3 ) , TL-PA7010P KIT , TL-WPA1300P KIT , TL-PA4010 KIT , TL-WPA8635P( V2 ) , TL-PA4016P KIT , TL-PA411KIT( V3 V4 ) , TL-WPA4530 KIT , TL-WPA8631P KIT , TL-WPA8630P( V2 V2.10 ) , TL-WPA7817 KIT , TL-PA4010 , TL-PA8033P KIT( V2 ) , TL-WPA4225 KIT , TL-PA8030P KIT , TL-PA711 KIT( V3 ) , TL-PA8010P , TL-WPA7517 KIT
Recent updates may have expanded access to feature(s) discussed in this FAQ. Visit your product's support page, select the correct hardware version for your device, and check either the Datasheet or the firmware section for the latest improvements added to your product. Please note that product availability varies by region, and certain models may not be available in your region.
1. Download the utility and install it on your computer.
• For Windows Users
a) Go to your product's support page at https://www.tp-link.com and download the tpPLC Utility package (You may type in the model No. on the search bar).

b) Double-click the package and follow the setup wizard to install the utility.
Note: WinPcap (version 4.1.2 or higher) is required for the tpPLC Utility. If it is not found on your computer, the wizard will guide you to install it.
c) Wait until the installation is completed. The following icon will appear on your desktop.

d) Double-click the tpPLC icon to open the utility.
• For Mac Users
a) Go to the product support page at http://www.tp-link.com and download the tpPLC Utility package.
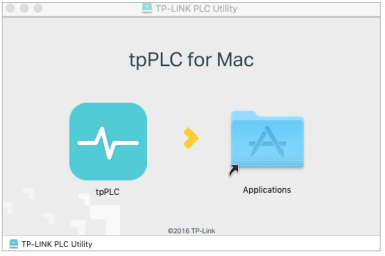
b) Double-click the package and drag tpPLC to Applications.

c) Find the utility in Launchpad or Applications. Click to open it.

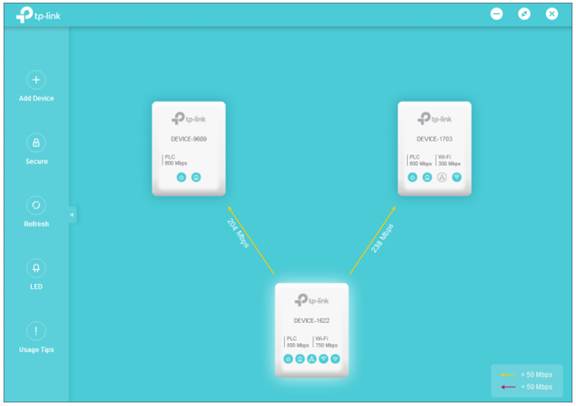
2. Simply connect your computer to a powerline device via an Ethernet cable or wirelessly. Then the utility will show you the powerline network, with the local powerline device at the bottom and remote powerline devices above it.
Tips: You can click each device to view the current powerline data rates. If you see a red line between two devices, move either device to another location and check the rates again.

Get to know more details of each function and configuration please go to Download Center to download the manual of your product.
Questa faq è utile?
Your feedback helps improve this site.
What’s your concern with this article?
- Dissatisfied with product
- Too Complicated
- Confusing Title
- Does not apply to me
- Too Vague
- Other
Grazie
We appreciate your feedback.
Click here to contact TP-Link technical support.
Questo sito utilizza i cookies per migliorare l'esperienza di navigazione, analizzare le attività online e offrire agli utenti una migliore user experience. Puoi disattivare o rifiutare il loro utilizzo in qualunque momento. Per maggiori informazioni consulta la nostra privacy policy .
Questo sito utilizza i cookies per migliorare l'esperienza di navigazione, analizzare le attività online e offrire agli utenti una migliore user experience. Puoi disattivare o rifiutare il loro utilizzo in qualunque momento. Per maggiori informazioni consulta la nostra privacy policy .
Basic Cookies
Questi cookies sono necessari per il corretto funzionamento del sito e non possono essere disattivati nel tuo sistema.
TP-Link
accepted_local_switcher, tp_privacy_base, tp_privacy_marketing, tp_smb-select-product_scence, tp_smb-select-product_scenceSimple, tp_smb-select-product_userChoice, tp_smb-select-product_userChoiceSimple, tp_smb-select-product_userInfo, tp_smb-select-product_userInfoSimple, tp_top-banner, tp_popup-bottom, tp_popup-center, tp_popup-right-middle, tp_popup-right-bottom, tp_productCategoryType
Livechat
__livechat, __lc2_cid, __lc2_cst, __lc_cid, __lc_cst, CASID
Youtube
id, VISITOR_INFO1_LIVE, LOGIN_INFO, SIDCC, SAPISID, APISID, SSID, SID, YSC, __Secure-1PSID, __Secure-1PAPISID, __Secure-1PSIDCC, __Secure-3PSID, __Secure-3PAPISID, __Secure-3PSIDCC, 1P_JAR, AEC, NID, OTZ
Analytics e Marketing Cookies
I cookies analitici ci permettono di analizzare le tue attività sul nostro sito allo scopo di migliorarne le funzionalità.
I marketing cookies possono essere impostati sul nostro sito dai nostri partner pubblicitari allo scopo di creare un profilo di tuo interesse e proporti contenuti pubblicitari rilevanti su altri siti.
Google Analytics & Google Tag Manager
_gid, _ga_<container-id>, _ga, _gat_gtag_<container-id>
Google Ads & DoubleClick
test_cookie, _gcl_au
Meta Pixel
_fbp
Crazy Egg
cebsp_, _ce.s, _ce.clock_data, _ce.clock_event, cebs
lidc, AnalyticsSyncHistory, UserMatchHistory, bcookie, li_sugr, ln_or


