
Catalogue
4G Mobile Wi-Fi Features_User Guide
About This Guide
This guide introduces each function of your device and demonstrates how to configure them.
When using this guide, please notice that features of the device may vary slightly depending on the model and software version you have, and on your location, language, and internet service provider. Because each device model supports different frequency bands (2.4GHz, 5GHz, 6GHz), the settings you can configure will also vary. This guide uses M7750 1.0 as an example. All screenshots, images, parameters and descriptions documented in this guide are used for demonstration only.
Conventions
In this guide the following conventions are used:
|
Convention |
Description |
|---|---|
|
Underline |
Underlined words or phrases are hyperlinks. You can click to redirect to a website or a specific section. |
|
Bold |
Contents to be emphasized and texts on the web page are in bold, including the menus, items, buttons and so on. |
|
> |
The menu structures to show the path to load the corresponding page. For example, Settings > System Tools > Firmware Upgrade means the Firmware Upgrade page is under the System Tools menu that is located in the Settings tab. |
|
Note: |
Ignoring this type of note might result in a malfunction or damage to the device. |
|
Tip: |
Indicates important information that helps you make better use of your device. |
More Info
The latest software, management app and utility are available from Download Center at https://www.tp-link.com/support
The Quick Installation Guide can be found where you find this guide or inside the package of the extender.
Operating temperature, storage temperature, and other specifications can be found on the product page at https://www.tp-link.com
TP-Link Community is provided for you to discuss our products and share knowledge at https://community.tp-link.com/
Our Technical Support contact information can be found at the Contact Technical Support page at https://www.tp-link.com/support
Wi-Fi Speed/Coverage Disclaimer
*Maximum wireless signal rates are the physical rates derived from IEEE Standard 802.11 specifications. Actual wireless data throughput and wireless coverage are not guaranteed and will vary as a result of 1) environmental factors, including building materials, physical objects, and obstacles, 2) network conditions, including local interference, volume and density of traffic, product location, network complexity, and network overhead, and 3) client limitations, including rated performance, location, connection, quality, and client condition.
Battery Life Disclaimer
*Battery life estimates obtained through testing in a laboratory setting.
Login
This chapter introduces 3 methods to log in to the web management page. Demonstrations in this guide use the phone web management interfaces, while some use the computer as those functions are only available on the computer’s web management page.
Before login, make sure your device is connected to the Mobile Wi-Fi’s SSID. If not, refer to Chapter 2 for detailed instructions.
This chapter includes the following sections:
- Via Phone Login Entry
- Via PC Login Entry
- Via tpMiFi App
Via Phone Login Entry
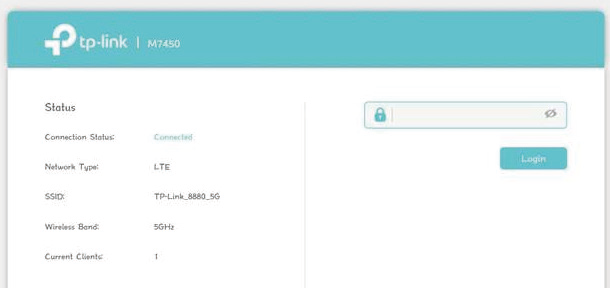
On your smart phone, visit https://tplinkmifi.net, and create a password to log in.

Via PC Login Entry
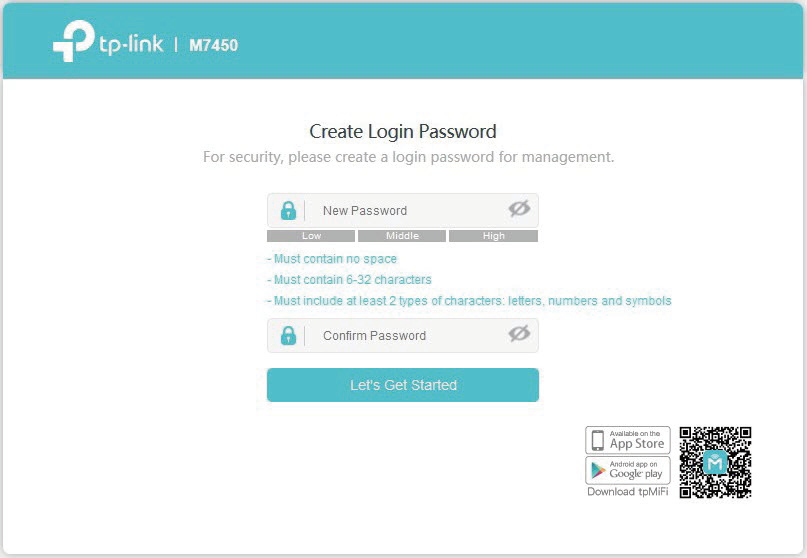
Visit https://tplinkmifi.net from the PC entry, and create a password to log in.

Via tpMiFi App
- Search “tpMiFi“ at the App Store or Google Play Store or simply scan the QR code to download the tpMifi app.


- Connect your device to the Mobile Wi-Fi.
- Launch the tpMiFi app and create a password to log into the device.
Manage Your Data Usage
This chapter explains how to manage the data usage of your Mobile Wi-Fi.
It includes the following sections:
- Track Data Usage
- Limit Data Usage
- Set up Free Data Period
- Enable Mobile Data
- Enable Data Roaming
Track Data Usage
This feature allows you to monitor the amount of data you have used on your Mobile Wi-Fi and revise the displayed data usage as needed.
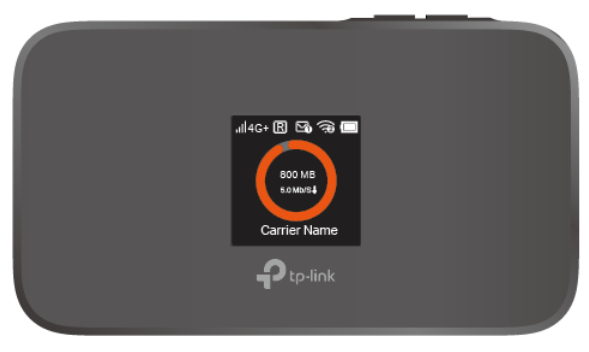
- Check Data Usage on Screen
You can view data usage on the screen of your Mobile Wi-Fi.

- Check Data Usage on the Web Management Page

 Note:
Note:1. Actual data usage may vary from the estimated data usage displayed on the usage meter.
2. The page above displays the monthly data usage if you have enabled Monthly Data Statistics.
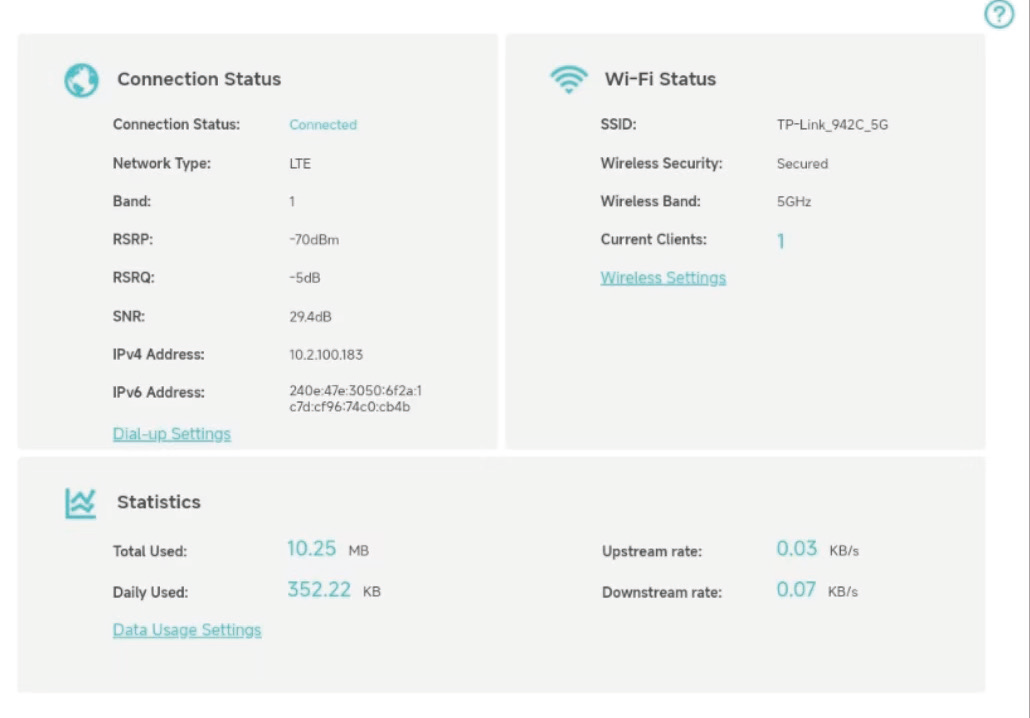
- Visit https://tplinkmifi.net, and log in with the password you set for the Mobile Wi-Fi.
Note: Before login, make sure your device is connected to the Mobile Wi-Fi’s SSID.
- You can view the data usage on the Status page as shown below.
- Visit https://tplinkmifi.net, and log in with the password you set for the Mobile Wi-Fi.
- Check Data Usage via SMS
Your mobile carrier can provide more accurate data usage information. To obtain it, you can send messages to your mobile carrier.

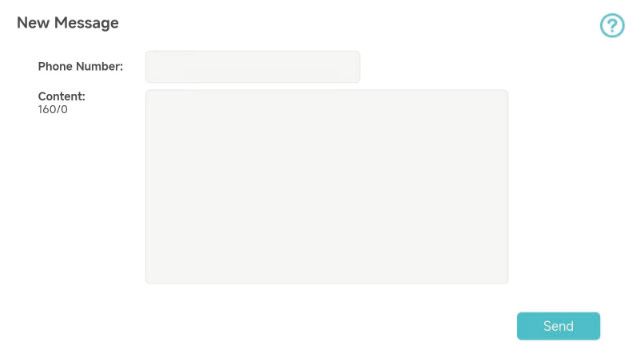
- Visit https://tplinkmifi.net, and log in with the password you set for the Mobile Wi-Fi.
- Go to SMS.
- Tap New Message.
- Create a message to your carrier and then tap Send to send it. And a few minutes later, you will receive a message of data usage information. For the phone number and message content, check from your carrier.
- Revise Data Usage
If the data usage displayed is not accurate, you can modify it as needed.
Note:- Visit https://tplinkmifi.net, and log in with the password you set for the Mobile Wi-Fi.
- Go to Advanced > Data Usage Settings.
- The figure below displays the current data usage. Tap Correct, enter a more accurate value for the data usage.

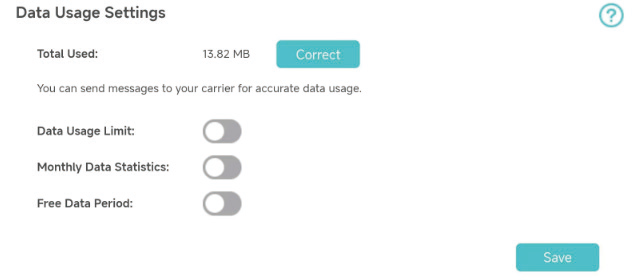
- Tap Save.
- You can obtain the exact data usage from your carrier. Please refer to Check Data Usage via SMS.
- The page above displays the monthly data usage if you have enabled Monthly Data Statistics.
Limit Data Usage
This feature allows you to establish data limits for different data packages so that you can better control your data usage.
- Limit Data Package
I want to:
Limit my data usage so that I will not exceed my data package (2GB). I wish to:
How can I do that ?
Done!
Now your data usage is limited according to your settings.
- Receive an alert when the data usage reaches 1.8GB (90% of the allowance).
- Disable the internet access automatically when it reaches the allowance (2GB).
- Visit https://tplinkmifi.net, and log in with the password you set for the Mobile Wi-Fi.
- Go to Advanced > Data Usage Settings.
- Enable Data Usage Limit.
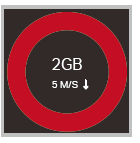
- Enter 2 in Total Allowance field and specify GB as the unit of measure. To inform you that your data usage has reached the allowance, the internet access will be disabled automatically and the data usage circle on the Home Screen will turn to red
 :
:  .
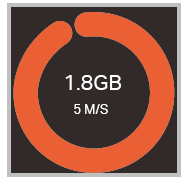
. - Set 90 as the Usage Alert percentage. To inform you that your data usage has reached the alert value, the data usage circle on the Home Screen will turn to orange:

 .
.

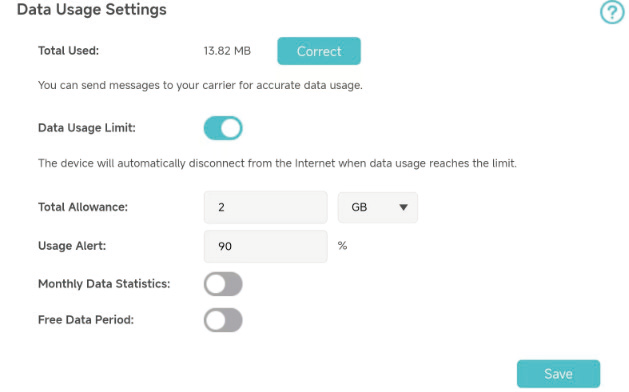
- Tap Save.
- Limit Monthly Data Usage
I want to:
Limit my data usage so that I will not exceed my monthly data package (800MB). I wish to:
How can I do that?
Done!
Now your data usage is limited according to your settings.
- Receive an alert when the data usage reaches 720MB (90% of the allowance);
- Disable the internet access automatically when it reaches the allowance (800MB).
- Visit https://tplinkmifi.net, and log in with the password you set for the Mobile Wi-Fi.
- Go to Advanced > Data Usage Settings.

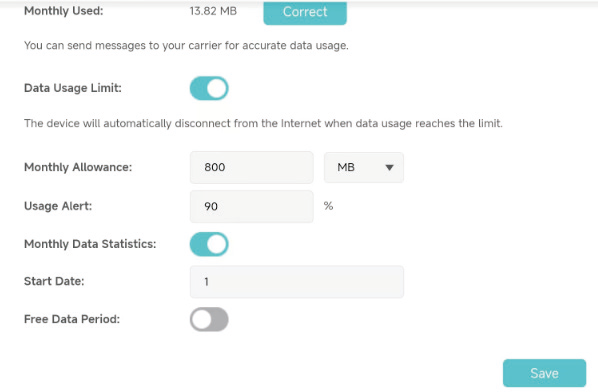
- Enable Data Usage Limit and Monthly Data Statistics.
- Enter 800 in Monthly Allowance field and specify MB as the unit of measure. To inform you that your data usage has reached the allowance, the Internet access will be disabled automatically and the data usage circle

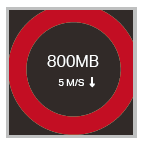 on the Home Screen will turn to red.
 - Set 90 as the Usage Alert percentage. To inform you that your data usage has reached the alert value, the data usage circle

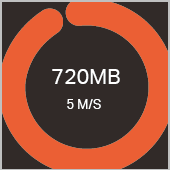 on the Home Screen will turn to orange.
 - Enter the Start Date.
Note: The monthly data usage statistics will be cleared and recounted from the day you have set every month.
- Tap Save.
Set up Free Data Period
In the free data period, you will not be charged for the data by the mobile carrier. If your carrier has provided this data service to you, you can specify the free data period during which the data usage will not be counted for data alert and limitation.
- Visit https://tplinkmifi.net from the PC entry, and log in with the password you set for the Mobile Wi-Fi.
- Go to Advanced> Data Usage Settings.
- Enable Free Data Period.
- Enter the Start Time and End Time of Free Data Period.

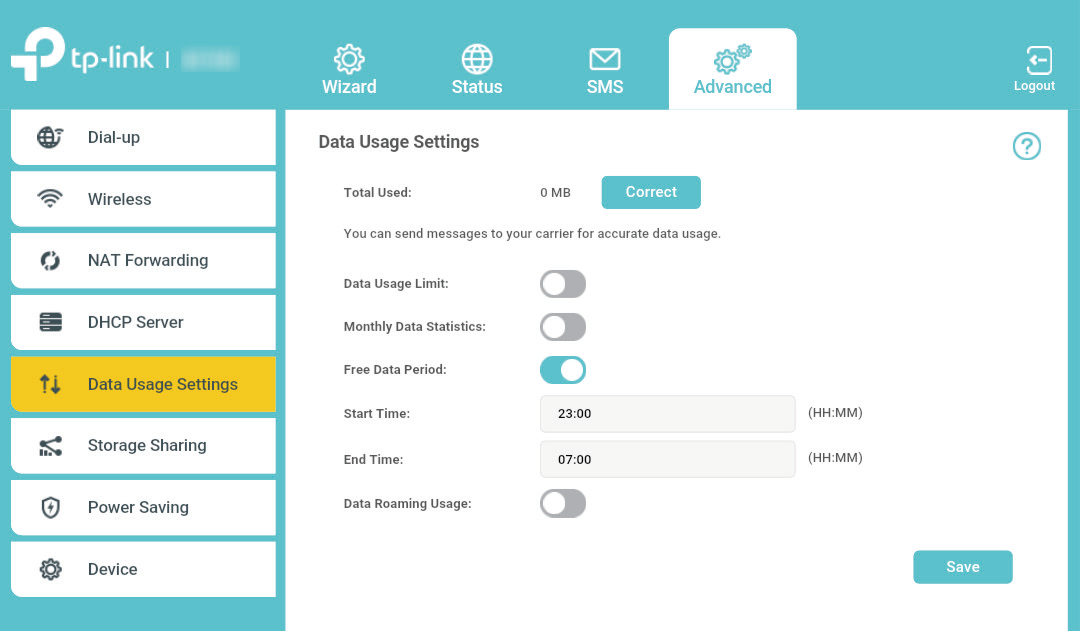
- Click Save.
Enable Mobile Data
With Mobile Data (also known as cellular data) enabled, devices connected to the Mobile Wi-Fi can access the internet. This feature is enabled by default.
- Visit https://tplinkmifi.net, and log in with the password you set for the Mobile Wi-Fi.
- Go to Advanced > Dial-up.
- Enable Mobile Data.

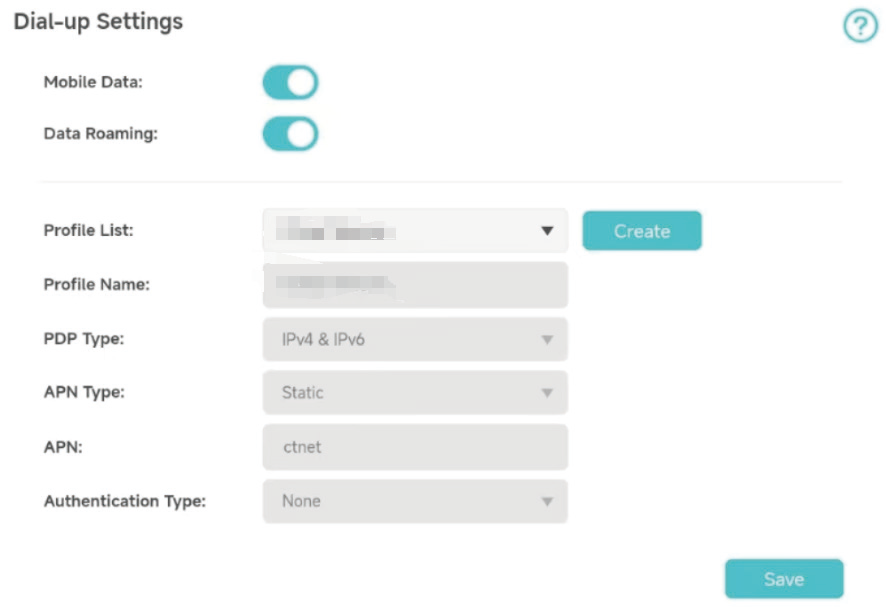
- Tap Save.
Enable Data Roaming
If you are out of the network service area, you can use this feature as needed.
Method One: Via the screen
- Press

 (menu button) and switch to the Data Roaming menu.

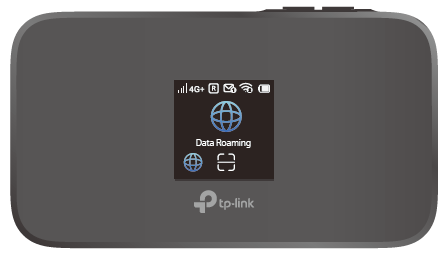
- Press

 (power button) to enter the Data Roaming page.
 - Press menu button and power button to select ON.
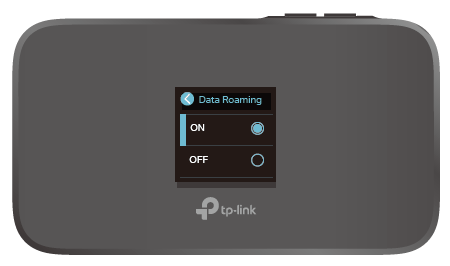

Method Two: Via the web management page
- Visit https://tplinkmifi.net, and log in with the password you set for the mobile Wi-Fi.
- Go to Advanced > Dial-up.
- Enable Data Roaming.
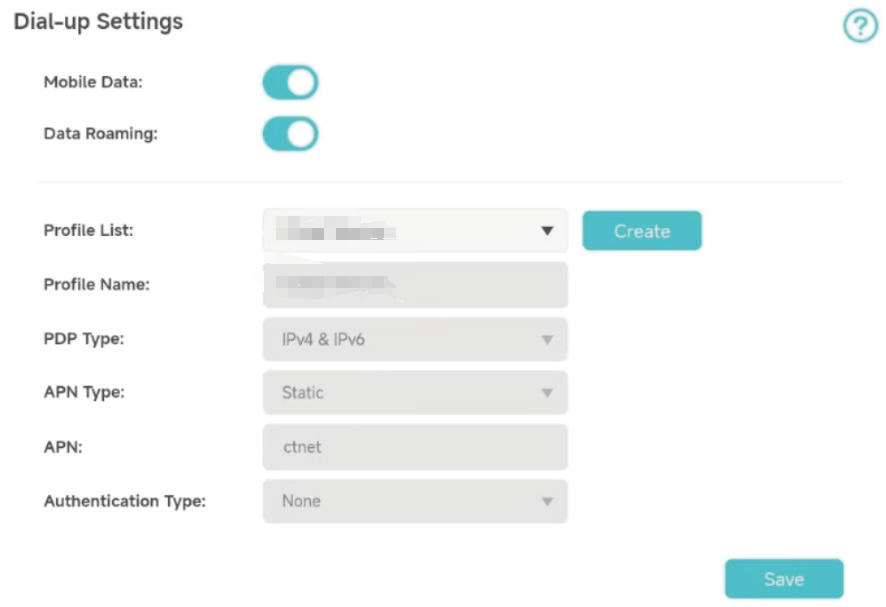
- Tap Save.
Secure Your Network
This chapter explains how to secure your network in various ways. You can change the SSID and wireless password, manage the blacklist and lock your SIM card to safeguard your network.
It includes the following sections:
- Secure Wireless Network
- Block Unwelcome Devices
- Lock SIM Card
Secure Wireless Network
The SSID (network name), wireless password of the Mobile Wi-Fi and security options are preset as default. The default SSID and password can be found on the screen of your Mobile Wi-Fi. You can customize the wireless settings as needed.
- Visit https://tplinkmifi.net, and log in with the password you set for the Mobile Wi-Fi.
- Go to Advanced > Wireless.
To change the SSID and wireless password
- Enter a new SSID and wireless password in the Wireless Network Name and Wireless Password fields respectively.

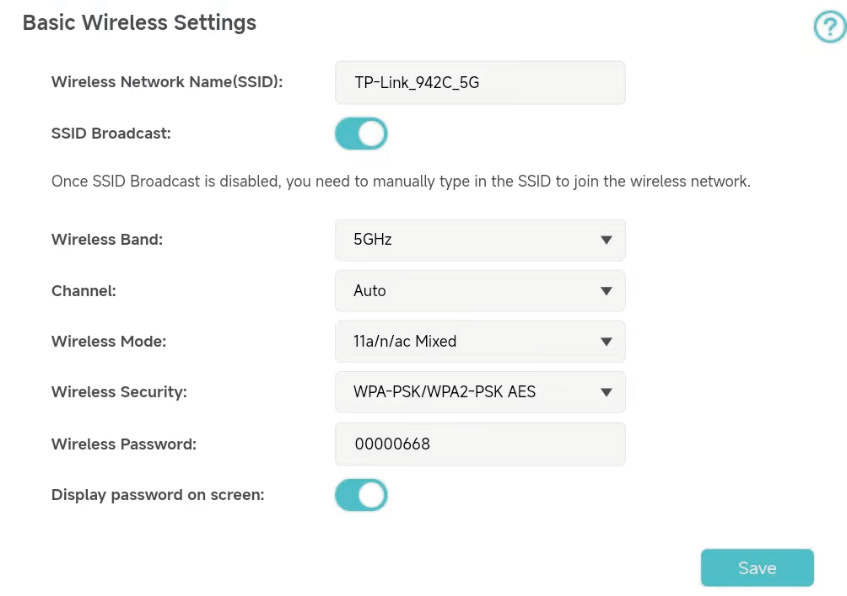
- Tap Save.
To hide the SSID
- Toggle off SSID Broadcast, so the SSID will not be displayed when you scan for wireless networks.


- Tap Save.
 Note:
Note:If the SSID is hidden, it will not be displayed on your wireless device when you scan for local wireless networks. And you need to manually enter the SSID to join the wireless network.
To hide the password on screen
- Toggle off Display password on screen, so the wireless password will not be displayed on the screen of your Mobile Wi-Fi.


- Tap Save.
Block Unwelcome Devices
This feature allows you to restrict unwelcome devices to accessing the wireless network of your Mobile Wi-Fi.
- Visit https://tplinkmifi.net, and log in with the password you set for the mobile Wi-Fi.
- Go to Advanced > Wireless > Online Clients.
- Select the device(s) that you want to block from the Online Clients list.

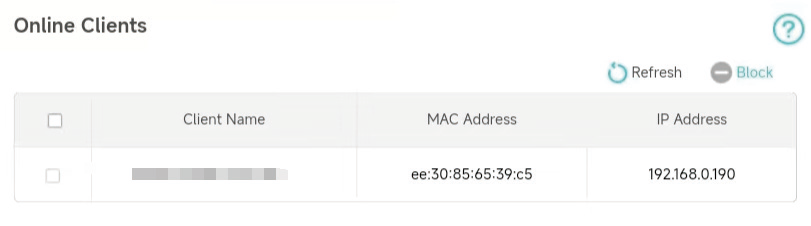
- Tap Block.
- Then you can view your blocked devices in Advanced > Wireless > Black List. To remove a device from the block list, select it and tap Resume.
Lock SIM Card
This feature allows you to lock your SIM card with the PIN lock. Once the PIN lock is enabled, every time you start your Mobile Wi-Fi with your SIM card inserted, you need to enter the PIN code to access the internet.
If you don’t wish to enter the PIN code on your Mobile Wi-Fi, you can enable the Auto-unlock PIN upon Power-on function. You will still have to enter the PIN code on other devices to unlock this SIM card, however.
- Visit https://tplinkmifi.net, and log in with the password you set for the Mobile Wi-Fi.
- Go to Advanced > Dial-up > PIN Management.
To enable the PIN lock
- Visit https://tplinkmifi.net, and log in with the password you set for the Mobile Wi-Fi.
- Go to Advanced > Dial-up > PIN Management. Select Enable from the PIN Management list.
- Enter the PIN code of your SIM card.

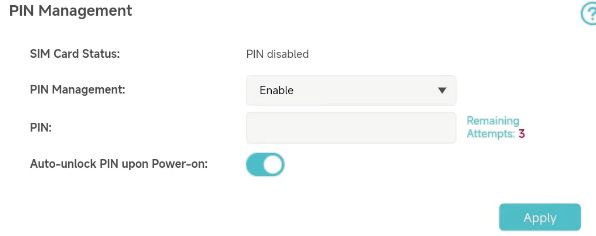
- Tap Apply.
- Visit https://tplinkmifi.net and then enter the PIN code to access the internet every time you start your Mobile Wi-Fi.
Note:
- The PIN code of your SIM card is preset by your carrier and usually can be found on the package of the SIM card.
- After 3 failed verification attempts, the SIM card will be locked, and you will need to enter the PUK code to unlock it. The PUK code can usually be found on the package of the SIM card, too.
To reset PIN code
- Visit https://tplinkmifi.net from the PC entry, and log in with the password you set for the Mobile Wi-Fi.
- Go to Advanced > Dial-up > PIN Management.
- Select Enable from the drop-down list if SIM Card Status is disabled. Enter the PIN code of your SIM card, and then click Apply.
- Select Modify from the drop-down list.
- Enter the current PIN code and a new PIN code twice to complete the resetting.
Note: The new PIN code must consist of 4-8 digits.

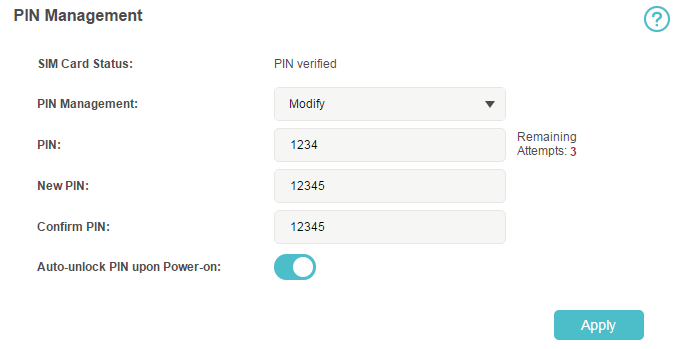
- Click Apply.
- Use the new PIN code for future PIN verifications.
To enable Auto-unlock PIN upon Power-on
- Enable Auto-unlock PIN upon Power-on.

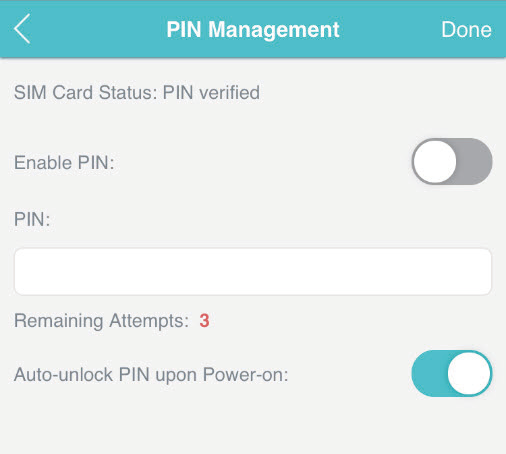
- Once enabled, you can save the trouble of entering the PIN code on your Mobile Wi-Fi.
Share Files on SD Card
This chapter describes how to share and access files on an SD card via Wi-Fi and via a USB cable.
It contains the following sections:
- Access via Wi-Fi Mode
- Access via USB Mode
Access via Wi-Fi Mode
You can share files on an SD card via Wi-Fi mode so clients connected to the Mobile Wi-Fi can access the SD card.
- Visit https://tplinkmifi.net, and log in with the password you set for the Mobile Wi-Fi.
- Go to Advanced > Storage Sharing.
- Select By Wi-Fi for Access Mode.

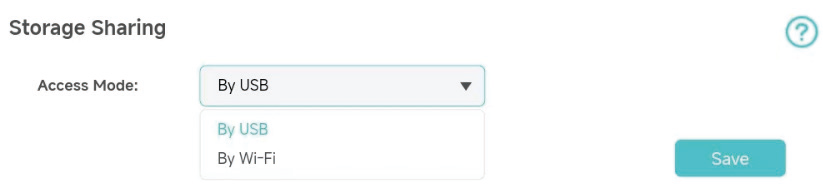
- Select Signed or Anonymous for Login Permission. If you have selected Signed, please specify Username and Password for the access (admin by default).

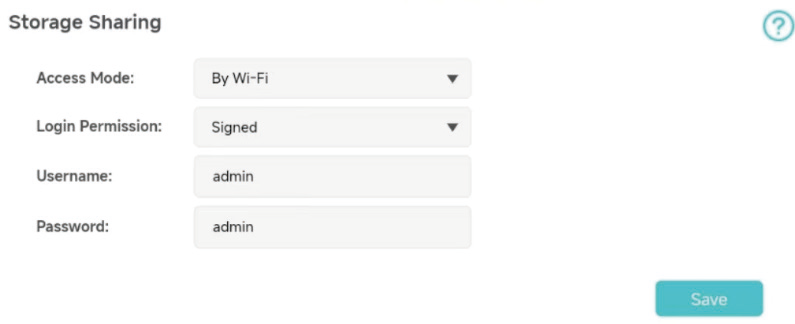
- Tap Save.
- Access the storage sharing:
To access via an Android or iOS device
- Search tpMiFi at the App Store Store or Google Play Store or simply scan the QR code to download it.


- Connect your mobile device to the Mobile Wi-Fi.
- Launch tpMiFi and enter the password you set for the Mobile Wi-Fi.
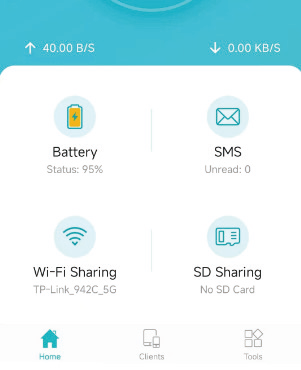
- Tap SD Sharing to access the SD card. You can then view, download and upload multimedia files as needed.
To access the SD card via a PC
- Connect your computer to the Mobile Wi-Fi.
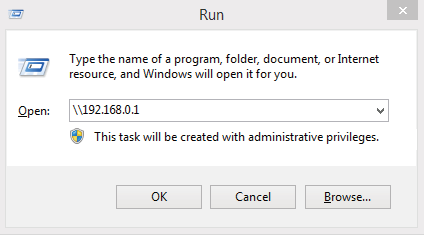
- Open Run and input “\\192.168.0.1“ (by default) or ftp://192.168.0.1. Then click OK to continue.

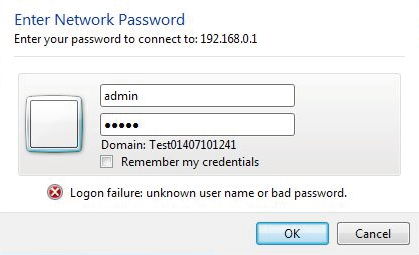
- For anonymous access, you can now access the SD card. For signed access, enter the login username and password in the authentication window and click OK. Then you can access the SD card.

Access via USB Mode
You can connect your computer to the Mobile Wi-Fi via a USB cable to access the SD card directly.
- Visit https://tplinkmifi.net, and log in with the password you set for the Mobile Wi-Fi.
- Go to Advanced > Storage Sharing.
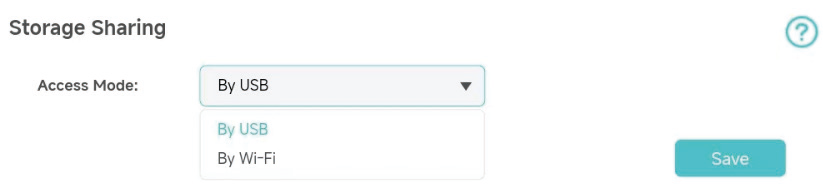
- Select By USB for Access Mode.
- Tap Save.
- Connect your computer to the Mobile Wi-Fi via a USB cable and access the SD card directly.

Customize Your Network
This chapter guides you on how to configure network settings of your Mobile Wi-Fi.
It contains the following sections:
- Specify Network Mode
- Specify Network Band
- Configure Dial-up
- Configure DHCP Server
Specify Network Mode
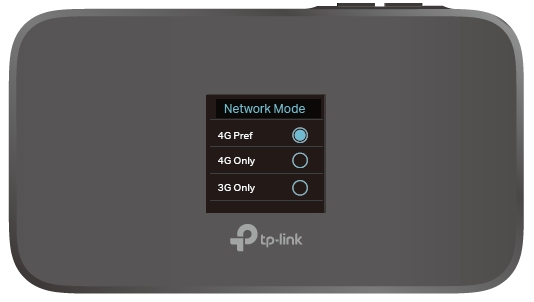
This Mobile Wi-Fi supports three modes of network connection: 4G Preferred, 4G Only and 3G Only. If your SIM card supports WCDMA, select 3G Only; if your SIM card supports FDD-LTE or TDD-LTE, select 4G Preferred or 4G Only as needed. In general, the 4G network is faster than the 3G one.
Method One: Via the screen
- Press

 (menu button) and switch to the Network Mode menu.

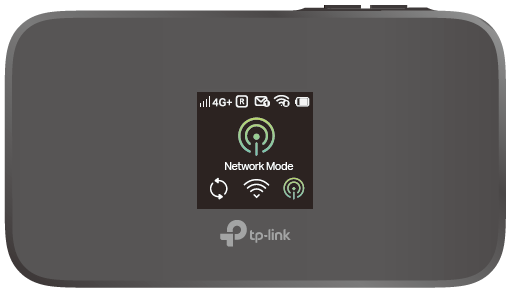
- Press

 (power button) to enter the Network Mode page.
 - Press menu button and power button to select 4G Pref, 4G Only or 3G Only as needed.

Method Two: Via the web management page
- Visit https://tplinkmifi.net, and log in with the password you set for the Mobile Wi-Fi.
- Go to Advanced > Dail-up > Network Settings.
- Select 4G Preferred, 4G Only or 3G Only as needed.

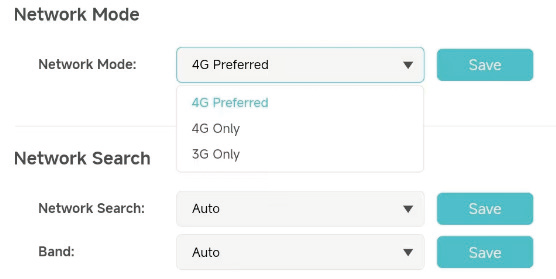
- Tap Save.
Specify Network Band
This Mobile Wi-Fi supports 2.4GHz and 5GHz wireless bands. In general, the 5GHz band performs better, but covers a smaller area .
 Note: If you have specified 5GHz for Wireless Band, devices that only support 2.4GHz can’t connect to the Mobile Wi-Fi.
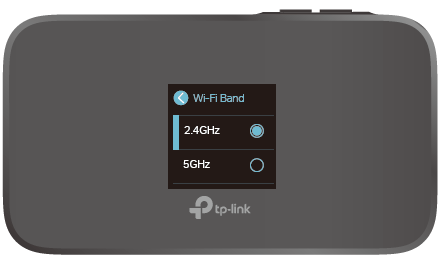
Method One: Via the screen
- Press
 (menu button) and switch to the Wi-Fi Band menu.

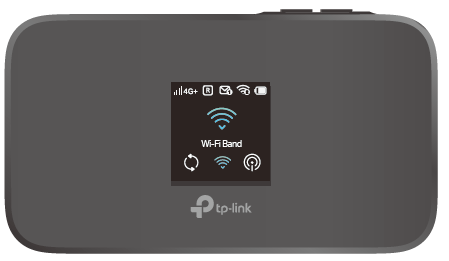
- Press (power button) to enter the Wi-Fi Band page.
- Press menu button and power button to specify 2.4GHz or 5GHz as needed.

Method Two: Via the web management page
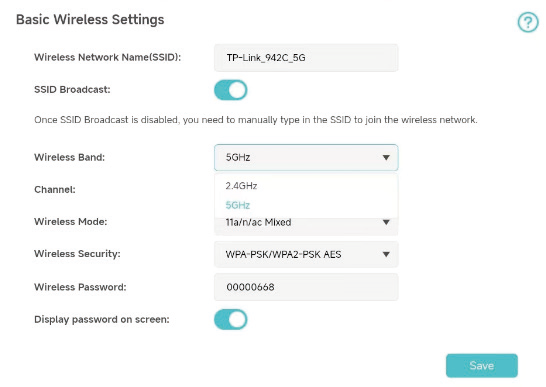
- Visit https://tplinkmifi.net, and log in with the password you set for the Mobile Wi-Fi.
- Go to Advanced > Wireless.
- Specify 2.4GHz or 5GHz for Wireless Band of your Mobile Wi-Fi.

- Tap Save.
Configure Dial-up
Configure Dial-up Settings
If you are in a location beyond your mobile carrier’s service area, you may need to configure the dial-up settings to access the internet provided by a local mobile carrier.
- Visit https://tplinkmifi.net, and log in with the password you set for the Mobile Wi-Fi.
- Go to Advanced > Dial-up.
- Tap Create to build a dial-up profile.
- Specify a name for the profile and fill in the parameters provided by your carrier.

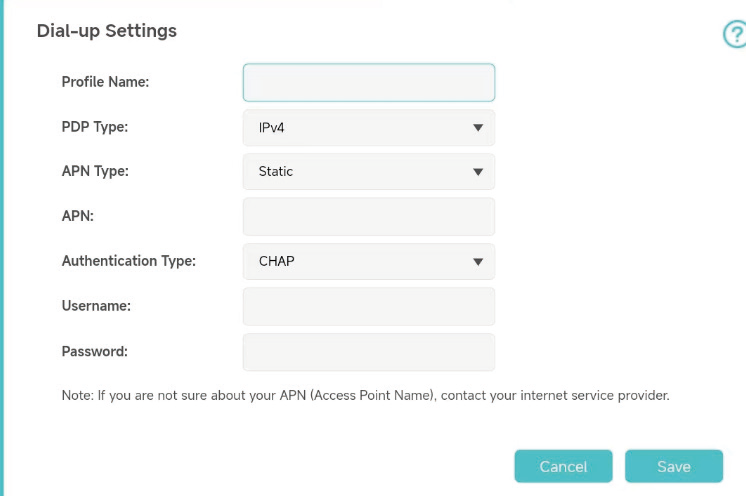
- Tap Save and then tap Yes in the pop-up to apply the new profile.
Note:
- Mobile Data is enabled by default. If disabled, internet access is prohibited.
- Data Roaming is disabled by default. If enabled, data service is allowed when roaming.
- You can click View Profile details to check the current profile. If any parameter is wrong, you can click Create to build a new one.
Configure Network Search
The Mobile Wi-Fi provides two types of network connection: Auto and Manual.
- Auto: The Mobile Wi-Fi will automatically establish internet connection when it is started.
- Manual: When you have selected Manual, click Search and the Mobile Wi-Fi will scan for mobile networks. You can choose to connect to a network with better performance. The mobile carrier providing the network must be or have cooperation with your SIM card provider.
1. Visit https://tplinkmifi.net from the PC login entry, and log in with the password
you set for the Mobile Wi-Fi.
2. Go to Advanced > Dial-up > Network Settings.
3. Select Auto or Manual for Network Search as needed.

4. Click Save or Search (when you select Manual).
5. When you select Manual, you need to select a network from the pop-up window and tap Apply.
Configure DHCP Server
The Mobile Wi-Fi acts as a DHCP (Dynamic Host Configuration Protocol) server, dynamically assigning TCP/IP parameters to devices from the IP Address pool.
You can change the settings of the DHCP server if necessary.
1. Visit https://tplinkmifi.net from the PC entry, and log in with the password you set for the Mobile Wi-Fi.
2. Go to Advanced > DHCP Server.
3. Enter a new IP address in the IP Address field and leave the Subnet Mask as default. And enter the starting and ending IP addresses in the Start and End IP Address fields respectively.
Note:
The Start and End IP Addresses should be on the same network segment as the IP address you have entered.
If you have changed the IP address of your Mobile Wi-Fi, you should use the new IP address or https://tplinkmifi.net to log in to the web management page.
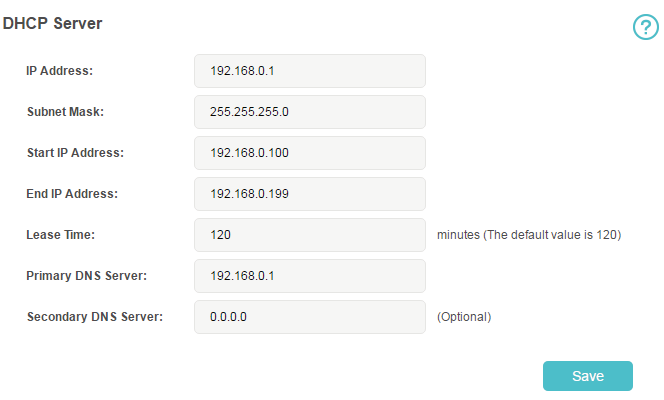
4. Enter the lease time in the Lease Time field. When the lease time expires, the Mobile Wi-Fi will reassign IP addresses.
5. Enter the primary DNS IP address which usually accords with the IP address.
6. Enter the secondary DNS IP address if provided by your carrier.
7. Click Save.
NAT Forwarding
The NAT (Network Address Translation) feature makes devices on the LAN use the same public IP address to communicate with devices on the internet, which protects the local network by hiding IP addresses of the devices. However, it also brings about the problem that an external host cannot initiatively communicate with a specified device on the local network.
With the forwarding feature the Mobile Wi-Fi can penetrate the isolation of NAT and allows devices on the internet to initiatively communicate with devices on the local network, thus realizing some special functions.
The Mobile Wi-Fi supports four forwarding rules. If two or more rules are set, the priority of implementation from high to low is Virtual Servers, Port Triggering, UPNP and DMZ.
It contains the following sections:
- Translate Address and Port by ALG
- Share Local Resources on the Internet by Virtual Servers
- Open Ports Dynamically by Port Triggering
- Make Applications Free from Port Restriction by DMZ
- Make Xbox Online Games Run Smoothly by UPnP
Translate Address and Port by ALG
ALG (Application Layer Gateway) allows customized NAT (Network Address Translation) traversal filters to be plugged into the gateway to support address and port translation for certain application layer “control/data” protocols: FTP, TFTP, H323 etc. Enabling ALG is recommended.
- Visit https://tplinkmifi.net from the PC entry, and log in with the password you set for the Mobile Wi-Fi.
- Go to Advanced > NAT Forwarding > ALG.

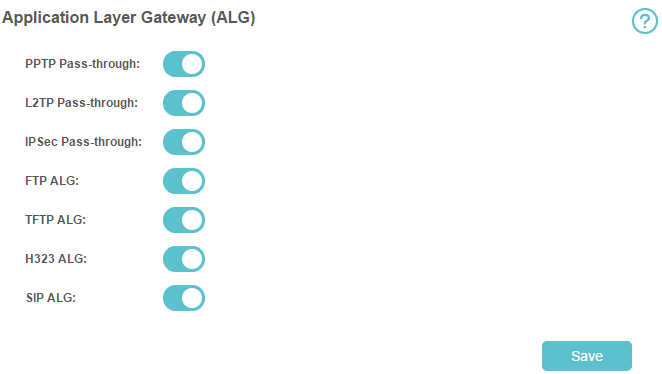
- PPTP Passthrough: If enabled, it allows Point-to-Point sessions to be tunneled through an IP network and passed through the Mobile Wi-Fi.
- L2TP Passthrough: If enabled, it allows Layer 2 Point-to-Point sessions to be tunneled through an IP network and passed through the Mobile Wi-Fi.
- IPSec Passthrough: If enabled, it allows IPSec (Internet Protocol Security) to be tunneled through an IP network and passed through the Mobile Wi-Fi. IPSec uses cryptographic security services to ensure private and secure communications over IP networks.
- FTP ALG: If enabled, it allows FTP (File Transfer Protocol) clients and servers to transfer data via NAT.
- TFTP ALG: If enabled, it allows TFTP (Trivial File Transfer Protocol) clients and servers to transfer data via NAT.
- H323 ALG: If enabled, it allows Microsoft NetMeeting clients to communicate via NAT.
- SIP ALG: If enabled, it allows clients communicate with SIP (Session Initiation Protocol) servers via NAT.
Share Local Resources on the Internet by Virtual Servers
When you build up a server on the local network and want to share it on the internet, Virtual Servers can realize the service and provide it to internet users. At the same time Virtual Servers can keep the local network safe as other services are still invisible from the internet.
Virtual Servers can be used for setting up public services on your local network, such as HTTP, FTP, DNS, POP3/SMTP and Telnet. Different services use different service ports. Port 80 is used in HTTP service, port 21 in FTP service, port 25 in SMTP service and port 110 in POP3 service. Please verify the service port number before the configuration.
I want to:
Share my personal website I’ve built in local network with my friends through the internet.
For example, the personal website has been built on my home PC (192.168.0.100). I hope that my friends on the internet can visit my website in some way. The PC is connected to the Mobile Wi-Fi with the WAN IP address 218.18.232.154.
How can I do that?
- Assign a static IP address to your PC, for example 192.168.0.100.
- Visit https://tplinkmifi.net from the PC entry, and log in with the password you set for the Mobile Wi-Fi.
- Go to Advanced > NAT Forwarding > Virtual Servers.
- Click Add. Click View Existing Applications and select HTTP. The External Port, Internal Port and Protocol will be automatically filled in. Enter the PC’s IP address 192.168.0.100 in the Internal IP field.
- Click Save.

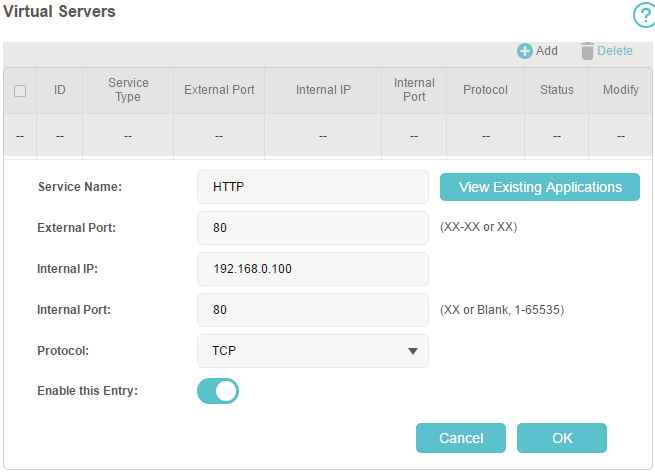
 Tips:
Tips:- It is recommended to keep the default settings of Internal Port and Protocol if you are not clear about which port and protocol to use.
- If the service you want to use is not in the Service Type, you can enter the corresponding parameters manually. You should verify the port number that the service needs.
- You can add multiple virtual server rules if you want to provide several services in the Mobile Wi-Fi. Please note that the External Port should not be overlapped.
Done!
Users on the internet can enter http:// WAN IP (in this example: http://218.18.232.154) to visit your personal website.
Tips:
- The WAN IP should be a public IP address. Users on the internet can also use
http:// domain name to visit the website. - If you have changed the default External Port, you should use http:// WAN IP: External Port or http:// domain name: External Port to visit the website.
Open Ports Dynamically by Port Triggering
Port Triggering can specify a triggering port and its corresponding external ports. When a host on the local network initiates a connection to the triggering port, all the external ports will be opened for subsequent connections. The Mobile Wi-Fi can record the IP address of the host. When the data from the internet return to the external ports, the Mobile Wi-Fi can forward them to the corresponding host. Port Triggering is mainly applied to online games, VoIPs, video players and common applications including MSN Gaming Zone, Dialpad and Quick Time 4 players, etc.
Follow the steps below to configure the Port Triggering rules:
- Visit https://tplinkmifi.net from the PC entry, and log in with the password you set for the Mobile Wi-Fi.
- Go to Advanced > NAT Forwarding > Port Triggering.
- Click Add. Click View Existing Applications, and select the desired application. The Triggering Port, External Port and Protocol will be automatically filled in. The following picture takes application MSN Gaming Zone as an example.
- Click Save.

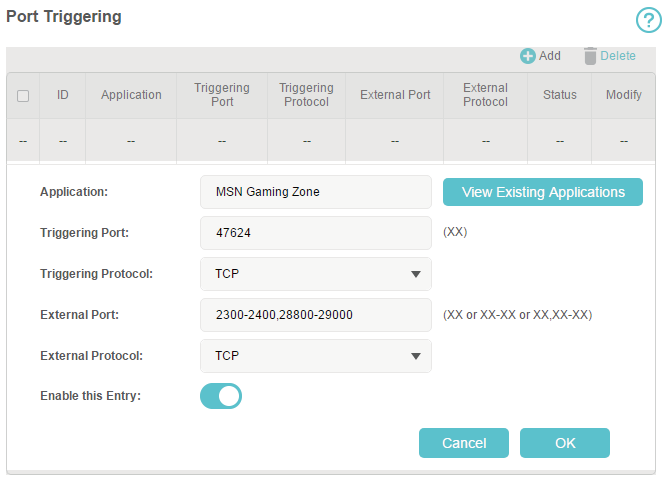
Tips:
- You can add multiple port triggering rules according to your network need.
- The triggering ports can not be overlapped.
- If the application you need is not listed in the Existing Applications list, please enter the parameters manually. You should verify the external ports the application uses first and enter them into External Port field according to the format the page displays.
Make Applications Free from Port Restriction by DMZ
When a PC is set to be a DMZ (Demilitarized Zone) host on the local network, it is totally exposed to the internet, which can realize the unlimited bidirectional communication between internal hosts and external hosts. The DMZ host becomes a virtual server with all ports opened. When you are not clear about which ports to open in some special applications, such as IP camera and database software, you can set the PC to be a DMZ host.
 Note:
Note:
When DMZ is enabled, the DMZ host is totally exposed to the internet, which may bring some potential safety hazards. If DMZ is not in use, please disable it in time.
I want to:
Make the home PC join the internet online game without port restriction.
For example, due to some port restriction, when playing the online games, you can login normally but cannot join a team with other players. To solve this problem, set your PC as a DMZ host with all ports open.
How can I do that?
- Assign a static IP address to your PC, for example 192.168.0.100.
- Visit https://tplinkmifi.net from the PC entry, and log in with the password you set for the Mobile Wi-Fi.
- Go to Advanced > NAT Forwarding > DMZ and select Enable DMZ.
- Enter the IP address 192.168.0.100 in the DMZ Host IP Address filed.

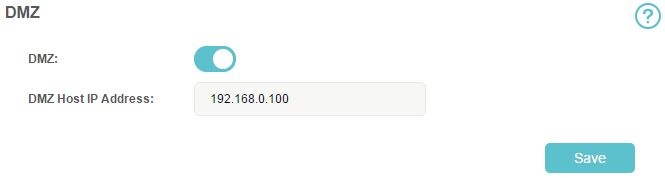
- Click Save.
Done!
The configuration is completed. You’ve set your PC to a DMZ host and now you can make a team to game with other players.
Make Xbox Online Games Run Smoothly by UPnP
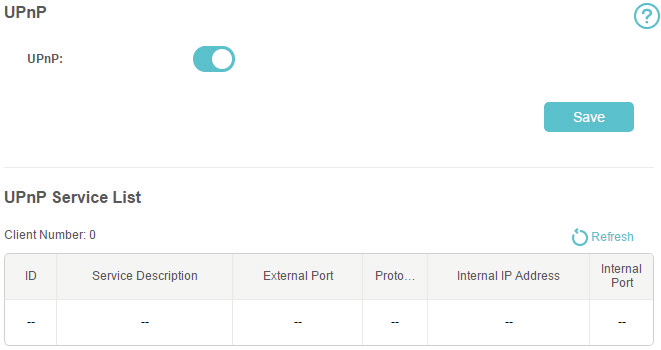
The UPnP (Universal Plug and Play) protocol allows applications or host devices to automatically find the front-end NAT device and send request to it to open the corresponding ports. With UPnP enabled, the applications or host devices on the local network and the internet can freely communicate with each other thus realizing the seamless connection of the network. You may need to enable the UPnP if you want to use applications for multiplayer gaming, peer-to-peer connections, real-time communication (such as VoIP or telephone conference) or remote assistance, etc.
 Tips:
Tips:
- UPnP is enabled by default.
- Only the application supporting UPnP protocol can use this feature.
- UPnP feature needs the support of operating system (e.g. Windows Vista/ Windows 7/ Windows 8, etc. Some of operating system need to install the UPnP components).
For example, when you connect your Xbox to the Mobile Wi-Fi which has connected to the internet to play online games, UPnP will send request to the Mobile Wi-Fi to open the corresponding ports allowing the following data penetrating the NAT to transmit. Therefore, you can play Xbox online games without a hitch.
If necessary, you can follow the steps to change the status of UPnP.
- Visit https://tplinkmifi.net from the PC entry, and log in with the password you set for the Mobile Wi-Fi.
- Go to Advanced > NAT Forwarding > UPnP and toggle on or off according to your needs.

Manage Your Mobile Wi-Fi
This chapter presents how to manage and maintain your Mobile Wi-Fi.
It includes the following sections:
- Save the Mobile Wi-Fi’s Power
- Change Login Password
- Set Up System Time
- Restore Configuration Settings
- Update the Firmware
- Update ISP Parameters
- USSD
- System Log
Save the Mobile Wi-Fi’s Power
The Power Saving feature allows you to slow down the power consumption of your Mobile Wi-Fi, by adjusting the Wi-Fi range or enabling the Wi-Fi Auto-disable Time feature.
Method One: Via the screen
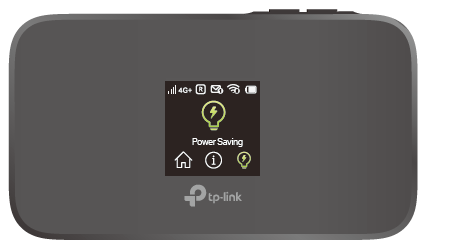
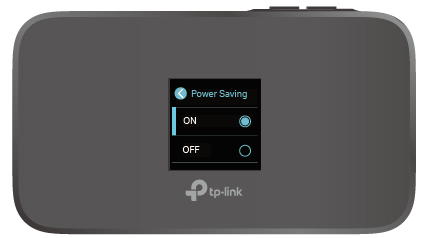
By enabling Power Saving on the screen, the Wi-Fi range will be medium and Wi-Fi Auto-disable time will be 10 minutes.
- Press
 the menu button and switch to the Power Saving menu.

- Press
 the power button to enter the Power Saving page.
 - Press
 the menu button and menu button to select ON.

Method Two: Via the web management page
- Visit https://tplinkmifi.net, and log in with the password you set for the Mobile Wi-Fi.
- Go to Advanced > Power Saving.
To set Wi-Fi Range
- Enable Power Saving Mode.
- Select Long, Medium or Short from the Wi-Fi Range drop-down list.

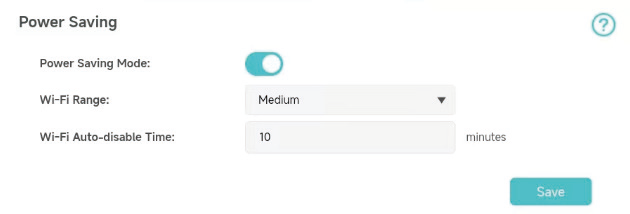
 Note: The shorter the Wi-Fi Range is, the less power your Mobile Wi-Fi uses.
 - Tap Save.
- Tap Restart Wi-Fi on the pop-up to make the configurations take effect, and then reconnect to the Wi-Fi after it restarts.
To set Wi-Fi Auto-disable Time
- Enable Power Saving Mode.
- Specify the Wi-Fi Auto-disable Time.

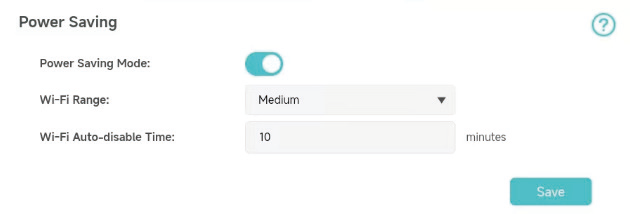
- Tap Save. If there are no devices connected to the Mobile Wi-Fi for the time your specified, the Wi-Fi will be disabled automatically.
Note: To resume the Wi-Fi, press the Power Button or the Menu Button.
Change Login Password
This feature allows you to change your login password of the web management page.
- Visit https://tplinkmifi.net, and log in with the password you set for the Mobile Wi-Fi.
- Go to Advanced > Device > Account Management.
- Enter the current password. Then enter the new password twice (case-sensitive) and tap Save.

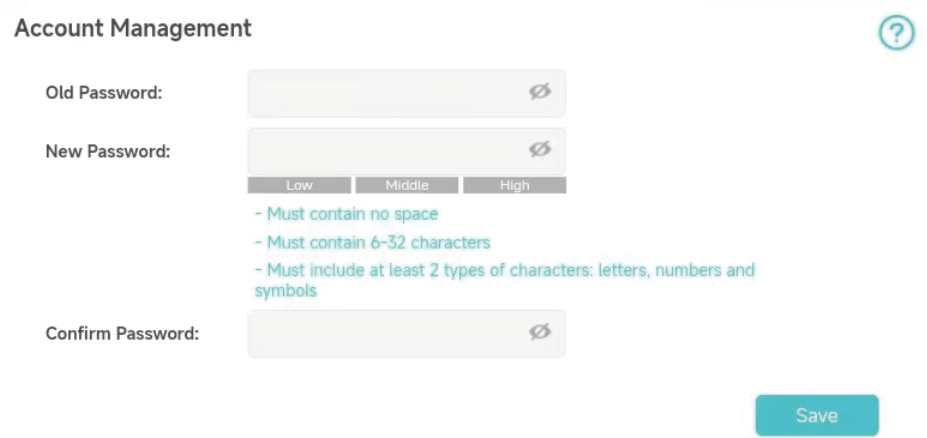
- Use the new password for future logins.
Set Up System Time
The system time you configure here will be used for time-based functions.
Note: Make sure your Mobile Wi-Fi has access to the internet. Otherwise, it can not synchronize the current time.
- Visit https://tplinkmifi.net, and log in with the password you set for the mobile Wi-Fi.
- Go to Advanced > Device > Time Settings.
- Select your local Time Zone from the drop-down list.

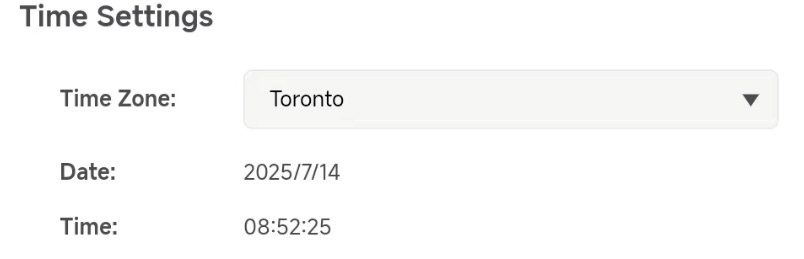
- Tap Save.
Restore Configuration Settings
The Factory Defaults feature allows you to restore your Mobile Wi-Fi to its factory defaults. After you restore your Mobile Wi-Fi, all previous settings will be cleared and you have to reconfigure them.
Method One: Via the Mobile Wi-Fi
With the Mobile Wi- Fi powered on, remove the cover. Use a pin to press and hold the Reset button until the “Power Off” appears on the screen.
Method Two: Via the web management page
- Visit https://tplinkmifi.net from the PC entry, and log in with the password you set for the Mobile Wi-Fi.
- Go to Advanced > Device > Factory Defaults.
- Click Restore.


- Wait a few minutes for the restore to complete and the Mobile Wi-Fi to restart.
Note: During the resetting process, do not power off the Mobile Wi-Fi.
Update the Firmware
TP-Link is committed to improving product features, giving you a better network experience. We will inform you through the screen and web management page if there’s any newly released update firmware. Also, you can download it from the Support page of our website www.tp-link.com.
Note:
- Make sure the latest firmware file is matched with the hardware version (as shown in the download section of the Support page).
- Make sure that you have a stable connection between the Mobile Wi-Fi and your computer.
- Do NOT power off the Mobile Wi-Fi during the firmware update and make sure it has sufficient power.
Method One: Via the screen
- When a new version of firmware is available, we will inform you through the software updates screen. Press
 the menu button to locate the Update entry and then press
  the power button to update your Mobile Wi-Fi.

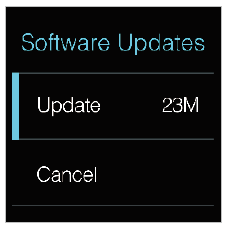
- Wait a few minutes for the update to complete and the Mobile Wi-Fi to restart.
Method Two: Via the web management page
To update the firmware locally
- Download the latest firmware file for your Mobile Wi-Fi from our website
www.tp-link.com. - Visit https://tplinkmifi.net from the PC entry, and log in with the password you set for the Mobile Wi-Fi.
- Go to Advanced > Device > Firmware Update.
- Select Update via the local server, click Browse to locate the downloaded file, and then click Update.

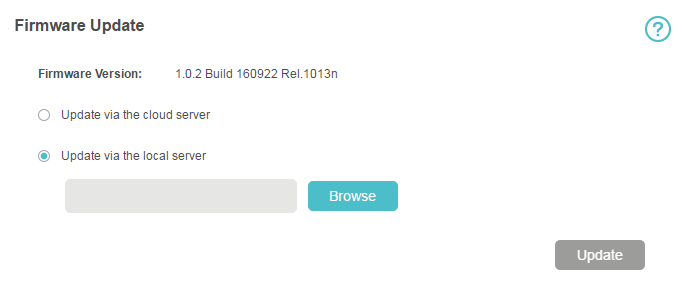
- Wait a few minutes for the update to complete and the mobile Wi-Fi to restart.
To update the firmware online
- Visit https://tplinkmifi.net from the PC entry, and log in with the password you set for the Mobile Wi-Fi.
- Go to Advanced > Device > Firmware Update.
- Select Update via the cloud server.
- Click Update.

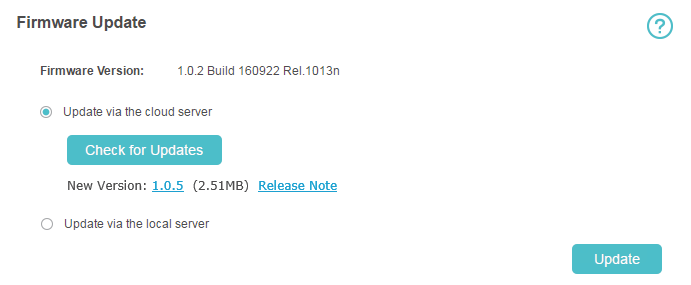
- Wait a few minutes for the update to complete and the Mobile Wi-Fi to restart.
Note: To download the latest firmware file, you can also click the New Version number, such 1.0.5 in the page above. To view update details, click Release Note.
Update ISP Parameters
You can update the ISP information.
- Download the latest ISP update file from the Support page at
www.tp-link.com. - Visit https://tplinkmifi.net from the PC entry, and log in with the password you set for the Mobile Wi-Fi.
- Go to Advanced > Dial-up > ISP Update.
- Click Browse to locate the downloaded file.
- Click Update.
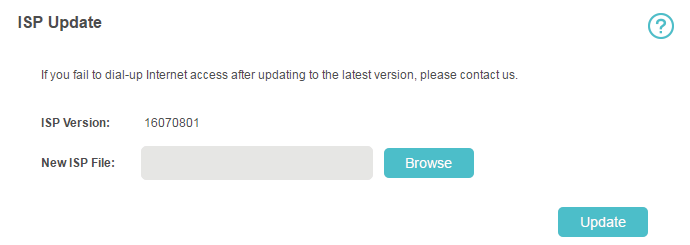

USSD
Unstructured Supplementary Service Data(USSD) allows you to query various information, such as balance from your mobile carrier by sending short codes.
Note: USSD request can’t be sent in the 4G Only mode. You can go to Advanced > Network Settings to change the mode.
- Visit https://tplinkmifi.net from the PC entry, and log in with the password you set for the Mobile Wi-Fi.
- Go to Advanced > Dial-up > USSD.
- Enter USSD request codes, click Send and wait for your mobile carrier’s response.
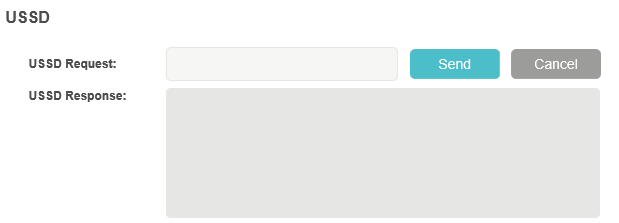

 Tips:
Tips:
- Please contact with your mobile carrier to obtain the USSD request code.
- The USSD reponse can be a menu and you can refer to it to obain the information you need.
System Log
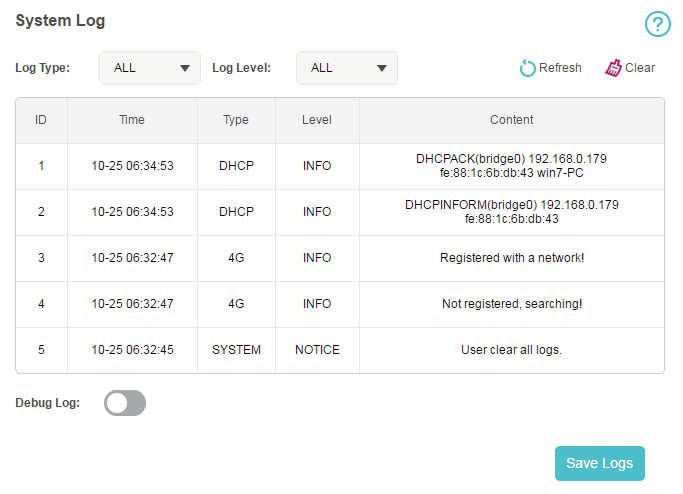
When the Mobile Wi-Fi does not work normally, you can save the system log and send it to our technical support for troubleshooting.
- Visit https://tplinkmifi.net from the PC entry, and log in with the password you set for the Mobile Wi-Fi.
- Go to Advanced > Device > System Log.
To save the system logs locally
Click Save Logs to save the logs to your local device.

To debug logs
The Debug Log feature can save logs for specific troubleshooting. This function should be enabled under the requirement of our technical support.
- Insert an SD card of at least 100MB storage in your Mobile Wi-Fi.
- Put the file provided by our technical support in the SD card.
- Go to the Advanced > Storage Sharing and set By Wi-Fi as Access Mode.
- Enable Debug Log.
- Click Save Logs.
- Visit the SD card and send the saved files to our technical support.


Note: Do not remove the SD card or switch the storage sharing mode when using this function.