
TP-Link Speed Test Guide: How to Test Your Router's Wi-Fi and Wired Performance
This guide walks through how to accurately perform a TP-Link router speed test, including identifying environmental interference, running a comparison test between wired and wireless clients, and configuring router settings to optimize results. This guide applies to most TP-Link broadband access products. Note that it does not apply if your Speedtest tool comes built into the device itself.
Key Takeaways
- Position your test device at the same height as the router's antenna and keep them aligned. Misalignment will skew your wireless speed test results.
- For accurate TP-Link speed test results, connect a computer to the router via Ethernet cable and a second device wirelessly. This lets you compare wired vs. Wi-Fi performance side by side.
- Before running a speed test, close all applications on the test device that use network resources, and restore the router to factory settings to eliminate configuration variables.
- Nearby Wi-Fi networks are a major source of interference. Use the inSSIDer tool to identify the number of competing networks on your channel before testing.
- For 2.4 GHz testing, select the HT40 bandwidth when interference is low. For 5GHz, HT80 is recommended.
- Before running a TP-Link Wi-Fi speed test, ensure Quality of Service (QoS) and Bandwidth Control are both disabled in the router management interface, and confirm NAT is enabled with the MTU value at its default setting.
Before You Begin
- This Article Applies to TL-WR841N, TL-WR842N, TL-WR743ND, more All broadband access products which are low-speed on Speedtest.
- This article is not relevant to you if you have the following condition: Your Speedtest tool comes with the device itself.
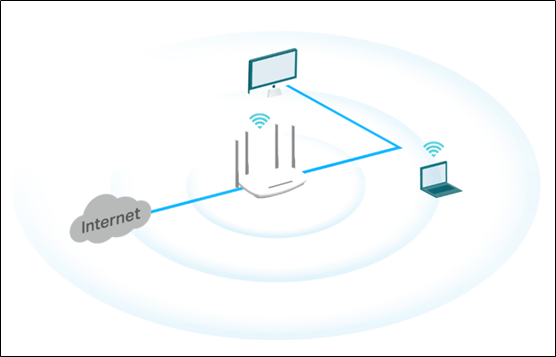
- Please connect your computer to a TP-Link router by cable, and connect a laptop/PC/phone to a TP-Link router by wireless connection.
- Close all applications on your test device that use network resources before running the speed test.
- Install the inSSIDer app and any network analysis tools on your test device before you begin.
- Restore the router to factory settings.
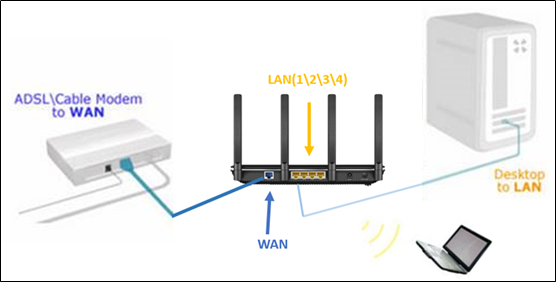
How to Run a TP-Link Speed Test
Step 1: Check Your Environment
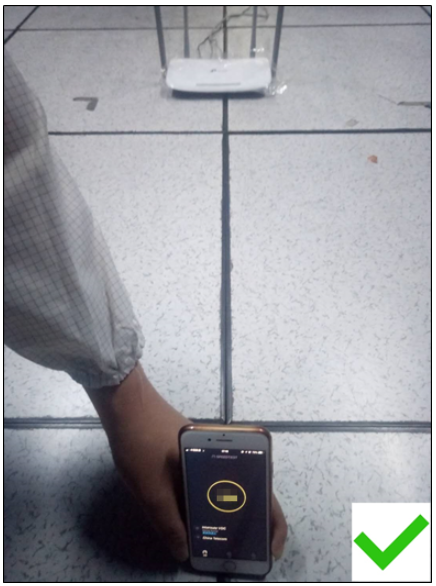
1. Troubleshoot the placement of the router’s antenna relative to the receiver
The correct placement of your accompanying device should be positioned as high as the router’s antenna and aligned.
Note: Do not place your router on the ground during testing, as this will affect wireless performance.
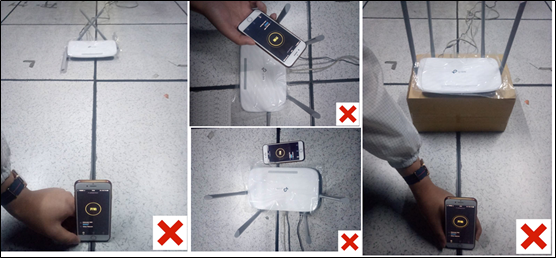
The wrong placement:
- Antenna polarization direction is inconsistent.
- The test device is placed too close to the router
- The test device is not aligned with the router's antenna
- The test device is not at the same height as the router's antenna
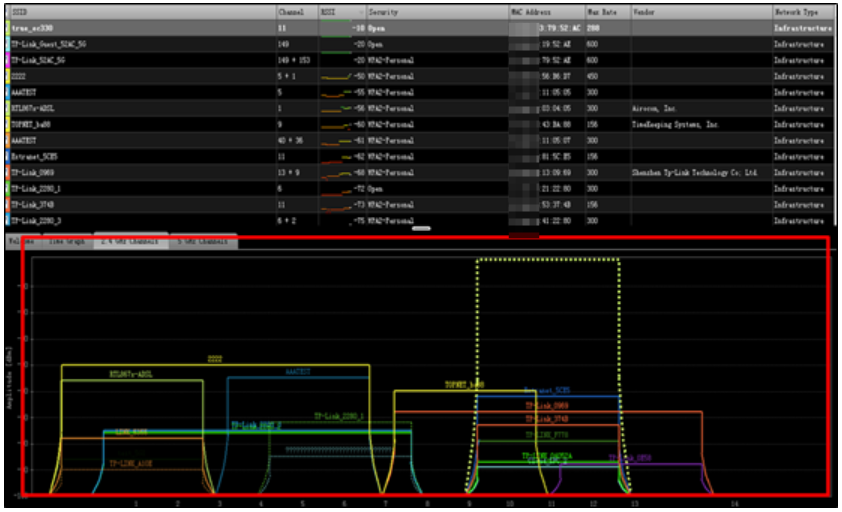
2. Identify the source of interference in the test environment:
Method 1:
Open the Insider tool, which is installed in your accompanying device in advance.
Check the number of nearby interference sources from the marked bold red box.
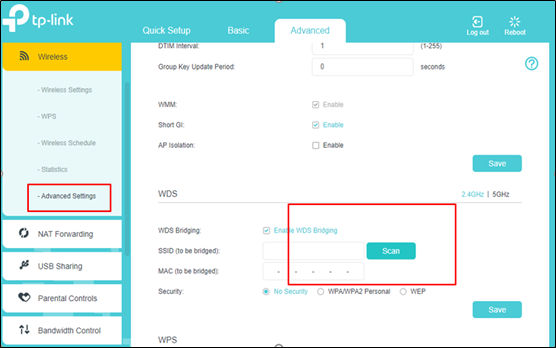
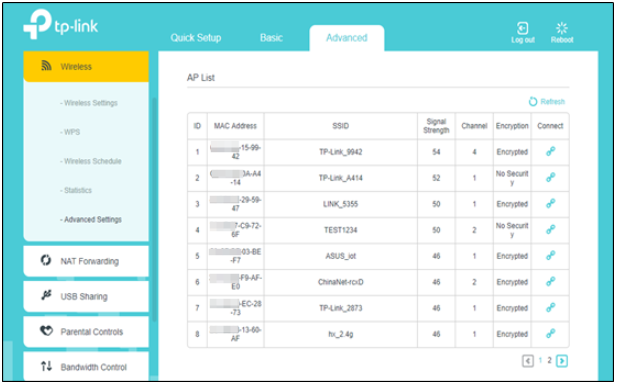
Method 2:
With the WDS scan function, you can check the interference when you click the ‘scan’ button.
Step 2: Run a Comparison Test
1. Your accompanying device should be in the same position and height as the test router and the competing router.
2. You must use the same accompanying device to connect to each router and test alternately.
3. When testing alternately between routers, ensure all wireless parameters are configured identically.
The configuration of the wireless parameters is shown below:
Recommended Wireless Parameters
|
Wireless |
Mode |
Channel |
Bandwidth |
RTS Threshold |
|
2.4GHz |
802.11b/g/n mixed |
1 |
HT40 |
2347 |
|
5GHz |
802.11a/n/ac mixed |
Band 1 |
HT80 |
2347 |
4. Output the configuration profile: conf.bin
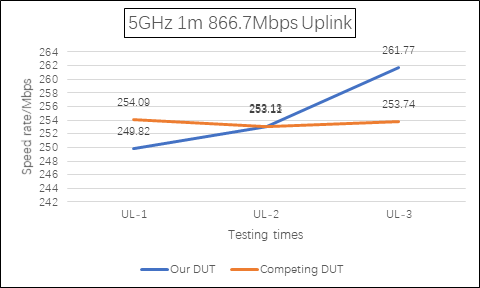
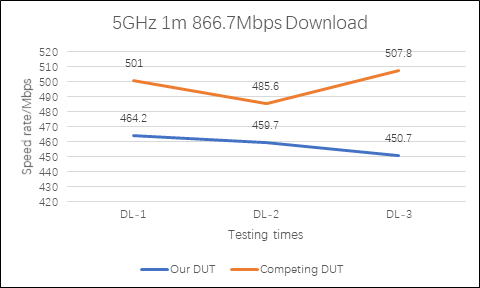
5. Record data for the entire comparison test process
6. Follow these steps to get the network card information,
Path: Control panel > network and Internet > network connection
Double-click the wireless card and select properties
Then we can check the information of the network card and the negotiation speed.
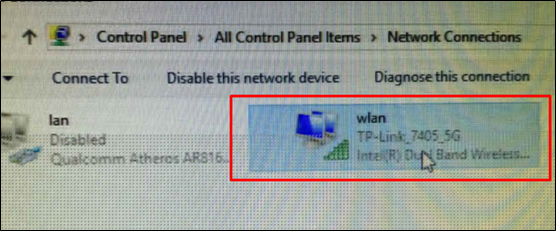
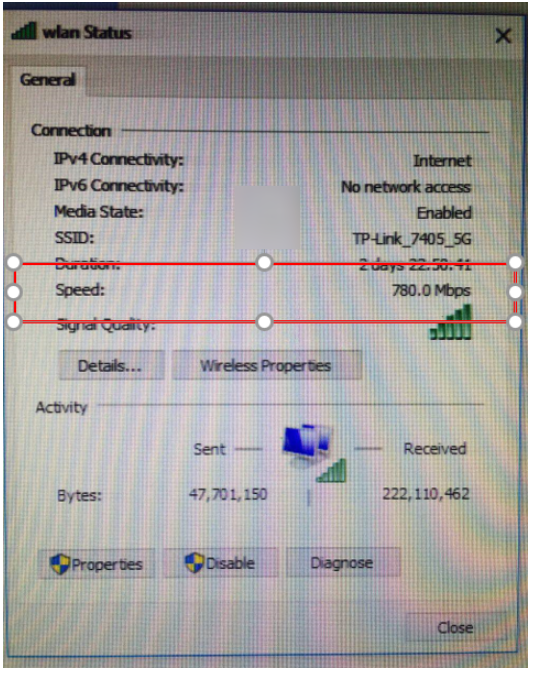
From this table, you can compare your accompanying device with standard specification:

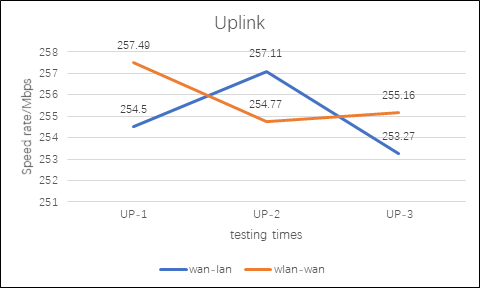
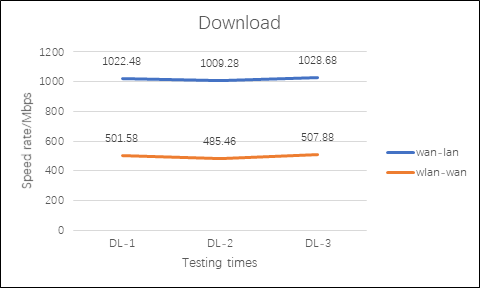
Compare wireless and wired clients:
Step 3: Configure Your Router Settings
Configure the WAN interface
1. Ensure the Quality of Service (QoS) function is disabled
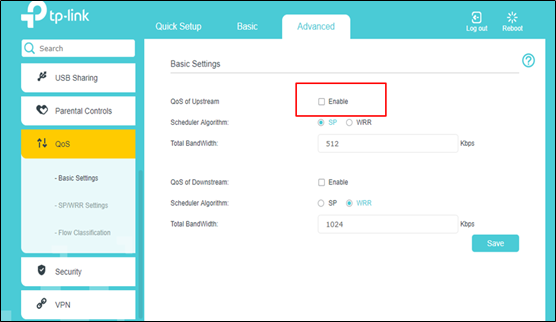
2. Ensure the Bandwidth Control function is disabled
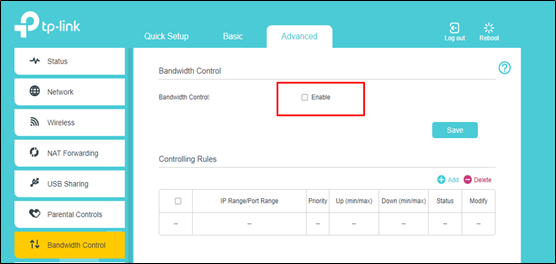
3. Ensure NAT is enabled and the MTU value is set to its default
Log in to the router management website > Network > Internet > Enter the Advanced setting > Enable NAT
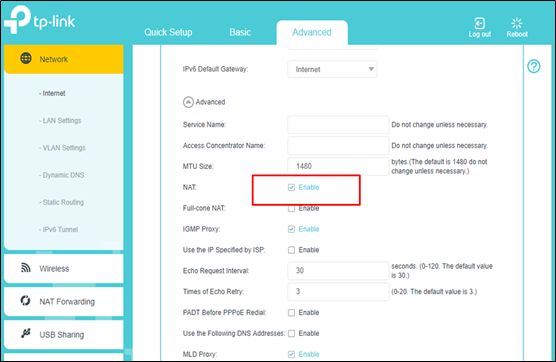
4. Link mode of the WAN interface
ADSL/VDSL can be distinguished from this data table
ADSL (Max Rate Upstream<2Mbps Downstream<25Mbps)
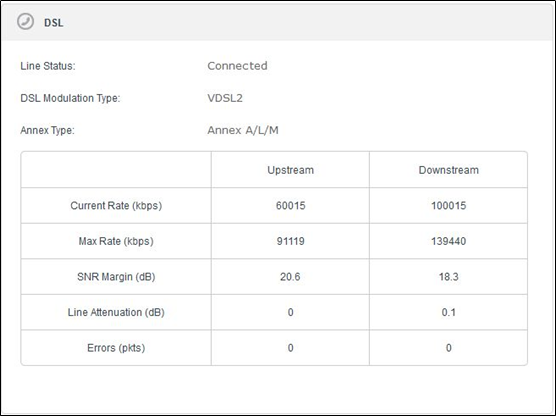
2.4GHz Wireless configuration
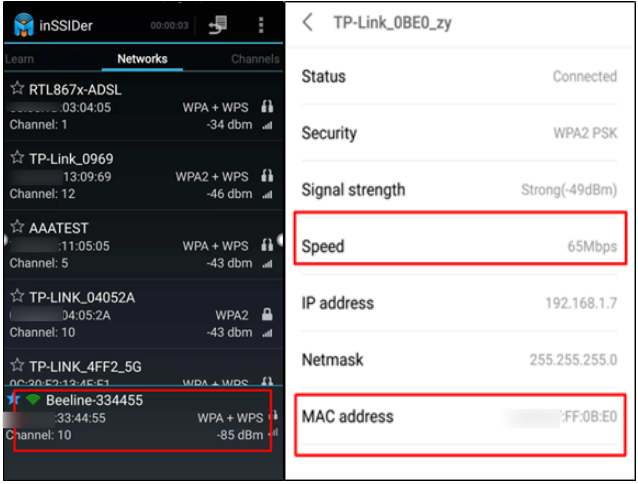
1. Open the inSSIDer from your accompanying device, and you can collect the information from the tool:
Channel: 10
Negotiating speed: 65Mbps
RSSI: -85dBm
The associated BSSID: 00:11:22:33:44:55
2. Packet capture
Set the parameters as follows:
RTS Threshold:2347 When there is less interference
Short GI: Enable
WMM: Enable
TxBF: Enable
MU-MIMO: Unable (This function can be turned on when multiple clients are present)
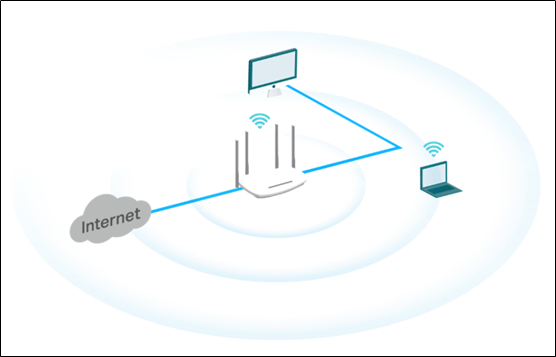
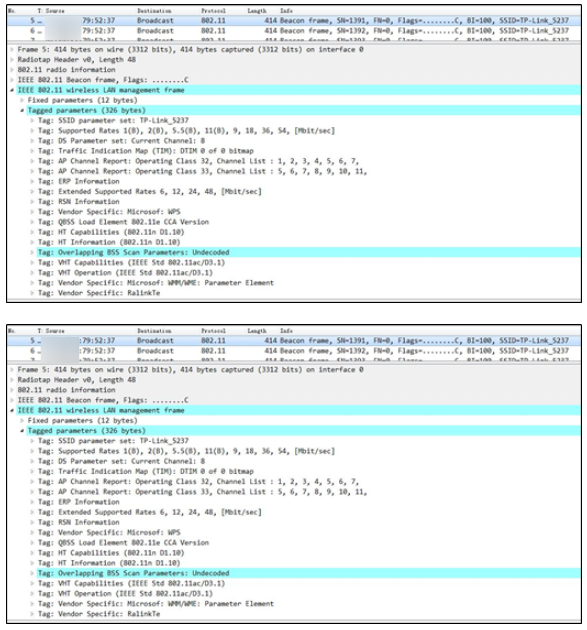
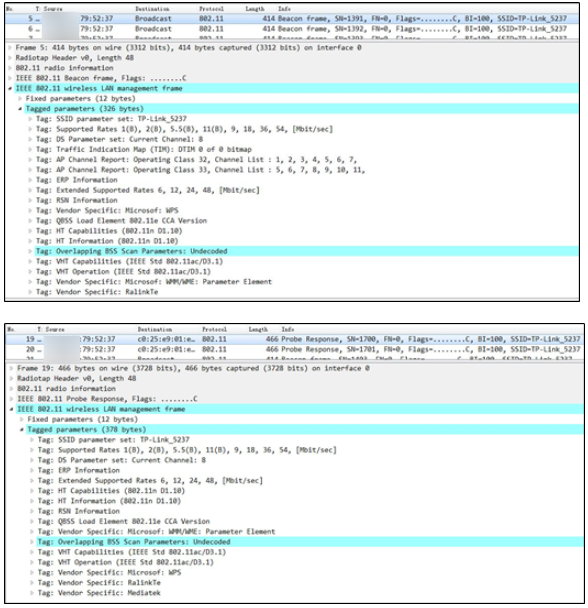
Turn on Sniffer and grab packets on the appropriate channel.
Record the Beacon Frame and Probe Response package.
3. How to increase the current wireless rate
Select channels with little interference and record the interference and signal intensity of different channels by using inSSIDer.
Bandwidth selection: HT20 is selected when the interference is strong, and HT40 is selected when the interference is weak.
5GHz Wireless configuration
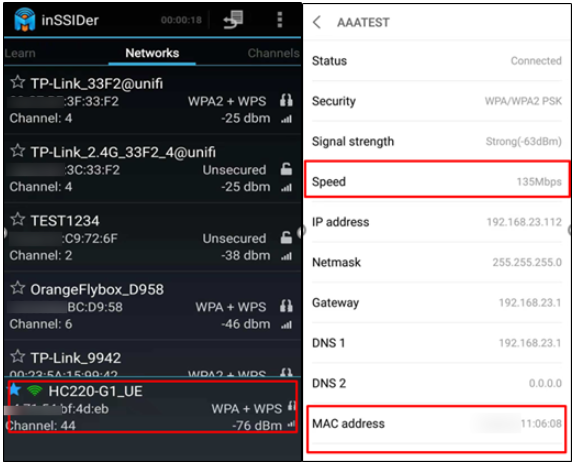
- Open the inSSIDer from your accompanying device, and you can collect the information from the tool:
Channel: 10
Negotiating speed: 135Mbps
RSSI: -85dBm
The associated BSSID: 00:11:22:33:44:55
2. Wireless Packet Capture
Set the parameters as follows:
RTS Threshold:2347 (When there is less interference)
Short GI: Enable
WMM: Enable
TxBF: Enable
MU-MIMO: Unable (This function can be turned on when multiple clients are present)
Enable the Sniffer and capture packets on the appropriate channel.
Record the Beacon Frame and Probe Response package.
3. How to increase the current wireless rate?
Select channels with little interference and record the interference and signal intensity of different channels by using inSSIDer.
Bandwidth selection: HT80 is available
Step 4: Submit Your Results
For more details on each function and configuration, visit the Download Center to find the manual for your product.
Looking For More
Finden Sie diese FAQ hilfreich?
Mit Ihrer Rückmeldung tragen Sie dazu bei, dass wir unsere Webpräsenz verbessern.
14.0-A_normal_1584497163963a.png)

TP-Link Community
Still need help? Search for answers, ask questions, and get help from TP-Link experts and other users around the world.
Von United States?
Erhalten Sie Produkte, Events und Leistungen speziell für Ihre Region