How to Enable Recording and View Playback in the VIGI App
Contents
Introduction
The VIGI App allows users to conveniently view surveillance recordings anytime and anywhere. In this guide, you will learn how to view recordings stored on your VIGI devices and use playback features to locate specific recorded events.
Requirements
- VIGI App
- VIGI Camera
- VIGI NVR or microSD Card
Configuration
Prepare storage for recording
Before enabling recording, please ensure your camera has available storage. You can store recordings on a VIGI NVR, and certain camera models also support local storage using a microSD card.
For NVR
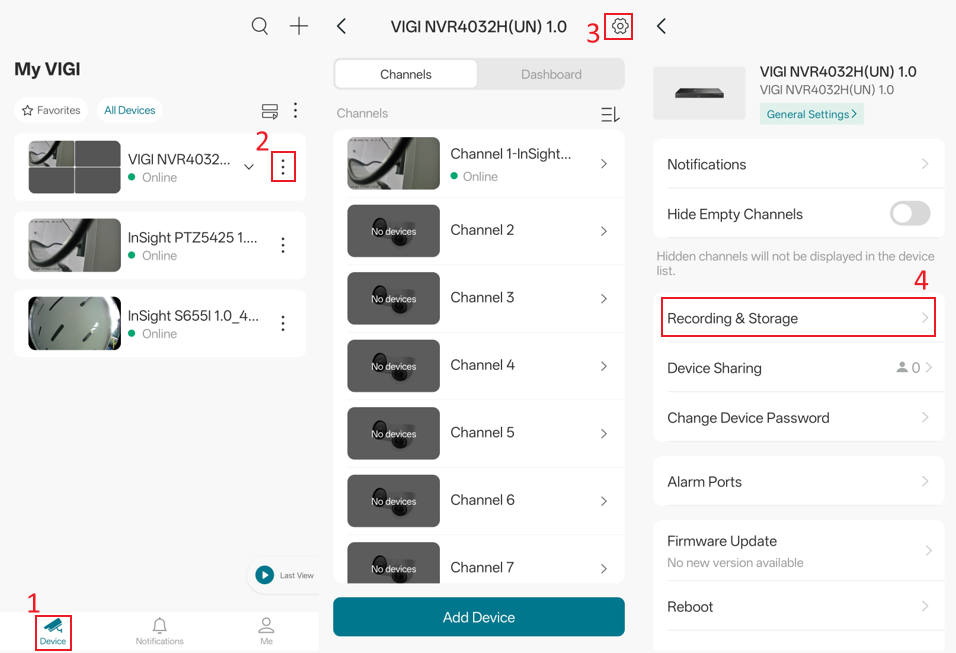
Step 1. Please go to the Device page > tap the three-dot menu on the right side of the NVR card > Settings > Recording & Storage.
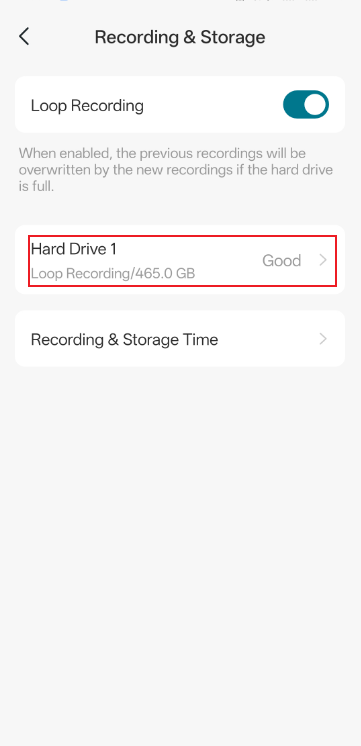
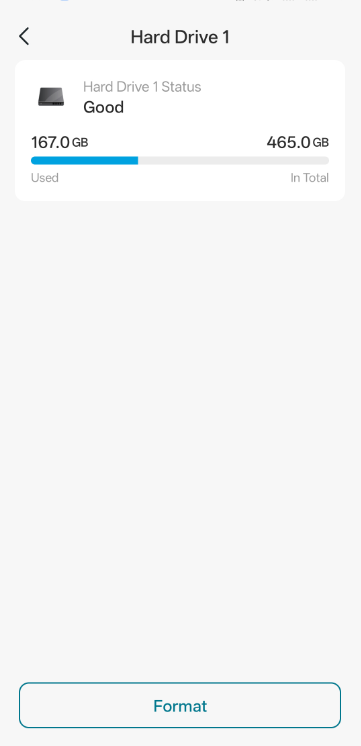
Step 2. Tap Your Hard Drive. On the Hardware Drive page, you can check the Hard Drive Status and format the hard drive if necessary. Please ensure that the Hard Drive Status is Good. If it is displayed as any abnormal status, please inspect the hard drive and ensure it is compatible with the NVR. For more information, refer to How to Choose a Suitable HDD for VIGI NVR.
For SD Card
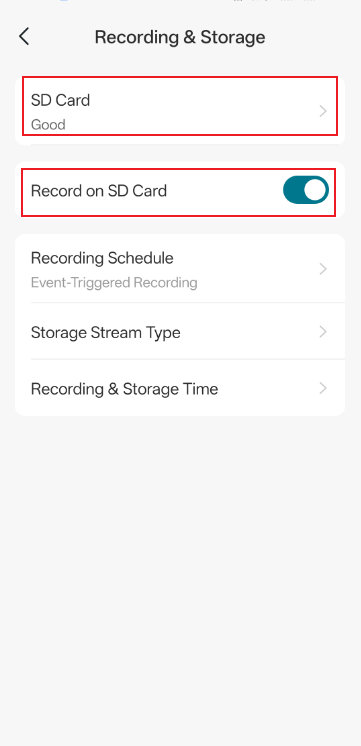
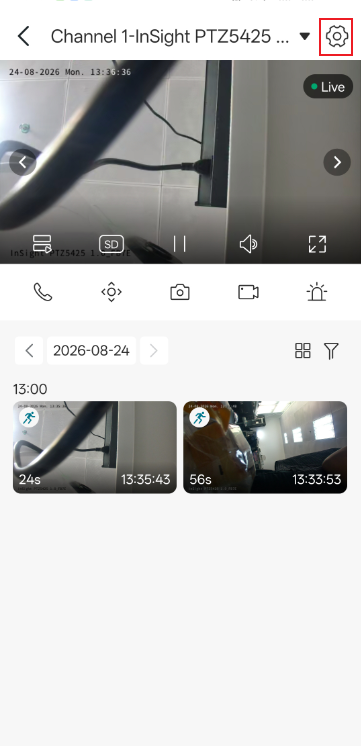
Step 1. For SD card storage, please go to the Device page > tap the camera card > navigate to the Settings icon in the top-right corner > Recording & Storage.
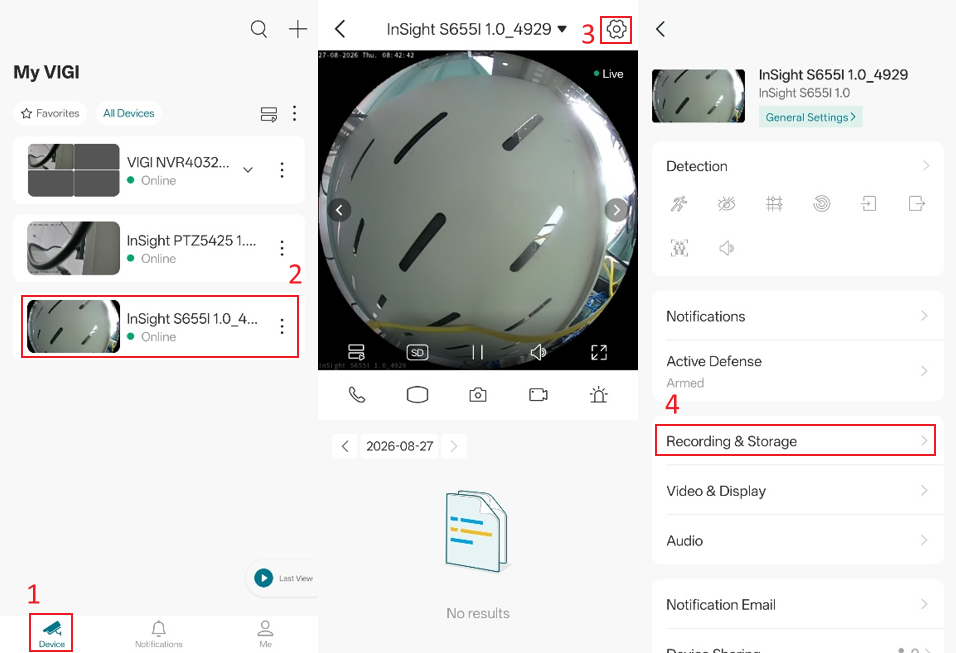
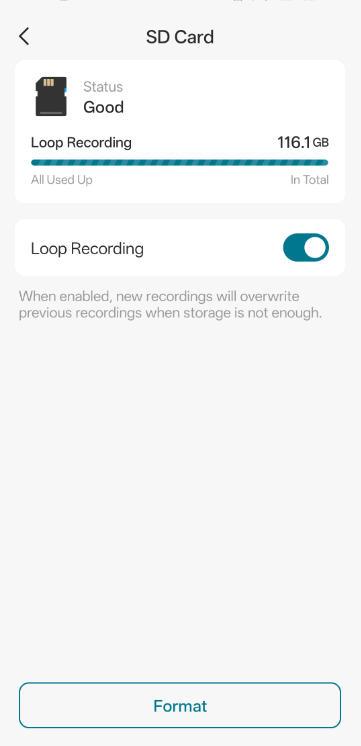
Step 2. Tap SD Card and enable Record on SD Card. On this page, you can check the SD Card Status and format it if necessary. Please ensure that the SD Card Status is displayed as Good. If the SD card shows any abnormal status, please refer to How to Verify Fake Micro SD Cards When Using with VIGI Cameras.
Configure Recording Schedule
Step 1. To set the recording mode, please navigate to the camera’s Settings page > Recording Schedule
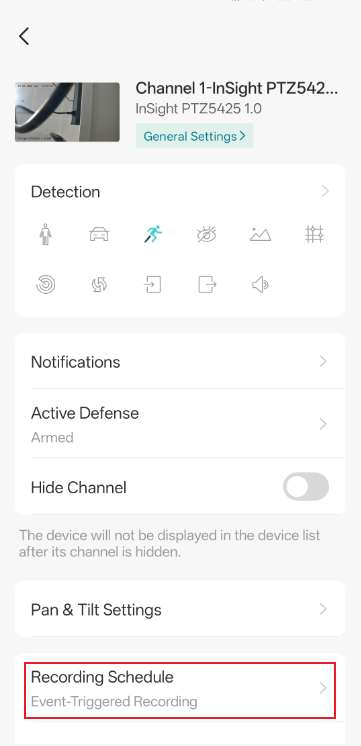
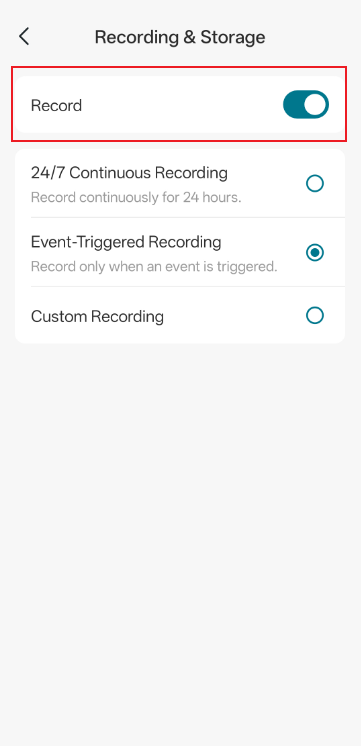
Step 2. Enable Record. There are three recording modes available. Please configure the recording mode according to your needs:
24/7 Continuous Recording: Records video continuously at all times.
Event-Triggered Recording: Records video only when specific events are detected, such as motion detection.
Custom Recording: Records video based on a user-defined schedule.
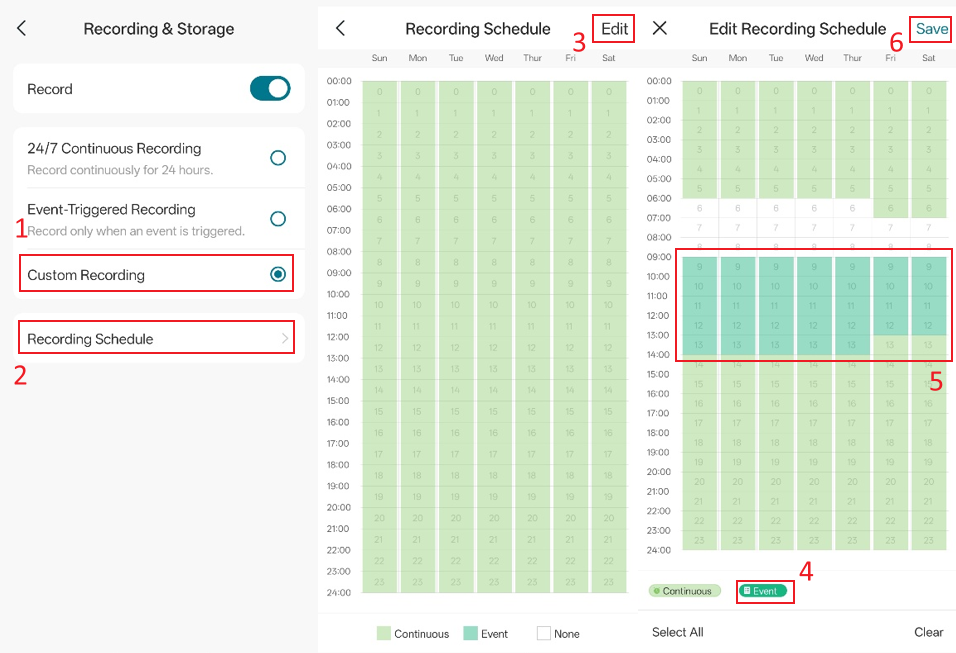
If you select Custom Recording, go to Recording Schedule > Edit to customize your Recording Schedule.
Please select the desired recording type below, then tap any time block to assign it to Continuous Recording, Event Recording, or no recording. Once you have finished configuring the schedule, tap the Save button in the upper-right corner to save your changes.
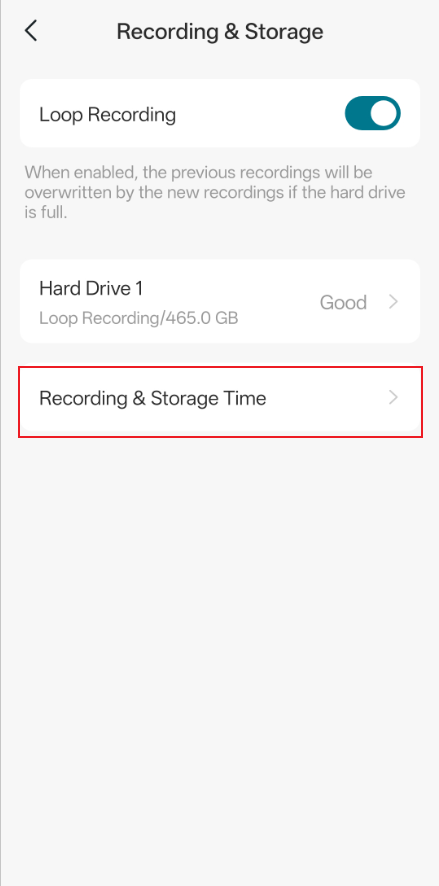
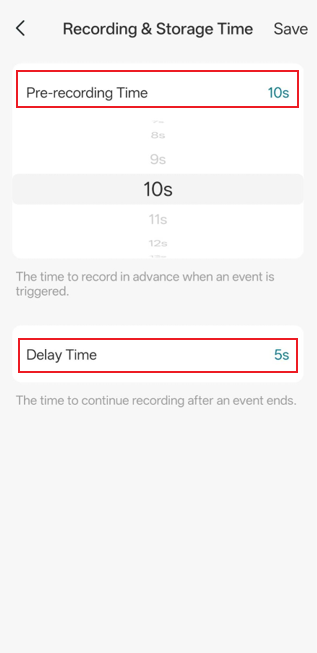
Step 3. For the Event-Triggered Recording, you can customize the recording clip duration by navigating to Recording & Storage > Recording & Storage Time on the NVR or camera.
View playback recordings
After confirming that the Recording Schedule has been configured successfully, you can go to the Live View page of the camera to find and watch recorded footage.
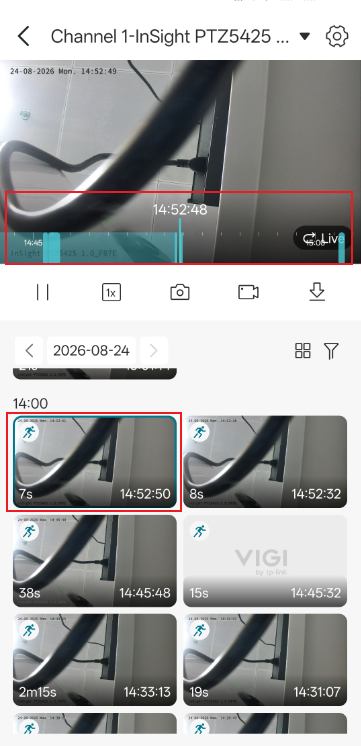
Tap the event clip you want to view to jump directly to the playback timeline of the corresponding event. Event cards are marked with event icons, making it easy to identify different event types at a glance.
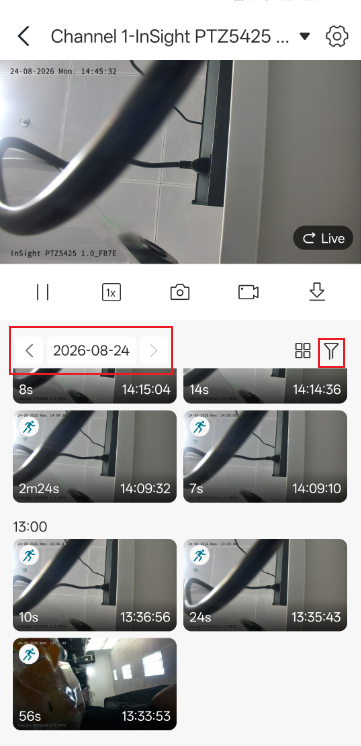
You can select the date and use the Filter on the right to filter the recordings you need.
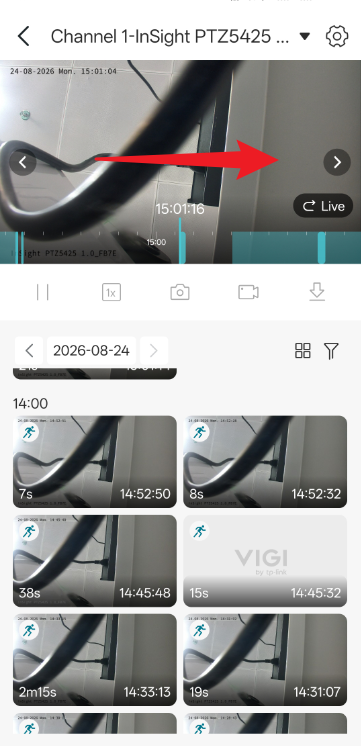
You can also swipe left or right on the live view screen to quickly jump to the time you want to review.
Conclusion
You have now learned how to configure the three recording modes in the VIGI App and how to view playback recordings. By selecting the recording mode that best suits your surveillance needs and using the playback feature to review recorded footage quickly, you can manage your camera recordings effectively and ensure important events are captured and easily accessible whenever needed.
To learn more about each function and configuration, please visit Support Home to download or check the manual for your product.
QA
Q1: Why are there no recordings even though Event-Triggered Recording is enabled?
A1: Please ensure that at least one detection is enabled and verify that you have received event notifications.
Q2: My storage space is running out quickly, and recording can no longer continue. How can I optimize the settings?
A2: You may enable Loop Recording for your SD card or NVR to ensure continuous recording when storage becomes full. Please note that recordings overwritten by Loop Recording are permanently deleted and cannot be recovered. To avoid losing important footage, make sure to back up your recordings regularly.
Q3: Why does my camera show “No local storage device” on the Live View page even though recording is enabled on the NVR?
A3: If the camera is recording through a VIGI NVR, this issue may occur because the camera has been added to the VIGI App as a standalone device instead of being accessed through the NVR channel. In some cases, both the camera and the NVR have been added to the App at the same time. When accessing the camera directly, the App may display “No local storage device” because the recordings are stored on the NVR instead of the camera itself.
To view NVR recordings, please ensure that you access the camera under the NVR Channel rather than the standalone camera device in the VIGI App.
Looking For More
Полезен ли беше този ЧЗВ?
Вашите отзиви помагат за подобряване на този сайт.



TP-Link Community
Still need help? Search for answers, ask questions, and get help from TP-Link experts and other users around the world.