


Setting up Site-to-Site IPsec VPN on TP-Link Router
This Article Applies to:
.jpg)
To setup an IPsec VPN tunnel on TP-Link routers you need to perform the following steps:
- Connecting the devices together
- Verify the settings needed for IPsec VPN on router
- Configuring IPsec VPN settings on TL-ER6120 (Router A)
- Configuring IPsec VPN settings on TL-R600VPN (Router B)
- Checking IPsec SA
NOTE: We use TL-ER6120 and TL-R600VPN in this example, the way to configure IPsec VPN on TL-WR842ND is the same as that on TL-R600VPN
Connecting the devices together
Before setup a VPN tunnel, you need to ensure that the two routers are connected to the Internet. After ensuring that there is an active Internet connection on each router, you need to verify the VPN settings of the two routers, please follow the instruction below.
Verify the settings needed for IPsec VPN on router
To verify the settings needed on the two routers, please login the router’s management webpage.
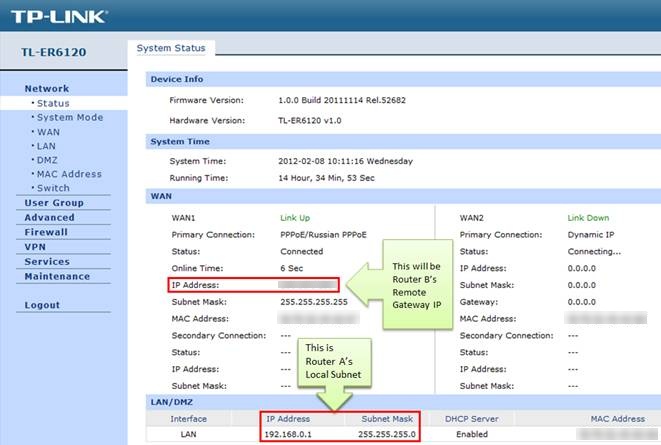
Router A’s Status page:
Router B’s Status page:

Configuring IPsec VPN settings on TL-ER6120 (Router A)
Step 1 : On the management webpage, click on VPN then IKE Proposal.
Under IKE Proposal, enter Proposal Name whatever you like, select Authentication, Encryption and DH Group, we use MD5, 3DES, DH2 in this example.
.jpg)
Step 2 : Click on Add.
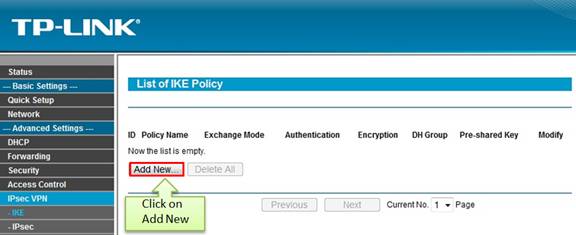
Step 3 : Click on IKE Policy, enter Policy Name whatever you like, select Exchange Mode, in this example we use Main, select IP Address as ID Type.
.jpg)
Step 4 : Under IKE Proposal 1, we use test1 in this example. Enter Pre-shared Key and SA Lifetime you want, DPD is disabled.
.jpg)
Step 5 : Click on Add.
.jpg)
Step 6 : Click on IPsec on the left menu, then IPsec Proposal. Select Security Protocol, ESP Authentication and ESP Encryption you want to enable on VPN tunnel. Here we use ESP, MD5 and 3DES for example.
.jpg)
Step 7 : Click on Add.
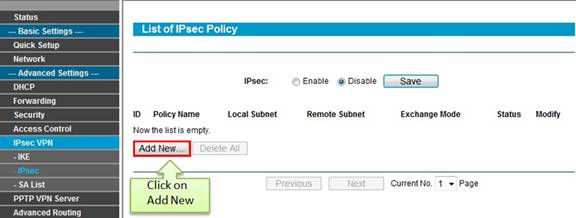
Step 8 : Click on IPsec Policy, enter Policy Name whatever you like, the Mode should be LAN-to-LAN. Enter Local Subnet and Remote Subnet.
.jpg)
Step 9 : Select WAN you use and type in Remote Gateway. In this example, the Remote Gateway is Router B’s WAN IP address, 218.18.1.208.
Step 10 : Look for Policy Mode and select IKE.
Step 11 : Under IKE Policy, we select test1 which is used.
Step 12 : Under IPsec Proposal, we use ipsec1 in this example.
Step 13 : Look for PFS, we set NONE here, under SA Lifetime, enter “28800” or the period you want.
Step 14 : Look for Status then select Activate
.jpg)
Step 15 : Click on Add.
.jpg)
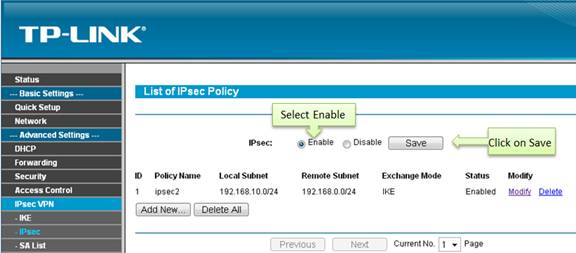
Step 16 : Select Enable then click on Save.
.jpg)
Configuring IPsec VPN settings on TL-R600VPN (Router B)
Step 1 : Go to IPsec VPN -> IKE, click on Add New
Step 2 : Enter Policy Name whatever you like, here we use test2. Exchange Mode, select Main.
.jpg)
Step 3 : Authentication Algorithm and Encryption Algorithm are the same with Router A, we use MD5 and 3DES in this example.
Step 4 : DH Group, select DH2, the same with Router A.
Step 5 : Enter Pre-share Key and SA Lifetime, make sure that they are the same with Router A.
Step 6 : Click on Save.
Step 7 : Click on IPsec on left side, click on Add New.
Step 8 : Enter Policy Name, we use ipsec2 in this example.
Step 9 : Enter Local Subnet and Remote Subnet, and then enter Remote Gateway, it’s Router A’s WAN IP address, 218.18.0.233.
.jpg)
Step 10 : Look for Exchange mode, please select IKE, and Security Protocol, we use ESP here.
Step 11 : Authentication Algorithm and Encryption Algorithm are the same with Router A, we use MD5 and 3DES in this example.
Step 12 : IKE Security Policy, we use test2 in this example.
Step 13 : Look for PFS, we set NONE here, under Lifetime, enter “28800” or the period you want.
Step 14 : Look for Status then select Enable.
Step 15 : Click on Save.
Step 16 : Enable IPsec and then click on Save.
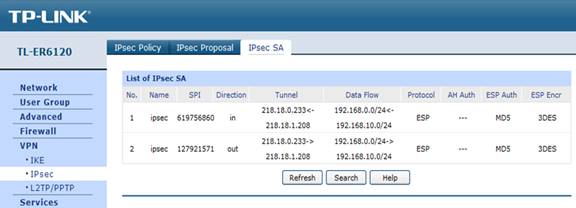
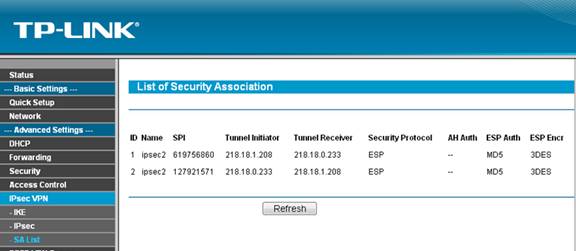
Checking IPsec SA
Router A:
Router B:
Get to know more details of each function and configuration please go to Download Center to download the manual of your product.
Is this faq useful?
Your feedback helps improve this site.
TP-Link Community
Still need help? Search for answers, ask questions, and get help from TP-Link experts and other users around the world.