How to login to the Pharos-Series’ web management page
CPE510 , CPE610 , WBS510 , CPE220 , CPE210 , CPE520 , WBS210 , CPE605
Recent updates may have expanded access to feature(s) discussed in this FAQ. Visit your product's support page, select the correct hardware version for your device and check either the Datasheet or the firmware section for the latest improvements added to your product.
In this article, we take the CPE as an example and introduce how to log into the web management page in the following operating systems:
To log into the web management page, your computer should be connected correctly in the network and have a static IP address. The computer is not required to access the internet.
1. Connecting the TP-Link device to your computer
Connect the devices as shown in the figure below.

A.Connect the CPE’s LAN0 port to the PoE port of the PoE adapter.
B.Connect the computer to the LAN port of the PoE adapter.
C.Plug the PoE adapter into the power socket.
2. Assigning a static IP address to your computer
Step 1
Here we introduce three methods to open Control Panel.
Method 1 (for Win 7/Vista/8/8.1/10): Press “Windows  + R”, then a Run box comes out. Input control panel and press Enter to open the control panel.

Method 2 (for Win 7/Vista): Go to Start > Control Panel.

Method 3 (for Win 8/8.1): Right Click on Start, then click Control Panel in the list.

Step 2
Windows 7/8/8.1/10: Go to Network and Internet > Network and Sharing Center. Select
Change adapter settings on the left.


Windows Vista: Go to Network and Internet > Network and Sharing Center. Select Manage network connections on the left.
Step 3
Right-click Local Area Connection/Ethernet Connection(Network Connection), select Properties, and then double-click Internet Protocol Version 4.


Step 4
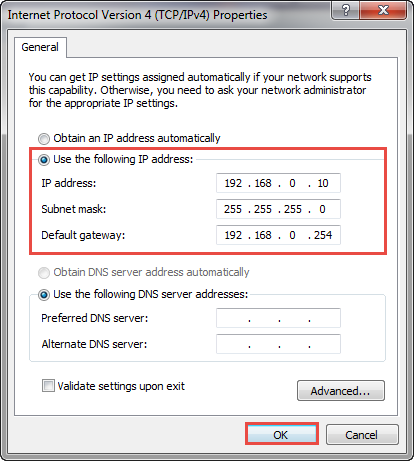
Select Use the Following IP address: and type in the IP address, Subnet mask and Default gateway as shown below. (The IP address should be 192.168.0.X. X ranges between 2 and 253, e.g. 192.168.0.10.)
Click OK to apply the settings.

Step 1
Go to the Apple > System Preferences > Network.


Step 2
Select Ethernet on the left, then select Manually from the drop- down list and input the IP Address (The IP address should be 192.168.0.X. X ranges between 2 and 253, e.g. 192.168.0.10.). Click Apply.

3. Logging into the Management Page
Before logging into the management page, please check the following points:
A.Your computer and devices are connected correctly.
B.Your computer has a static IP address.
Note: It is recommended to use the latest version of Google Chrome, Firefox, IE or Safari.
Step 1
Open a Web Browser, type 192.168.0.254 in the address bar and press Enter (Return for Mac Os) to load the login page.

Step 2
Enter admin for both User Name and Password, then select the Region and Language from the drop-down list. Read TERMS OF USE and check the box “I agree to these terms of use”, then click Login.
Step 3
Change the user name and password for security purpose. Click Finish to log into the web management page.
Is this faq useful?
Your feedback helps improve this site.
What’s your concern with this article?
- Dissatisfied with product
- Too Complicated
- Confusing Title
- Does not apply to me
- Too Vague
- Other
Thank you
We appreciate your feedback.
Click here to contact TP-Link technical support.
TP-Link Community
Still need help? Search for answers, ask questions, and get help from TP-Link experts and other users around the world.
This website uses cookies to improve website navigation, analyze online activities and have the best possible user experience on our website. You can object to the use of cookies at any time. You can find more information in our privacy policy . Don’t show again
This website uses cookies to improve website navigation, analyze online activities and have the best possible user experience on our website. You can object to the use of cookies at any time. You can find more information in our privacy policy . Don’t show again
Basic Cookies
These cookies are necessary for the website to function and cannot be deactivated in your systems.
TP-Link
SESSION, JSESSIONID, accepted_local_switcher, tp_privacy_base, tp_privacy_marketing, tp_smb-select-product_scence, tp_smb-select-product_scenceSimple, tp_smb-select-product_userChoice, tp_smb-select-product_userChoiceSimple, tp_smb-select-product_userInfo, tp_smb-select-product_userInfoSimple, tp_top-banner, tp_popup-bottom, tp_popup-center, tp_popup-right-middle, tp_popup-right-bottom, tp_productCategoryType
Youtube
id, VISITOR_INFO1_LIVE, LOGIN_INFO, SIDCC, SAPISID, APISID, SSID, SID, YSC, __Secure-1PSID, __Secure-1PAPISID, __Secure-1PSIDCC, __Secure-3PSID, __Secure-3PAPISID, __Secure-3PSIDCC, 1P_JAR, AEC, NID, OTZ
Zendesk
OptanonConsent, __cf_bm, __cfruid, _cfuvid, _help_center_session, _pendo___sg__.<container-id>, _pendo_meta.<container-id>, _pendo_visitorId.<container-id>, _zendesk_authenticated, _zendesk_cookie, _zendesk_session, _zendesk_shared_session, ajs_anonymous_id, cf_clearance
Analysis and Marketing Cookies
Analysis cookies enable us to analyze your activities on our website in order to improve and adapt the functionality of our website.
The marketing cookies can be set through our website by our advertising partners in order to create a profile of your interests and to show you relevant advertisements on other websites.
Google Analytics & Google Tag Manager
_gid, _ga_<container-id>, _ga, _gat_gtag_<container-id>
Google Ads & DoubleClick
test_cookie, _gcl_au


2.0-package-2000px_v2_normal_20231207094510m.png)
2.0-package-2000px_v2_normal_20231207092843d.png)