How to configure MAC filtering for EAP in Controller mode
EAP225-Wall( V2 ) , EAP223 , EAP245( V3 V4 ) , EAP265 HD , EAP230-Wall , EAP620 HD , EAP610 , EAP235 , EAP653 , Omada Software Controller( V4 V5 ) , EAP650-Outdoor , EAP655-Wall , EAP615-Wall , EAP610 HD , EAP653 UR , EAP660 HD , AP9665 , EAP670-Outdoor , EAP673 , EAP650 , EAP670 , EAP235-Wall , EAP690E HD , EAP225( V3 V3.20 V4 V5 ) , EAP623-Outdoor HD , EAP650-Wall , EAP610-Outdoor , EAP115-Wall
Recent updates may have expanded access to feature(s) discussed in this FAQ. Visit your product's support page, select the correct hardware version for your device and check either the Datasheet or the firmware section for the latest improvements added to your product.
MAC Filter allows or blocks connections from wireless clients of specific MAC addresses, even the clients know the password of the wireless network.
This article introduces how to configure MAC filtering for EAP in Controller mode.
Step 1: Adopt the EAP with the Controller. For more information about how to adopt the EAP with the controller, please refer to this article: How to adopt EAP in controller mode
Step 2: Create MAC Groups. Go to Settings-Profiles-Groups to create new MAC Groups.
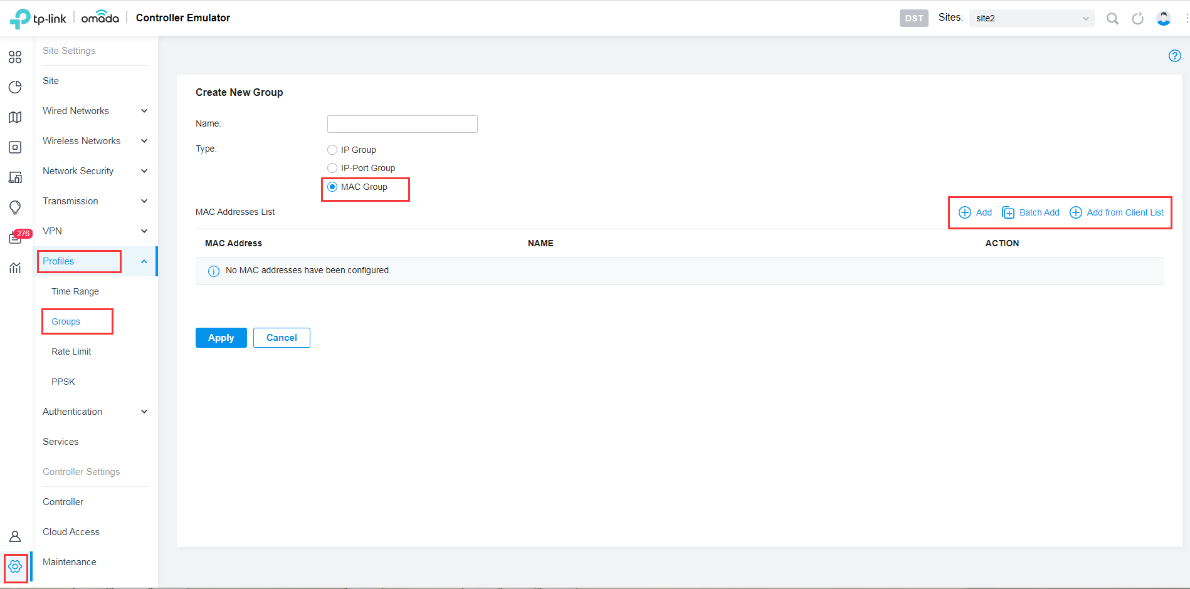
Here you can add the Devices’ MAC address via following three methods.
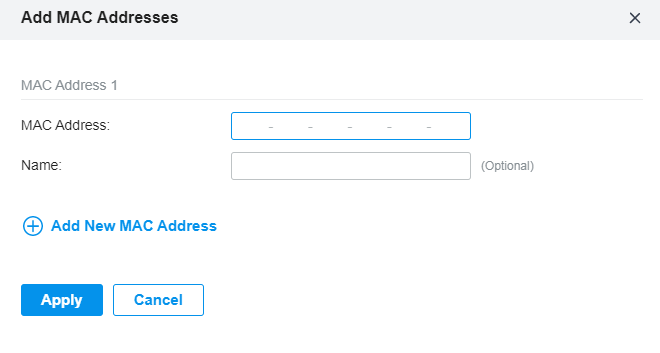
A. Add: Add MAC address singly.
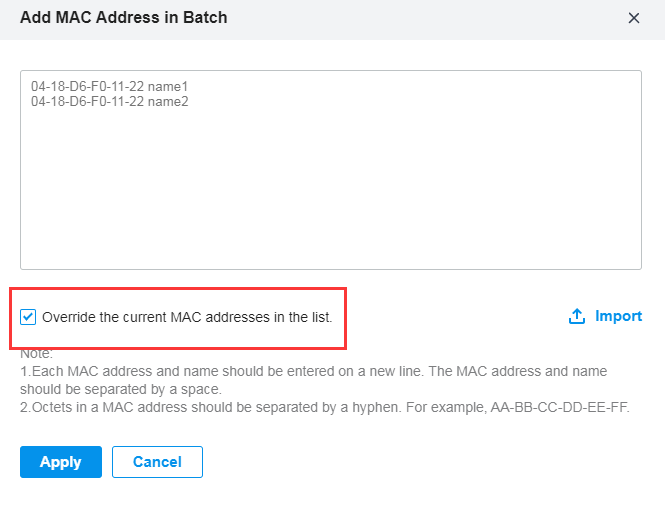
B. Batch Add: Add MAC addresses in batches. You can enter the MAC addresses and names in the input box or import them with files in the format of xlsx or txt.
If you want to use the newly added MAC address(es) and names when they conflict with the existing ones, click the small box to allow it to override the current MAC Access Control List.
Note:
- Each MAC address and name should be entered on a new line. The MAC address and name should be separated by a space.
- Octets in a MAC address should be separated by a hyphen. For example, AA-BB-CC-DD-EE-FF.
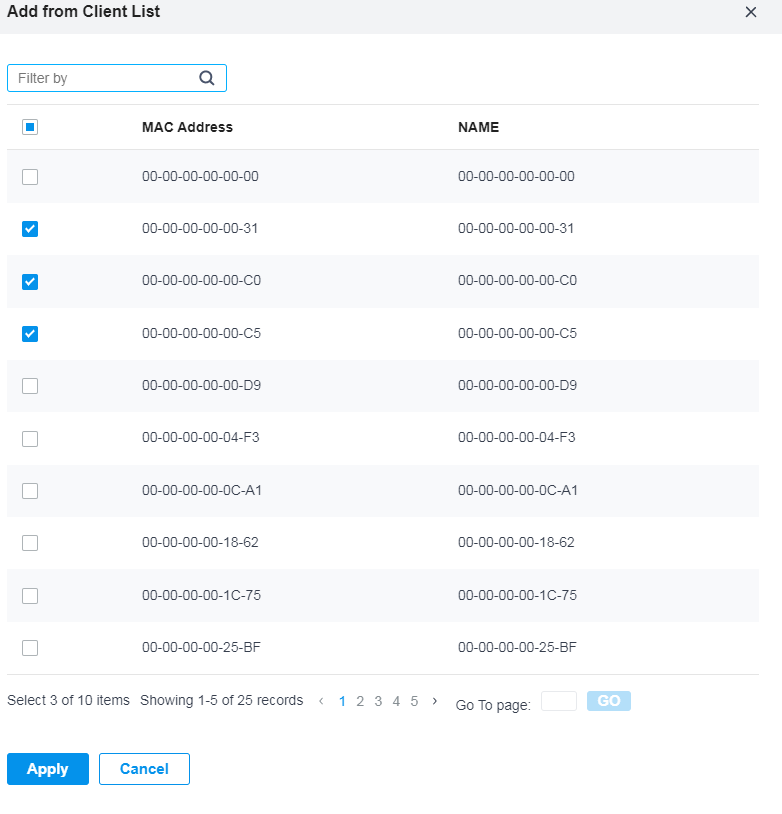
C. Add from Client list: Add MAC addresses from the clients that are connecting to the devices controlled by the Omada SDN Controller.
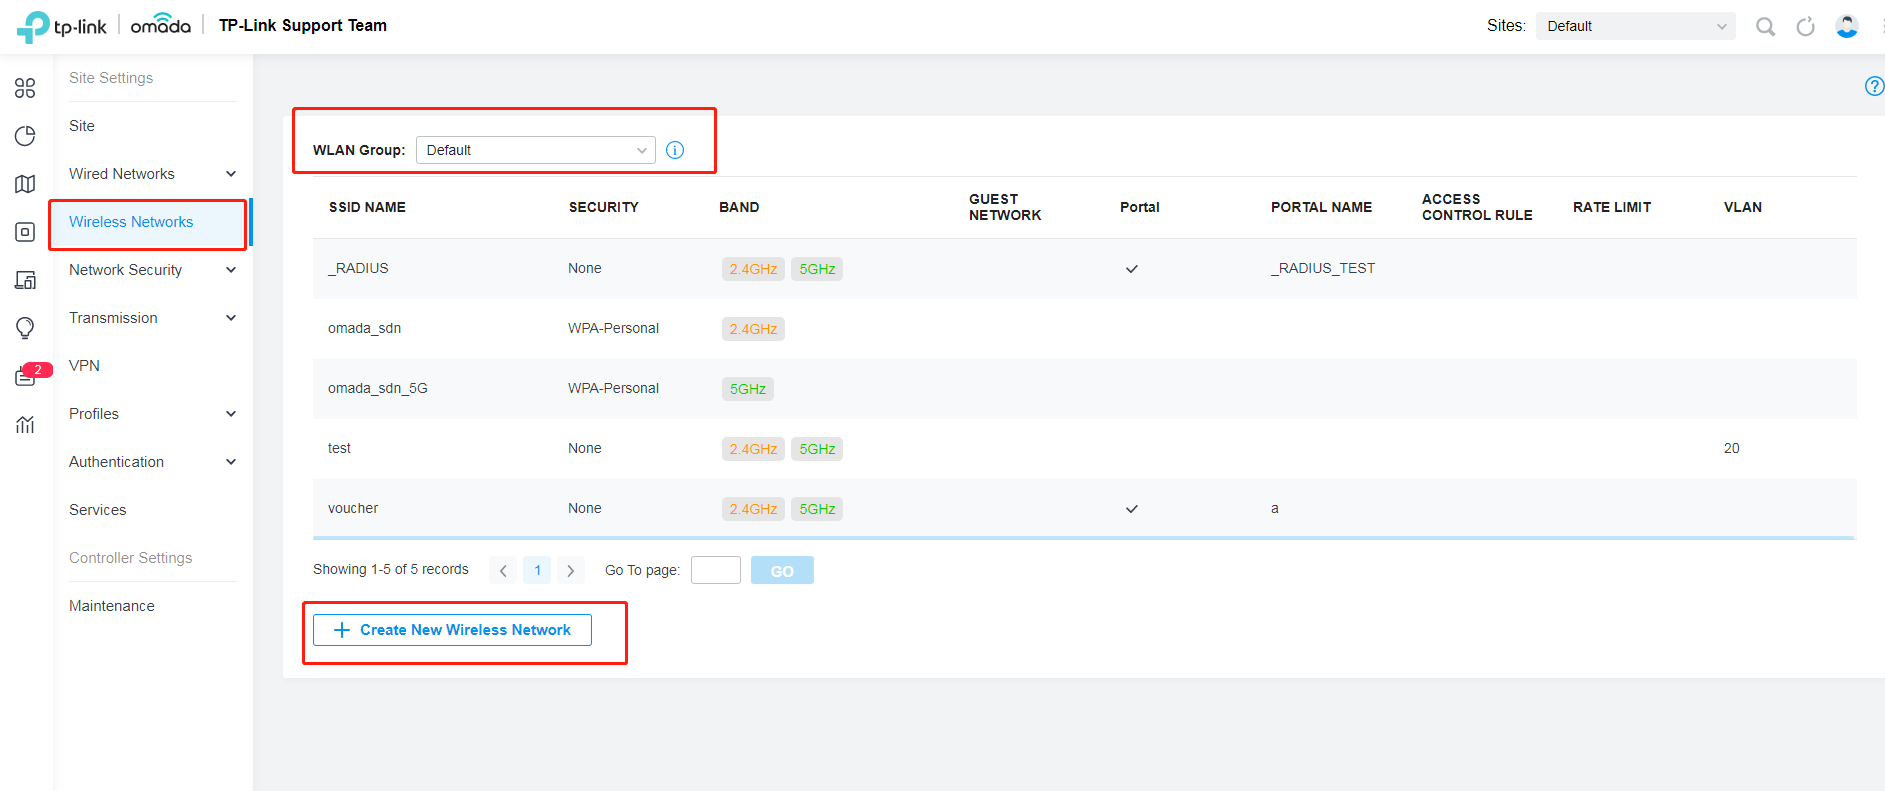
Step 3: Create a new wireless network. Please go to Settings - Wireless Networks. Note: You can skip this step if you want to apply the MAC Filter settings on an existing SSID.
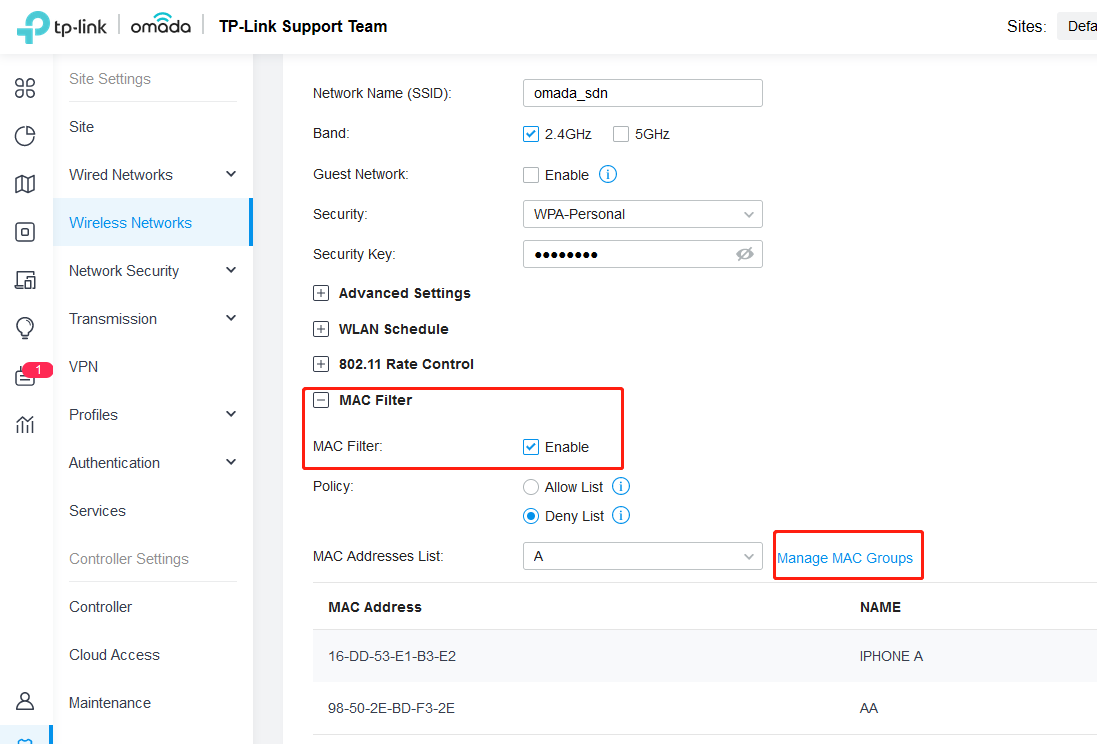
Step 4: Enable MAC Filtering after creates the wireless network.
Note: There are two type of policy, one is Allow list while the other is Deny list.
- Allow List: Allow the connection of the clients whose MAC addresses are in the specified MAC Address List, while blocking others.
- Deny List: Block the connection of the clients whose MAC address are in the specified MAC Addresses List, while allowing others.
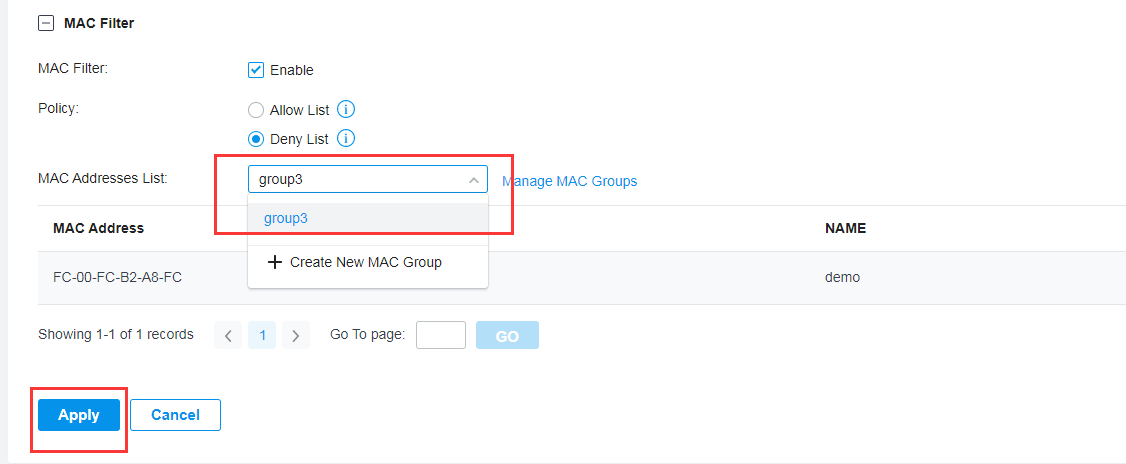
Step5: Check the MAC Group you created just now from the MAC address list.
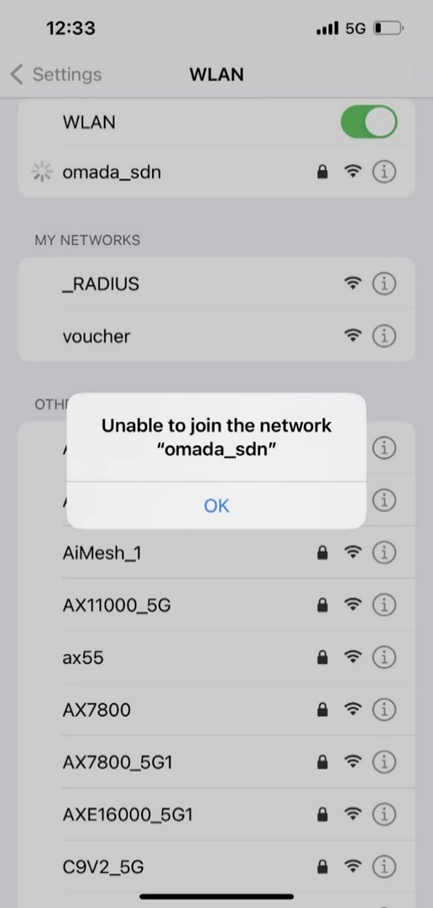
Step 6: Verification
Before setting the MAC address filtering, the device can connect to the network with ease, now, the device cannot join the network anymore.
Note: Some wireless clients will use random MAC addresses instead of their real MAC addresses when connecting to a wireless network, so called private MAC or virtual MAC. This feature may cause the MAC filter settings invalid, so please be careful with the configuration. Here is the article about the private MAC Address on iOS devices , please take it as a reference: https://support.apple.com/en-us/HT211227
Related FAQs
Looking for More
Is this faq useful?
Your feedback helps improve this site.
What’s your concern with this article?
- Dissatisfied with product
- Too Complicated
- Confusing Title
- Does not apply to me
- Too Vague
- Other
We'd love to get your feedback, please let us know how we can improve this content.
Thank you
We appreciate your feedback.
Click here to contact TP-Link technical support.
TP-Link Community
Still need help? Search for answers, ask questions, and get help from TP-Link experts and other users around the world.
This website uses cookies to improve website navigation, analyze online activities and have the best possible user experience on our website. You can object to the use of cookies at any time. You can find more information in our privacy policy . Don’t show again
Basic Cookies
These cookies are necessary for the website to function and cannot be deactivated in your systems.
TP-Link
SESSION, JSESSIONID, accepted_local_switcher, tp_privacy_base, tp_privacy_marketing, tp_smb-select-product_scence, tp_smb-select-product_scenceSimple, tp_smb-select-product_userChoice, tp_smb-select-product_userChoiceSimple, tp_smb-select-product_userInfo, tp_smb-select-product_userInfoSimple, tp_top-banner, tp_popup-bottom, tp_popup-center, tp_popup-right-middle, tp_popup-right-bottom, tp_productCategoryType
Youtube
id, VISITOR_INFO1_LIVE, LOGIN_INFO, SIDCC, SAPISID, APISID, SSID, SID, YSC, __Secure-1PSID, __Secure-1PAPISID, __Secure-1PSIDCC, __Secure-3PSID, __Secure-3PAPISID, __Secure-3PSIDCC, 1P_JAR, AEC, NID, OTZ
Zendesk
OptanonConsent, __cf_bm, __cfruid, _cfuvid, _help_center_session, _pendo___sg__.<container-id>, _pendo_meta.<container-id>, _pendo_visitorId.<container-id>, _zendesk_authenticated, _zendesk_cookie, _zendesk_session, _zendesk_shared_session, ajs_anonymous_id, cf_clearance
Analysis and Marketing Cookies
Analysis cookies enable us to analyze your activities on our website in order to improve and adapt the functionality of our website.
The marketing cookies can be set through our website by our advertising partners in order to create a profile of your interests and to show you relevant advertisements on other websites.
Google Analytics & Google Tag Manager
_gid, _ga_<container-id>, _ga, _gat_gtag_<container-id>
Google Ads & DoubleClick
test_cookie, _gcl_au