Frequently Asked Questions about EAP115-Wall
EAP115-Wall
Recent updates may have expanded access to feature(s) discussed in this FAQ. Visit your product's support page, select the correct hardware version for your device and check either the Datasheet or the firmware section for the latest improvements added to your product.
Q: What is EAP115-Wall’s advantage over ceiling mount designed EAP product?
A: Though software design exactly the same, EAP115-wall’s hardware design outweighs ceiling mount designed EAP in the following 4 ways:
- The appearance is concise, compactly designed, merging perfectly with indoor-decoration.
- More suitable for Hotel, Office, Campus and flat, where need both Ethernet Interface and Wi-Fi.
- Installation is easy and fast. The only tool you need is a utility screwdriver.
- Fit for the mainstream two kinds of wall junction box: both 86mm wall junction box and stand EAP junction box.
Q: How to Install EAP-wall?
A: To begin with, you should first get to know EAP115-Wall Front Panel and Back Panel
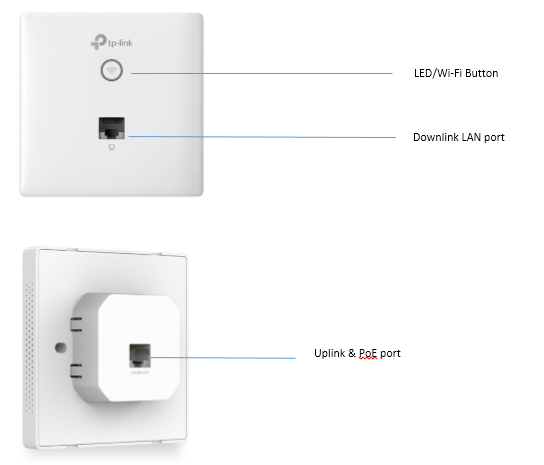
|
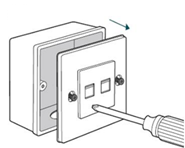
Installation Step 1: Detach the faceplate of the junction box with a utility screwdriver.
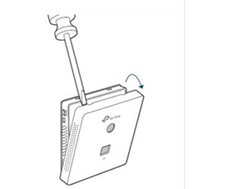
Installation Step 2: Remove the faceplate of EAP115-Wall.
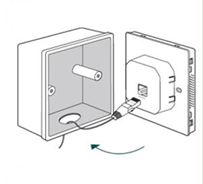
Installation Step 3: Connect one in-wall Ethernet Cable to Uplink PoE port.
Installation Step 4: Secure the access point to the wall using the nails provided.
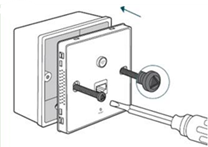
Installation Step 5: Press the faceplate back into position.
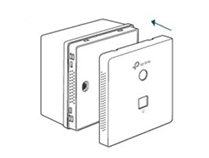
Note:
EAP115-wall fits for the mainstream two kinds of wall junction box: 86mm wall junction box and stand EAP junction box.
Q: How to use “Wi-Fi” button on EAP-wall?
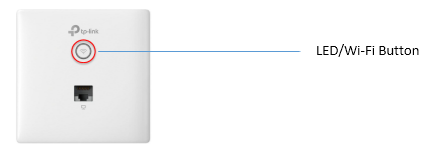
A: By factory default settings, LED ON/OFF is enabled, which means that you can press to turn off/on the LED. At this configuration, Wi-Fi button has no control over Wi-Fi.
Q: How to use “Wi-Fi button” as “Wi-Fi Controller”?
A: If you want to control over Wi-Fi using “Wi-Fi button”, please log in to the web GUI of EAP115-wall and enable “Wi-Fi Control”.
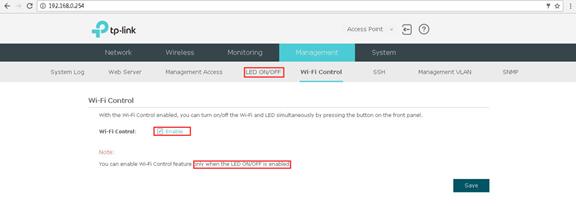
Note: Before you enable Wi-Fi Control, please first enable “LED ON/OFF”.
Q: How to reset EAP-wall?
A: There are software reset and hardware reset methods. You can use either EAP Controller or Web-GUI to factory reset EAP. Or if you want hardware reset, you should first remove the faceplate of EAP115-wall, then use a pin to press the reset hole for 5 seconds until LED light flashes.
Q: Does EAP115-wall support PoE passthrough?
A: If there is PoE IPC or IP Phone, it will be better if the downlink port of EAP115-wall can supply PoE. The bad news is that EAP115-wall does not support PoE passthrough at present. If you have any feedback or good ideas to help improve our EAP-wall product, you are very welcomed to drop a letter to support@tp-link.com .
Is this faq useful?
Your feedback helps improve this site.
What’s your concern with this article?
- Dissatisfied with product
- Too Complicated
- Confusing Title
- Does not apply to me
- Too Vague
- Other
We'd love to get your feedback, please let us know how we can improve this content.
Thank you
We appreciate your feedback.
Click here to contact TP-Link technical support.
Recommended Products
TP-Link Community
Still need help? Search for answers, ask questions, and get help from TP-Link experts and other users around the world.
This website uses cookies to improve website navigation, analyze online activities and have the best possible user experience on our website. You can object to the use of cookies at any time. You can find more information in our privacy policy . Don’t show again
Basic Cookies
These cookies are necessary for the website to function and cannot be deactivated in your systems.
TP-Link
SESSION, JSESSIONID, accepted_local_switcher, tp_privacy_base, tp_privacy_marketing, tp_smb-select-product_scence, tp_smb-select-product_scenceSimple, tp_smb-select-product_userChoice, tp_smb-select-product_userChoiceSimple, tp_smb-select-product_userInfo, tp_smb-select-product_userInfoSimple, tp_top-banner, tp_popup-bottom, tp_popup-center, tp_popup-right-middle, tp_popup-right-bottom, tp_productCategoryType
Youtube
id, VISITOR_INFO1_LIVE, LOGIN_INFO, SIDCC, SAPISID, APISID, SSID, SID, YSC, __Secure-1PSID, __Secure-1PAPISID, __Secure-1PSIDCC, __Secure-3PSID, __Secure-3PAPISID, __Secure-3PSIDCC, 1P_JAR, AEC, NID, OTZ
Zendesk
OptanonConsent, __cf_bm, __cfruid, _cfuvid, _help_center_session, _pendo___sg__.<container-id>, _pendo_meta.<container-id>, _pendo_visitorId.<container-id>, _zendesk_authenticated, _zendesk_cookie, _zendesk_session, _zendesk_shared_session, ajs_anonymous_id, cf_clearance
Analysis and Marketing Cookies
Analysis cookies enable us to analyze your activities on our website in order to improve and adapt the functionality of our website.
The marketing cookies can be set through our website by our advertising partners in order to create a profile of your interests and to show you relevant advertisements on other websites.
Google Analytics & Google Tag Manager
_gid, _ga_<container-id>, _ga, _gat_gtag_<container-id>
Google Ads & DoubleClick
test_cookie, _gcl_au