


Frequently asked questions about VIGI Cloud VMS
Contents
Objective
VIGI Cloud VMS provides centralized cloud management for VIGI Cameras, VIGI NVRs, and VIGI Solar Panels. This article describes the frequently asked questions about VIGI Cloud VMS.
Requirements
- VIGI Cloud VMS
- VIGI Camera/VIGI NVR
Q&A
Q1: How do I find the serial number and Device ID on VIGI devices?
A: You can find the serial number and Device ID on the device’s label.
For VIGI devices, turn over the device, and you can see the label at the back of the device. It usually starts with “S/N:” and “Device ID:”.

Q2: Does VIGI Cloud VMS support cloud storage?
A: No, VIGI Cloud VMS doesn’t support cloud storage. We recommend customers to use VIGI NVR to manage cameras and storage of recordings. Customers can back up recordings from NVR to FTP server.
Note: The FTP backup feature depends on the NVR model and firmware version. Not all VIGI NVRs support this feature.
Q3: How to create a VIGI Cloud VMS account?
A: VIGI Cloud VMS is based on TP-Link ID, and customers can log in to VIGI Cloud VMS via TP-Link ID.
Q4: How many users can be added to VIGI Cloud VMS?
A: Up to 5,000 users can be added. Subsequent new versions will support unlimited users.
Q5: How many organization managers can be added to VIGI Cloud VMS?
A: Up to 5,000 managers can be added. Subsequent new versions will support unlimited managers.
Q6: How many devices can be added to VIGI Cloud VMS?
A: Up to 5,000 devices can be added. Subsequent new versions will support unlimited devices.
Q7: Why can the video only play for 5 minutes without any operation?
A: VIGI Cloud VMS needs to pull the stream from the cloud server Relay for playback. Due to network conditions, if the video is played continuously for 5 minutes without any operation, the video will stop playing to ease the cloud traffic congestion. You can click the Play button to continue playing the video.
Q8: How many users can watch the live view on VIGI Cloud VMS at the same time?
A: Up to four users can watch the live view on VIGI Cloud VMS at the same time.
Q9: How long can events be saved on VIGI Cloud VMS?
A: Events can be saved for up to 180 days, and the corresponding event images can be saved for up to 7 days.
Q10: How long can system logs be saved on VIGI Cloud VMS?
A: 90 days.
Q11: Does VIGI have a device discovery and configuration tool?
A: Yes. We have VIGI Config Tool that can be downloaded at https://www.tp-link.com/en/support/download/vigi-config-tool/
Q12: How to add a third-party camera to VIGI Cloud VMS?
A: VIGI Cloud VMS does not support adding third-party cameras. If you want to add a third-party camera, access it through VIGI NVR. That is, the VIGI NVR manages the third-party camera, and VIGI Cloud VMS manages the VIGI NVR.
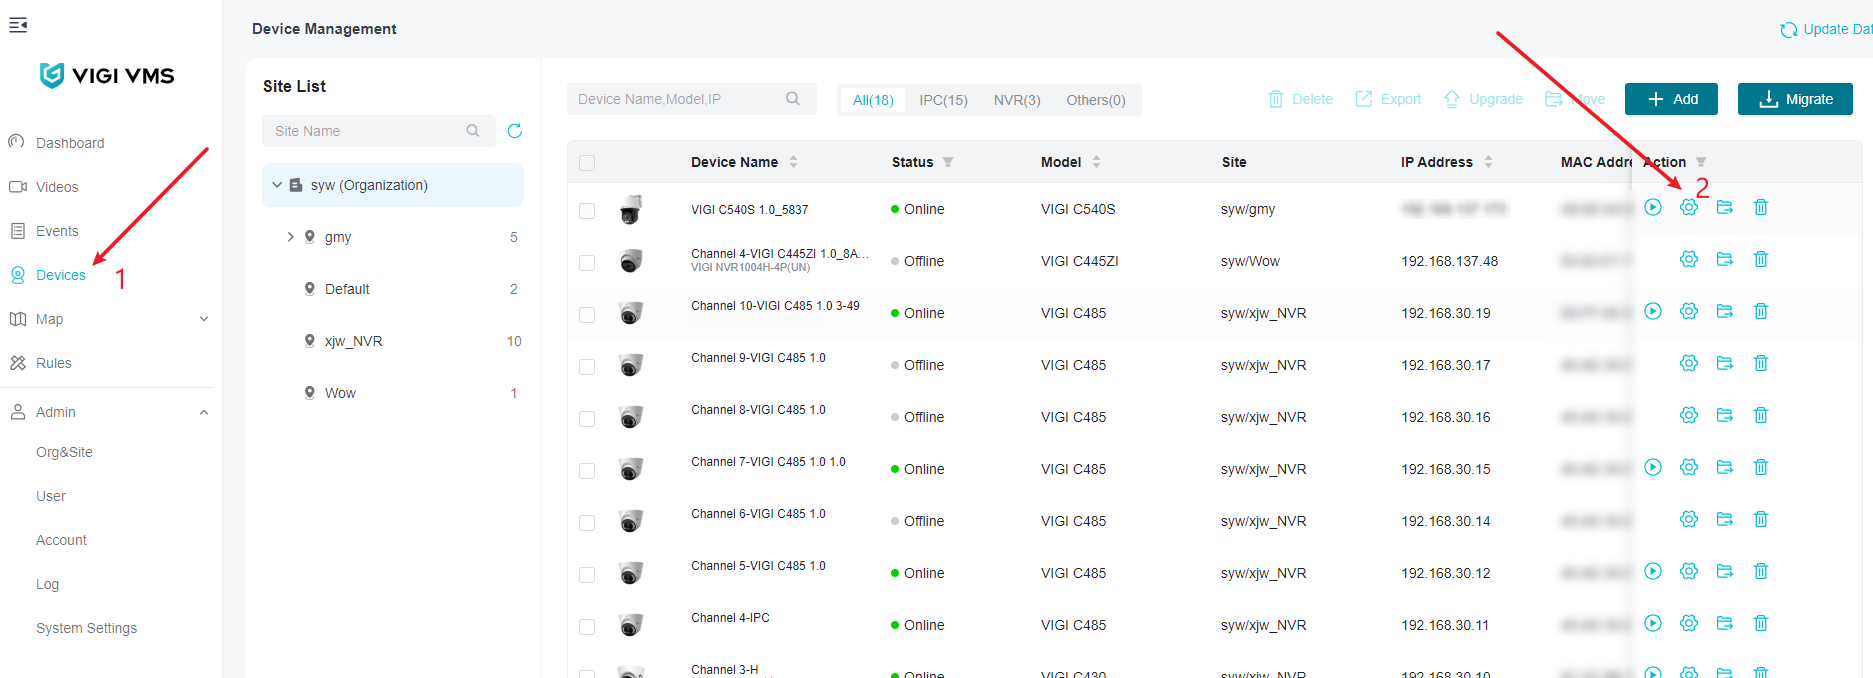
Q13: How to configure camera event detection?
A: There are two options:
- Separate configuration for each device. Go to Devices, click the Settings button of the desired device, then go to Event and configure the settings.


- Batch configuration. You can use batch configuration to enable the feature, but you cannot use it to configure specific parameters such as sensitivity. Go to Rules to configure the settings.


Q14. How to modify the image parameters?
A: There are two options:
- Go to Videos, and click the Settings button on the live view to configure the parameters.


- Go to Devices and click the Settings button of the desired device to configure the parameters.


Q15: How to update the device firmware?
A: There are two options:
- Online update. Batch operation is supported. Go to Devices to update the device firmware.
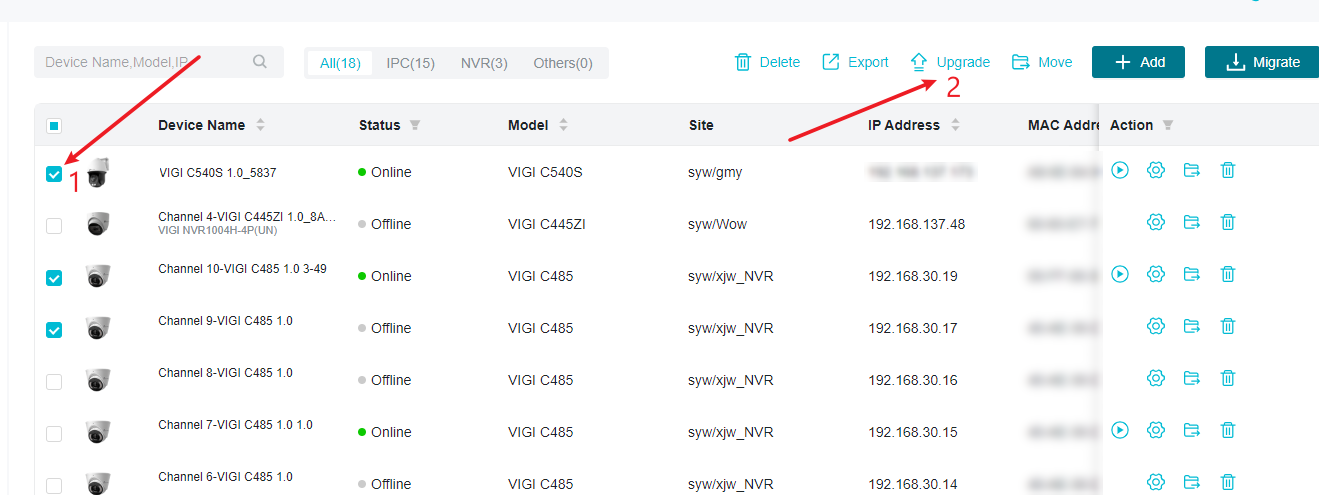
- Manual update. You can manually update devices one by one. Go to Devices, click the Settings button of the desired device, then go to System > System Management > Upgrade Firmware to update the device.

Q16: How to create a site?
A: Go to Admin > Org&Site, and click Add Site.

Q17. How to change the Location of the site?
A: Go to Admin > Org&Site, select the desired site and click the Edit button on the upper right corner to modify the location.


Q18: What should I do if there are problems with the video display, such as gray screen, and screen distortion?
A: Please try the following:
- It is recommended to use the Chrome browser.
- Update the graphics card driver to the latest version.
- The graphics card does not support 265 hardware decoding, and you need to change the stream type to 264, or change the playback client to soft decoding. Go to the advanced settings of the browser, turn off the graphics acceleration function, and uncheck Enable Hardware Decoding in the Settings of the client.


Q19. What should I do if there is a problem with the software layout?
A: Check the computer scaling.
- For Windows: Right click on the desktop, open “Display settings” and scroll to “Scale and layout”. It is usually recommended to use the same configuration. For example, use 100% scaling for 1080P, 150% scaling for 2K resolution, and 150% and 200% scaling for 4K resolution.
- For Mac: Go to System Settings > Displays and select the default resolution. If the layout is still too large, reduce the resolution.
Q20. Why does invitation fails when newly invited user clicks on the invitation link?
A: The reason for “Invalid Invitation” is that the TP-Link ID logged in on the current browser is not the same as the invited account. You need to log out Cloud VMS and access the invitation link again.

If “Invalid username or password” occurs when the invited user clicks on the invitation link and attempts to log in with their TP-Link ID, it may be because the user has not registered a TP-Link ID yet. You need to click Sign Up to create a new account.

Get to know more details of each function and configuration please go to Download Center to download the manual of your product.
Finden Sie diese FAQ hilfreich?
Mit Ihrer Rückmeldung tragen Sie dazu bei, dass wir unsere Webpräsenz verbessern.

Von United States?
Erhalten Sie Produkte, Events und Leistungen speziell für Ihre Region