How to migrate devices from VIGI app (Personal Edition) to VIGI Cloud VMS

VIGI C400HP , VIGI NVR4032H , VIGI C340HPWSM , VIGI NVR2008H-8MP , InSight S345-4G , VIGI NVR2016H-16P , VIGI C540V , VIGI C540S , VIGI C250 , VIGI C450 , VIGI C330 , VIGI C330I , VIGI C455 , VIGI NVR1008H , VIGI C230I Mini , VIGI NVR1004H , VIGI NVR1016H , VIGI NK8P-B434I , VIGI NVR1008H-8P , VIGI C340 , VIGI C540-4G , VIGI NVR2016H , VIGI C340-W , VIGI C540 , VIGI C385 , VIGI C430I , VIGI C220I , VIGI C345 , VIGI NVR1108H-W , VIGI C240I , VIGI C440-W , VIGI NVR1008H-8MP , VIGI NVR1008 , VIGI NK4P-T4425-2T , VIGI C540-W , VIGI C230 , VIGI C350 , VIGI C300P , VIGI C430 , VIGI NVR1104H-4P , VIGI C355 , VIGI C320I , VIGI NVR2016H-16MP , VIGI C340I , VIGI C420I , VIGI NK8MP-T6425-2T , EasyCam C320 , VIGI C300HP , VIGI NVR1004H-4P , VIGI C240 , VIGI C485 , VIGI C400P , VIGI C440 , VIGI C440I , VIGI C445 , VIGI C230I
Recent updates may have expanded access to feature(s) discussed in this FAQ. Visit your product's support page, select the correct hardware version for your device, and check either the Datasheet or the firmware section for the latest improvements added to your product. Please note that product availability varies by region, and certain models may not be available in your region.
Contents
VIGI Cloud VMS supports device migration. You can migrate devices under the current account from personal edition to enterprise edition. This article introduces how to migrate devices from the VIGI app (Personal Edition) to the VIGI Cloud VMS.
- VIGI Cloud VMS
Devices added via the VIGI app (Personal Edition) will not be displayed in the VIGI Cloud VMS. For convenience and centralized management, you can migrate these devices to the VIGI Cloud VMS.
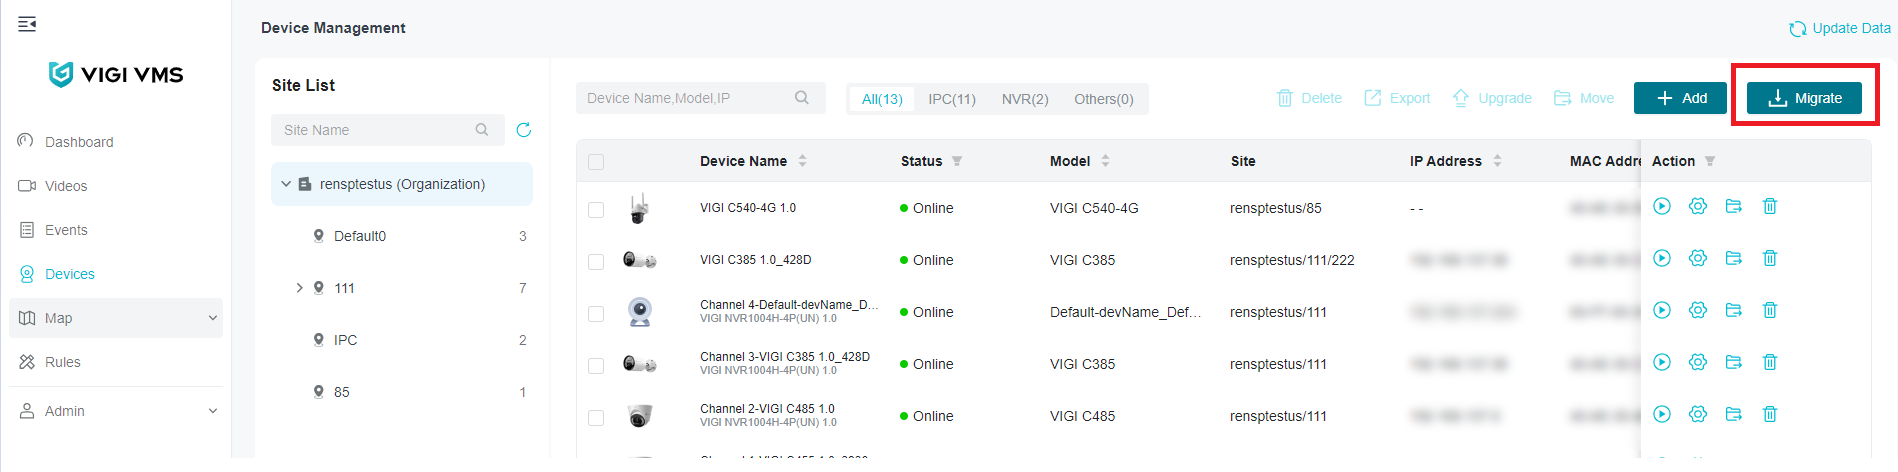
Step 1. Log in to the VIGI Cloud VMS (https://vms.tplinkcloud.com/). Go to the Devices page and click Migrate.
Step 2. In the pop-up window, click Migrate to continue.
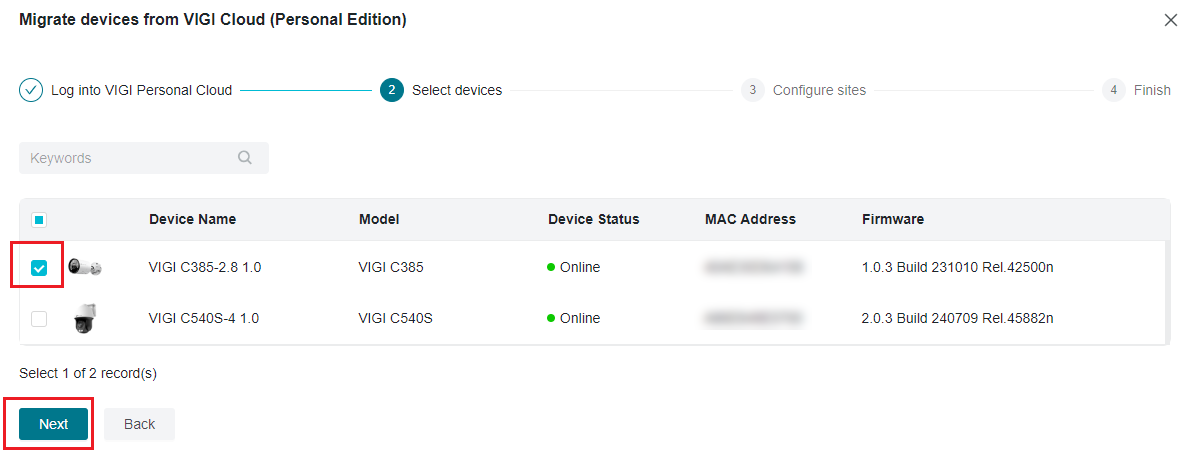
Step 3. Select the devices you want to migrate, and click Next.
Step 4. Select the site to which you want to migrate the devices, and then click Next.
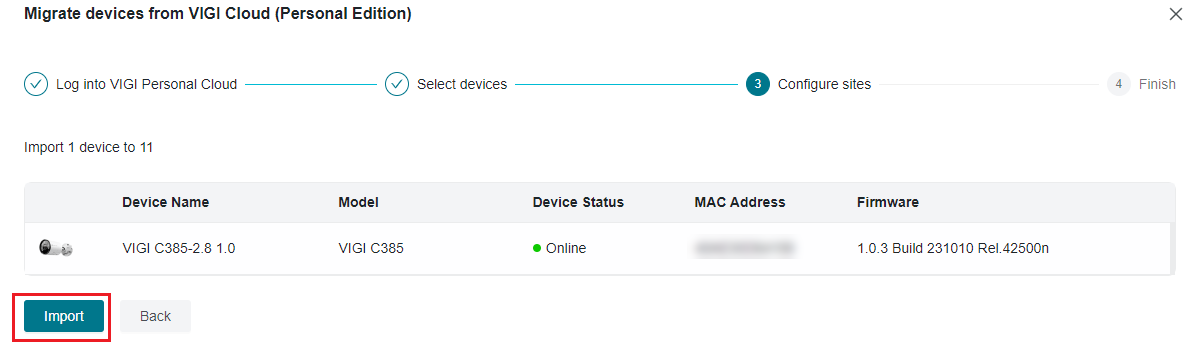
Step 5. Click Import to start migrating devices to the VIGI Cloud VMS. A migration request email will be sent to your account’s email address,
Step 6. Go to the account’s email address, and confirm the migration.
Now that the devices have been migrated to the VIGI Cloud VMS, you can manage the device via the VIGI Cloud VMS.
Get to know more details of each function and configuration please go to Download Center to download the manual of your product.
Finden Sie diese FAQ hilfreich?
Mit Ihrer Rückmeldung tragen Sie dazu bei, dass wir unsere Webpräsenz verbessern.
Was ist Ihr Bedenken bei diesem Artikel?
- Mit Produkt unzufrieden
- Zu kompliziert
- Irreführende Titel
- Betrifft mich nicht
- Zu ungenau
- Was anderes
Vielen Dank.
Vielen Dank für Ihr Feedback.
Von United States?
Erhalten Sie Produkte, Events und Leistungen speziell für Ihre Region
Diese Webseite verwendet Cookies, um die Websitenavigation zu verbessern, Online-Aktivitäten zu analysieren und die bestmögliche Nutzererfahrung auf unseren Webseiten zu haben. Sie können der Verwendung von Cookies jederzeit Widersprechen. Nähere Informationen finden Sie in unseren Datenschutzhinweisen.
Notwendige Cookies
Diese Cookies sind zur Funktion der Website erforderlich und können in Ihren Systemen nicht deaktiviert werden.
TP-Link
SESSION, JSESSIONID, accepted_local_switcher, tp_privacy_base, tp_privacy_marketing, tp_smb-select-product_scence, tp_smb-select-product_scenceSimple, tp_smb-select-product_userChoice, tp_smb-select-product_userChoiceSimple, tp_smb-select-product_userInfo, tp_smb-select-product_userInfoSimple, tp_top-banner, tp_popup-bottom, tp_popup-center, tp_popup-right-middle, tp_popup-right-bottom, tp_productCategoryType
Youtube
id, VISITOR_INFO1_LIVE, LOGIN_INFO, SIDCC, SAPISID, APISID, SSID, SID, YSC, __Secure-1PSID, __Secure-1PAPISID, __Secure-1PSIDCC, __Secure-3PSID, __Secure-3PAPISID, __Secure-3PSIDCC, 1P_JAR, AEC, NID, OTZ
Zendesk
OptanonConsent, __cf_bm, __cfruid, _cfuvid, _help_center_session, _pendo___sg__.<container-id>, _pendo_meta.<container-id>, _pendo_visitorId.<container-id>, _zendesk_authenticated, _zendesk_cookie, _zendesk_session, _zendesk_shared_session, ajs_anonymous_id, cf_clearance
Analyse- und Marketing-Cookies
Analyse-Cookies ermöglichen es uns, Ihre Aktivitäten auf unserer Website zu analysieren, um die Funktionsweise unserer Website zu verbessern und anzupassen.
Die Marketing-Cookies können über unsere Website von unseren Werbepartnern gesetzt werden, um ein Profil Ihrer Interessen zu erstellen und Ihnen relevante Anzeigen auf anderen Websites zu zeigen.
Google Analytics & Google Tag Manager
_gid, _ga_<container-id>, _ga, _gat_gtag_<container-id>
Google Ads & DoubleClick
test_cookie, _gcl_au