How to manage the switch with Mac via Micro USB cable

S5500-8MHP2XF , TL-SG3428MP , T3700G-52TQ , SX3008F , SG3428MP , SG3428X , T2600G-52TS , SG3452P , T2600G-18TS , T2600G-28SQ , TL-SG3210 , TL-SG3452 , SG3210 , SG3452 , TL-SX3008F , TL-SG3210XHP-M2 , S5500-24GP4XF , TL-SG3428 , SG3428XMP , SG3428 , TL-SG3452P , TL-SG3428XMP , TL-SG3428X , T3700G-28TQ
Recent updates may have expanded access to feature(s) discussed in this FAQ. Visit your product's support page, select the correct hardware version for your device, and check either the Datasheet or the firmware section for the latest improvements added to your product. Please note that product availability varies by region, and certain models may not be available in your region.
In this article, we will share how to manage the switch and enter the BootUtil menu to reset or clear the password with Mac via a micro USB cable.
Step 1. Connect Mac to the switch.
Make sure your micro USB cable supports data transfer because some cables only support power supply. Then use it to connect your Mac to the switch.
Step 2. Use Terminal for management.
Go to “Launchpad”, search “Terminal”, then run it. Enter the following commands in Terminal to connect. Commands are listed in bold and italic.
ls /dev/*usb*
Then you will know the micro USB port used for terminal (tty) connection. Here the port is “/dev/tty.usbmodem141201”.
screen MICRO_USB_PORT 38400
Use screen command for connection, where 38400 indicates the bit rate. Here we should use “screen /dev/tty.usbmodem141201 38400” for connection. Don’t forget that the “Tab” key can help auto-completion.
Click the “Enter” key and a new screen will be displayed. Now you can manage the switch with CLI commands.
If you want to exit, press the “Ctrl” + “a” keys at the same time, then press “d” key to disconnect.
If you need to enter the BootUtil menu to reset the switch or clear the password, please continue below.
Step 3. Enter the BootUtil menu.
First, please complete the two steps above to ensure your Mac can communicate with the switch.
Then plug and unplug the power cord to reboot the switch. At the same time, you will notice that the switch screen will exit on its own because the switch is powered off and the USB connection is disconnected.
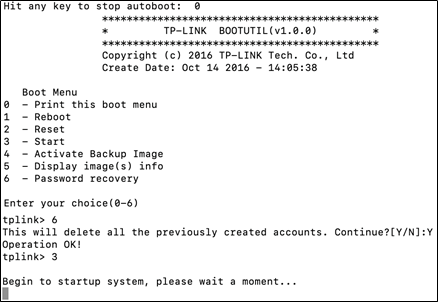
Be sure to note that press the up arrow key “↑” immediately and the “screen MICRO_USB_PORT 38400” command you typed before will be copied; then immediately press the “Enter” key to execute the command and a new CLI screen will be displayed. Keep clicking any key on the keyboard to stop the autoboot and you will enter the BootUtil menu.
Enter the number of the appropriate feature.
To factory reset the switch, type 2 then enter.
To recover the password, type 6 then enter.
Looking for More
Finden Sie diese FAQ hilfreich?
Mit Ihrer Rückmeldung tragen Sie dazu bei, dass wir unsere Webpräsenz verbessern.
Was ist Ihr Bedenken bei diesem Artikel?
- Mit Produkt unzufrieden
- Zu kompliziert
- Irreführende Titel
- Betrifft mich nicht
- Zu ungenau
- Was anderes
Vielen Dank.
Vielen Dank für Ihr Feedback.
Von United States?
Erhalten Sie Produkte, Events und Leistungen speziell für Ihre Region
Diese Webseite verwendet Cookies, um die Websitenavigation zu verbessern, Online-Aktivitäten zu analysieren und die bestmögliche Nutzererfahrung auf unseren Webseiten zu haben. Sie können der Verwendung von Cookies jederzeit Widersprechen. Nähere Informationen finden Sie in unseren Datenschutzhinweisen.
Notwendige Cookies
Diese Cookies sind zur Funktion der Website erforderlich und können in Ihren Systemen nicht deaktiviert werden.
TP-Link
SESSION, JSESSIONID, accepted_local_switcher, tp_privacy_base, tp_privacy_marketing, tp_smb-select-product_scence, tp_smb-select-product_scenceSimple, tp_smb-select-product_userChoice, tp_smb-select-product_userChoiceSimple, tp_smb-select-product_userInfo, tp_smb-select-product_userInfoSimple, tp_top-banner, tp_popup-bottom, tp_popup-center, tp_popup-right-middle, tp_popup-right-bottom, tp_productCategoryType
Youtube
id, VISITOR_INFO1_LIVE, LOGIN_INFO, SIDCC, SAPISID, APISID, SSID, SID, YSC, __Secure-1PSID, __Secure-1PAPISID, __Secure-1PSIDCC, __Secure-3PSID, __Secure-3PAPISID, __Secure-3PSIDCC, 1P_JAR, AEC, NID, OTZ
Zendesk
OptanonConsent, __cf_bm, __cfruid, _cfuvid, _help_center_session, _pendo___sg__.<container-id>, _pendo_meta.<container-id>, _pendo_visitorId.<container-id>, _zendesk_authenticated, _zendesk_cookie, _zendesk_session, _zendesk_shared_session, ajs_anonymous_id, cf_clearance
Analyse- und Marketing-Cookies
Analyse-Cookies ermöglichen es uns, Ihre Aktivitäten auf unserer Website zu analysieren, um die Funktionsweise unserer Website zu verbessern und anzupassen.
Die Marketing-Cookies können über unsere Website von unseren Werbepartnern gesetzt werden, um ein Profil Ihrer Interessen zu erstellen und Ihnen relevante Anzeigen auf anderen Websites zu zeigen.
Google Analytics & Google Tag Manager
_gid, _ga_<container-id>, _ga, _gat_gtag_<container-id>
Google Ads & DoubleClick
test_cookie, _gcl_au